Self tending climbing system

  • Thread starter Thread starter rich_h
  • Start date Start date
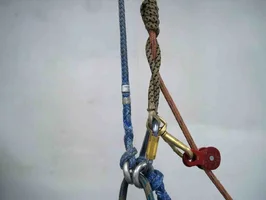
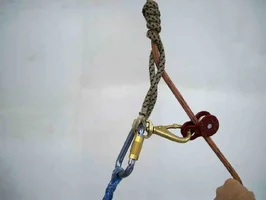
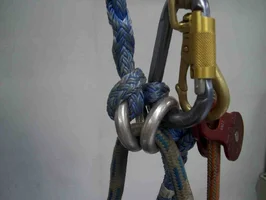
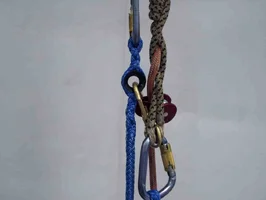
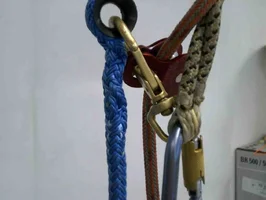
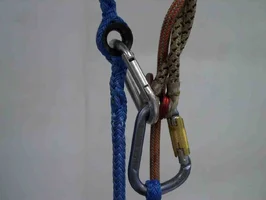
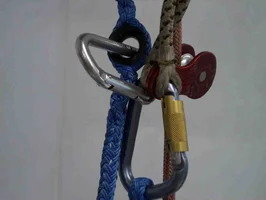
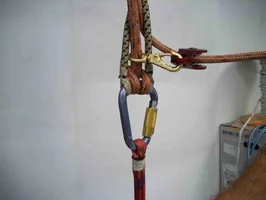
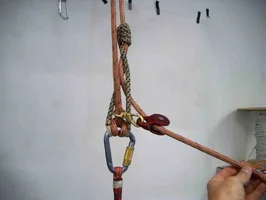
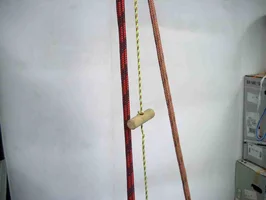
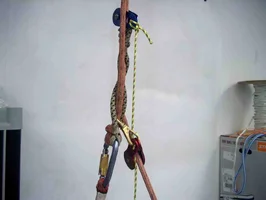
Now open the carabiner and clip it onto your anchor point on the harness. Depending on your harness this will either be onto a single ring, a single sliding D, a fixed D, or whatever you are using. The system will work on all of these configurations, you may just need to alter the dimensions of the anchor bridges.

When clipping onto the anchor point make sure that you are doing so in a way that does not make it possible for your smaller anchor bridge to fall off of the carabiner. This will be important so that you can extend the hitch side and reattach it safely.

I HIGHLY RECOMMEND USING YOUR SAFETY LANYARD WHEN YOU ARE MOVING BETWEEN MODES (EXTENDED, WORK) IT WOULD BE UNSAFE TO UNCLIP YOUR CARABINER WITHOUT BEING SAFELY ATTACHED TO THE TREE.
 

Attachments

  • 51408-correctsetupbothsides.webp
    51408-correctsetupbothsides.webp
    38.3 KB · Views: 268
The next step is to connect your climbing hitch to the smaller bridge. This should be done so that the larger side of the carabiner is situated towards the bottom. This will allow you to quickly connect and disconnect from your low anchor point.
 

Attachments

  • 51409-Correcthitchsetuponbridge.webp
    51409-Correcthitchsetuponbridge.webp
    32.3 KB · Views: 263
sorry the last two were switched, you must first connect to the bridge and then anchor the hitch down low. sorry about the confusion.
 
Here is a close up of the proper set up for the work position. I realize this looks like a mess, but I can assure you that it is very easy to use. The clutter looks much worse than it actually is.
 

Attachments

  • 51411-closeuplowconnection.webp
    51411-closeuplowconnection.webp
    37.3 KB · Views: 255
The next step is to safety into the tree, unclip your hitch from your low connection point and basically let the hitch extend out naturally. Now grab the boat snap and attach it to the thimble on the anchor side. This is a little weird to do at first, but it gets super easy really quickly.
 

Attachments

  • 51412-extendedandattached.webp
    51412-extendedandattached.webp
    33.9 KB · Views: 235
Close up of extended mode connection. The system is sized up so that the boat snap is not holding any body weight, but like I said depending on your harness the sizes may need to be altered. As you can see the slack tending pulley is in perfect place to instantly slide the know when the free end of the rope is pulled down. With this system you will get as close to 100% return on your effort as possible. Granted it helps if you are working off a pulley or rope guide.
 

Attachments

  • 51413-closeupextended.webp
    51413-closeupextended.webp
    41.8 KB · Views: 232
Here is a pic of the complete system in work mode. This functions exactly as the system you are currently using. (assuming split tail)

So these pics hopefully explain the system a little better. If anyone has any questions I would be more than happy to do my best to answer them. I absolutely agree that this takes a little time to get used to, however, it is worth the time it takes to do it. The quick and safe change from low (work) mode to extended (assent) mode is really fast and easy.
 

Attachments

  • 51414-propersetuplowposition.webp
    51414-propersetuplowposition.webp
    45.1 KB · Views: 231
Here are a few of the modifications that have come up so far. I will name them for reference but feel free to call them what you want.

The Polish Mod- (named for Crashan Krasjewski one of the extremely talented Polish arborists at our company)

This mod basically gets rid of the boat snap. What you do is just hand an open gate carabiner from the thimble on the long bridge. When you want to extend the system just unclip your hitch side , extend it, and clip the open gate biner directly to your hitch carabiner.

This modification works extremely well, however, we have found over time that the slight seperation of the lines that the boat snap allows really helps in keeping your hitch from hitting the anchor carabiner and therefore keeping it from opening up or loosening up on you. Also with the open gate biner you run the chance of side loading it, which in this case would alter the sizing.
 

Attachments

  • 51415-polishmod.webp
    51415-polishmod.webp
    38.9 KB · Views: 220
Here is a shot of the biner side loading.

I will post the single bridge (Cincinnati modi) modification tomorrow.
 

Attachments

  • 51416-polishmodproblem.webp
    51416-polishmodproblem.webp
    34.9 KB · Views: 207
sorry glens about the sizing and the size of the files, one of these days I am going to pick your brain on the best way to post these dang pics.


The pics of the updated design start on page 3 for those who are seeing this first.
 
Right; there are two sizes involved. The file size in bytes and the image size in pixels. They are not directly related in a JPEG due to the ability to alter compression levels when encoding the image file.

You got the file sizes just right for we poor depraved dialup folk. That was due to the low "quality" (higher compression) factor employed.

When an image has rather large pixel dimensions it introduces a possible compromise in the viewing "experience" in that it's not atypical for the viewing software to not do a great job of resizing it dimensionally for display. But some software doesn't do any better at the task even before making a display image of it.

The software I'm using may be at the top of the pyramid for manipulating images before taking the separate conversion for display into account. It does not do so well after it's been converted to the display format however. When already viewing the image and opting to resize it for display, it works on the "display" version, which is different from the "native" version. I'm not intimately familiar with all the many schemes employed by various programs but I know my browsers also do not do as good a job of shrinking an image for display after the fact.

If you want the highest quality work done on your image before uploading it here or for any other reason, get the software shown on the last line in the following paragraph (an excerpt of the image information -- note the date your image was "created"!) and manipulate them with it first.

Image: 51415-polishmod.jpg
Format: JPEG (Joint Photographic Experts Group JFIF format)
Geometry: 1136x856
Filesize: 32kb
Compression: JPEG
Quality: 25
Date Time Original: 2002:01:19 20:40:31.
Date Time Digitized: 2002:01:19 20:40:31.
Version: ImageMagick 6.2.3 08/26/05 Q16 http://www.imagemagick.org

Regarding your device itself, the only drawback I can see would be the additional length introduced to the system, even when "retracted", which would make it get in the way when trying to get as close to the TIP as possible.
 
Glens,

Thanks a ton for the formatting information and advice. I will do my best to adhere to the recomendations as they certainly help the viewing experience.

The problem witht he addtional length on the anchor side is easily solved by simply attaching your left side anchor down low on your connection bridge for the short period of time that you are up by your TIP. You basically anchor it just like you do on the right side of the system. This will certainly get in your way for a bit, but usually once you come down or sideways about 4' you can then reextend the anchor side. Again, I realize this sounds a bit confusing but within a short period of time this all makes sense.
 
The following are a series of pics (sorry glens I haven’t had time to edit these yet) of a working single bridge version of the anchor bridge. This is basically a homemade version of the Lockjack twin, however, it is a hell of a lot less expensive.

This one will be called the Cincinnati mod for the group (Jay Butcher, Chris Bramlage, Josh Jump) who ironed out the problems.

The cord used in this bridge is 1/2” Ultratech, which strength wise a bit of overkill but the climbers seem to like its feel and its size for this application. The blue pulley on top of the knot is one of those super lightweight CMI micropulleys with the plastic sheave. This is the best piece we have found so far for this application as it is light enough to not push your knot down when it is resting on top and the longer side plates offer a perfect lever action when the toggle is pulled to work the knot. Others climbers use different pieces to pull the knot and Iwould love to see some pics of other set ups if you have them.

The toggle can be done as in the pic or just with a cord and a series of knots on the cord (ala lockjack) Again I would love to see everyones mods to this system.

The pics aren’t really in any special order. If you have questions I would be more than happy to try to answer them.

PS

This system on a single bridge is great in the fact that your are always in extended mode and therefore can always take advantage of the fact that you can climb with no slack in your system, however, due to the knot tending cord hanging down it can be a bit messy. This application has a longer learning curve compared to the regular anchor bridge set up. Again, it doesn’t take too long to get it though.
 

Attachments

  • 51442-cincinnatimodsinglebridge.webp
    51442-cincinnatimodsinglebridge.webp
    41.5 KB · Views: 254
hitch set up with slack tending pulley on your climbing line and your anchor knot inbetween the eyes of your knot
 

Attachments

  • 51443-singlebridge.webp
    51443-singlebridge.webp
    40.5 KB · Views: 214
sorry its sideways, but here is the whole system fully set up
 

Attachments

  • 51445-singlebridgecomplete.webp
    51445-singlebridgecomplete.webp
    77.1 KB · Views: 220
necessary components for single bridge system
 

Attachments

  • 51446-singlebridgecomponents.webp
    51446-singlebridgecomponents.webp
    91.2 KB · Views: 193
the toggle
 

Attachments

  • 51447-singlebridgetoggle.webp
    51447-singlebridgetoggle.webp
    38 KB · Views: 170
last pic
 

Attachments

  • 51448-singlebridgemodsetup.webp
    51448-singlebridgemodsetup.webp
    41.9 KB · Views: 184
Makes complete sense and I'm kicking myself for not considering it before opening my mouth...

Attached is an example of what I was talking about above. It's a screenshot of a displayed picture of that gal from "Law and Order" (or some similar show). It's natively a 2250×3000 image. When I use the program "display" (part of the ImageMagick package) to display it, then hit the 50% resize, and again, and again, the image on the left is the result. If I tell "display" to resize it to 12.5% from the get-go, the image on the right is the result.

When I opt to save the modified image after the first method of resizing, however, the result saved to disk is the same as the second image; the "problem" is only with the displayed version. I'm thinking the program modifies the in-memory original and the display version simultaneously as a speed measure. (It's probably faster to drop every other pixel from the displayed version and show the result immediately while doing the harder work on the in-memory original than waiting to re-generate an entirely new display version from the new in-memory modified-"original"; overall it's likely the same type of actions taken by most displaying programs [like web-browsers]).

Incidentally, I've noted the same type of artifacts as in the left version in most of Mark Chisholm's (among other folks') image attachments. So whatever software they're using it's obviously not as good at what it does than the doubly-free ImageMagick.
 

Attachments

  • 51450-example.webp
    51450-example.webp
    31.9 KB · Views: 195
Glens;

Thanks. That information is VERY helpful. You should put it in a separate thread so that it is all in one place and can be easily referenced later.

[ QUOTE ]
When I opt to save the modified image after the first method of resizing, however, the result saved to disk is the same as the second image; the "problem" is only with the displayed version.

[/ QUOTE ]

So the 'displayed' version is the one that appears when it is uploaded from my computer to a post? What if I resize, save-as (so I don't lose the original), and then upload the resized version that has been saved to my hard drive? Would'nt that be like the image on the right?
 

New threads New posts

Back
Top Bottom