ductaper
New member
- Location
- Morris County, NJ
Testing the larger thread/fewer stitches: This eye had 17 stitches/pass/side for a total of 102 stitches with 70lb actual strength thread. That's a theoretical strength of 7140 lbs and the jacket of this rope has less edit: more friction than the last test piece. I only have cranes at work up to 4000 lbs so I had to get creative. I used a forklift to pick up the back end (counterweight end) of a 10,000 lb rated forklift (8990 lbs on the rear axle per manufacturer data sheet) Let's see how we do:

I had to stop because I heard the fibers in the rope breaking at the knot and didn't want to add another satellite to space. I wish I knew the actual pull amount but we can get in the ballpark. The truck doing the lifting is rated to 5000 lbs but they can pick up more if the load center is closer to the front tires like it is above. The rear tires on the test dummy were able to be moved by hand so they were significantly unweighted. Let's call this a (very) conservative 6000 lbs. Here's another pic of it under load:

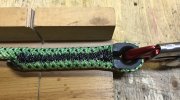
And here's what the test piece looked like afterwards:

Note the fibers at the knot beginning to break and the stitching that has gone a little diagonal. Again, seems to be a good indicator of overloading. I'd say we achieved our goal of having the stitching be stronger than the knot. Also, side note, look how the knot rolled under load!
I'd rather have hard data vs. the close estimates I have now. I'm in the process of welding up a break test stand and will report back when it's done. So far I have the I-beam, cylinder and power unit but still need a load cell and a readout and they're pricey. I'll let you guys know when it's done and then do some more break testing.
Takeaway: @moss 's technique is one I'll continue using for myself. Nice job, Andrew!
I'm curious to hear what you guys think so bring it on.
I had to stop because I heard the fibers in the rope breaking at the knot and didn't want to add another satellite to space. I wish I knew the actual pull amount but we can get in the ballpark. The truck doing the lifting is rated to 5000 lbs but they can pick up more if the load center is closer to the front tires like it is above. The rear tires on the test dummy were able to be moved by hand so they were significantly unweighted. Let's call this a (very) conservative 6000 lbs. Here's another pic of it under load:
And here's what the test piece looked like afterwards:
Note the fibers at the knot beginning to break and the stitching that has gone a little diagonal. Again, seems to be a good indicator of overloading. I'd say we achieved our goal of having the stitching be stronger than the knot. Also, side note, look how the knot rolled under load!
I'd rather have hard data vs. the close estimates I have now. I'm in the process of welding up a break test stand and will report back when it's done. So far I have the I-beam, cylinder and power unit but still need a load cell and a readout and they're pricey. I'll let you guys know when it's done and then do some more break testing.
Takeaway: @moss 's technique is one I'll continue using for myself. Nice job, Andrew!
I'm curious to hear what you guys think so bring it on.
Last edited: