
TREEfool
Participating member
- Location
- Sioux Falls, SD
All of my over night adventures into the tree canopy have been either in the middle of winter or very close to the winter season for one reason only: mosquitoes. If you have never experienced a Minnesotan mosquito warzone then you need to understand that a hammock or treeboat with a sleeping bag just isn't enough for the wilderness! So I finally built a canopy sleeping system that solved this problem.
I have used my home made portaledge multiple times but without the ability to stop rain or snow I always took my hammock on overnight trips. I was tossing around the idea of building my own rainfly to fit the ledge when I came across the perfect tent.
(portaledge) Aluminum cot from Gander Mtn $69
(rigging) climb spec webbing $10
(buckles) lbs rated quick adjust buckles from menards $12
(mosquito net and fly) fully seam sealed Rei Passage 1p $109
The following is a list of videos (each are only 15 to 25 seconds long) that highlight my latest trip into an MN wilderness with my goal of camping above a secluded lake. Lot's of rain and even more mosquitoes made this the perfect test for my new canopy camping set up.
-
Video 1 shows my gear laid out next to my bike and a view of the tree from the ground.
Video 1 pre-climb
-
Video 2 was taken after I got my first tie in point. Just a quick view of the tree.
Video 2 mid-climb
-
Video 3 shows me hauling my gear with my RADS setup. For this trip I unfolded the ledge on the ground but I usually set everything up in the tree.
Video 3 hauling up the gear
-
Video 4 is a view of the inside of the ledge the first night. I was wearing my rain jacket and long pants the whole climb to avoid mosquitoes so I was very thrilled to have so much protected area to undress and eat dinner.
Video 4 inside the ledge
-
Video 5 is my morning view which shows the contrast from inside of the ledge to the 50' drop down to the ground.
Video 5 waking up in a portaledge
-
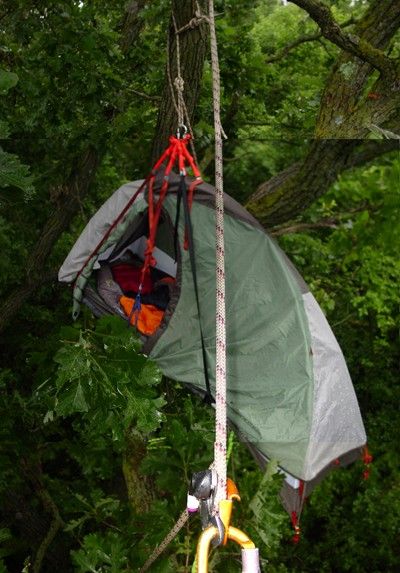
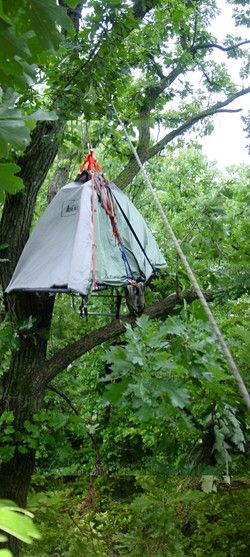
Video 6 is a view of how the tent sits on the ledge.
Video 6 tent and ledge integration
-
Video 7 is another closeup view of the ledge and rainfly from the outside.
Video 7 closeup of ledge and rainfly
-
Video 8 gives a good view of the rigging setup. This setup was temporary to see how I liked it so I will soon be designing a simpler system. The view also does a good job of showing why I chose this particular tent. The poles collapse together which allows them to fit within the portaledge webbing. This protects the rainfly from getting torn up.
Video 8 top view and rigging
-
Video 9 is a view from the other side of the tree. The rainfly is zipped up tight and shows how it rappelled all of the rain so good the night before. You can see that the fly is not very taught which was due to the fact that I didn't put any effort into guying it out.
Video 9 portaledge zipped up
-
Video 10 shows me rappelling from top to bottom with a standard belay device.
Video 10 double rope rappel
Thanks guys!
I have used my home made portaledge multiple times but without the ability to stop rain or snow I always took my hammock on overnight trips. I was tossing around the idea of building my own rainfly to fit the ledge when I came across the perfect tent.
(portaledge) Aluminum cot from Gander Mtn $69
(rigging) climb spec webbing $10
(buckles) lbs rated quick adjust buckles from menards $12
(mosquito net and fly) fully seam sealed Rei Passage 1p $109
The following is a list of videos (each are only 15 to 25 seconds long) that highlight my latest trip into an MN wilderness with my goal of camping above a secluded lake. Lot's of rain and even more mosquitoes made this the perfect test for my new canopy camping set up.
-
Video 1 shows my gear laid out next to my bike and a view of the tree from the ground.
Video 1 pre-climb
-
Video 2 was taken after I got my first tie in point. Just a quick view of the tree.
Video 2 mid-climb
-
Video 3 shows me hauling my gear with my RADS setup. For this trip I unfolded the ledge on the ground but I usually set everything up in the tree.
Video 3 hauling up the gear
-
Video 4 is a view of the inside of the ledge the first night. I was wearing my rain jacket and long pants the whole climb to avoid mosquitoes so I was very thrilled to have so much protected area to undress and eat dinner.
Video 4 inside the ledge
-
Video 5 is my morning view which shows the contrast from inside of the ledge to the 50' drop down to the ground.
Video 5 waking up in a portaledge
-
Video 6 is a view of how the tent sits on the ledge.
Video 6 tent and ledge integration
-
Video 7 is another closeup view of the ledge and rainfly from the outside.
Video 7 closeup of ledge and rainfly
-
Video 8 gives a good view of the rigging setup. This setup was temporary to see how I liked it so I will soon be designing a simpler system. The view also does a good job of showing why I chose this particular tent. The poles collapse together which allows them to fit within the portaledge webbing. This protects the rainfly from getting torn up.
Video 8 top view and rigging
-
Video 9 is a view from the other side of the tree. The rainfly is zipped up tight and shows how it rappelled all of the rain so good the night before. You can see that the fly is not very taught which was due to the fact that I didn't put any effort into guying it out.
Video 9 portaledge zipped up
-
Video 10 shows me rappelling from top to bottom with a standard belay device.
Video 10 double rope rappel
Thanks guys!
