


Navigation
Install the app
How to install the app on iOS
Follow along with the video below to see how to install our site as a web app on your home screen.
Note: This feature may not be available in some browsers.
More options
You are using an out of date browser. It may not display this or other websites correctly.
You should upgrade or use an alternative browser.
You should upgrade or use an alternative browser.
Documenting my hand-sewn eye process
- Thread starter moss
- Start date
moss
Been here much more than a while
- Location
- Carlisle, Massachusetts, U.S.
Within this recall, they say cut termination & use knot. Followed by "You are not allowed to make any other termination!". If you can't go from there & use a regular splice or sewn end it really makes me wonder if there's more concern to be had.. If the problem spot is gone, what's the problem with re-terminating unless there's a problem with the cordage itself???
I don't want to be alarmist, it's just how my mind works.. especially considering i just did a hand splice on this cordage a 2 weeks ago & it felt like it buried way to easy (my method may have helped though. Still, it left me second guessing as to why it was that easy).
Yeah this is classic. The cordage manufacturer is using carefully worded language based on legal advice related to liability. Leaves room for a range of interpretation, they are doing what they have to do to cover their assets.
I'm sure your splice is excellent, after all you're the best judge of it based on your splicing skill level. So if you have doubts based on the qualities of your finished splice that's something to listen to. No relationship to a defective Slaice eye as I'm sure you know ;-)
-AJ
JeffGu
Been here much more than a while
- Location
- Osceola, Nebraska
For life support lines, I treat all spliced ropes as a 23Kn component, regardless of the rope's rating. Most of my commercially spliced lines have an MBS of 5000 to 5500 lbs. on the splice label. Again, this is a liability issue, but a splice does weaken the rope a bit. If you treat the spliced rope as just another 23Kn component of your system, you're not tempted to ignore the possibility that the rope might be the weakest link. In reality, it rarely is. But, you can't really be too cautious. You can be too stupid, though.
If you rig with spliced ropes, as I do, then you should probably derate the rope a bit and make allowances. What I find odd is people I've met that go on and on about the ratings of the rope they are using, but don't take the knots they are using into consideration when calculating how big their maximum chunk can be. I've actually had people tell me they don't trust splices, but then use knots that derate the system by 50% without hesitation.
In the end, I think the weakest link in our systems is ourselves.
Joeybagodonuts
Participating member
- Location
- Boondocks
Yeah this is classic. The cordage manufacturer is using carefully worded language based on legal advice related to liability. Leaves room for a range of interpretation, they are doing what they have to do to cover their assets.
So if you have doubts based on the qualities of your finished splice that's something to listen to.
-AJ
It's just the blanket statement about "no other termination being acceptable" that makes you want to know why. If your going to condem something like that, there should be an explanation as to why.. The way it's worded makes you think there's a problem with the cordage & not the Slaice. I mean, that's a metric shit ton of people that are affected by this. That's every 16 strand Slaice sold in the past 5 years.
Right. I agree, I am the best judge of my own splice. My doubts are purley about how easy it buried. I use this anchored off soft fid method that really makes stuff easy. This one just felt easier than what i remember from last season. I do however wonder if it's possible that this hank of cordage just had more wax than the others I've done. What sux is im second guessing it, but it probably has the most consistant x-over I've ever ended up with. I can barley even feel it, no sudden drops or binds when running hitch cord over it..
Jeff you couldn't have said that better!! I've been trying to wrap my head around some of the stuff I've seen within ads & just regular people's logic in regards to rigging & life support.. you'll see girth hitches, knots, etc preferred over a splice that's 90% the ropes strengthWhat I find odd is people I've met that go on and on about the ratings of the rope they are using, but don't take the knots they are using into consideration when calculating how big their maximum chunk can be. I've actually had people tell me they don't trust splices, but then use knots that derate the system by 50% without hesitation.
In the end, I think the weakest link in our systems is ourselves.
Even though that recall is super vague, Teufelberger actually goes to great extent with showcasing the different expected strengths of their rigging cordage & rigging slings.. they test, document & make available, a really good amount of rigging situations & what you can expect for a strength decrease in the more common setups. It's way beyond what I've seen from other manufacturers that just put out the generic "knots can decrease" statement.
If anyone is interested here's the link.
theatertech87
Branched out member
- Location
- Rochester
Stumbled across this video in my subsription feed. Not my work, but seems we're not the only ones doing it
moss
Been here much more than a while
- Location
- Carlisle, Massachusetts, U.S.
Stumbled across this video in my subsription feed. Not my work, but seems we're not the only ones doing it
I think he's been looking at what we've been doing over the recent years.
-AJ
Naturarbo
Participating member
- Location
- South Portugal
starting 2 enjoy this thread,,,I splice all our ropes rig & climb,never even believed that this splices wouldnt take what we load them with.Insurance will be a problem when something fails...how much likely is that 2 happen?
moss
Been here much more than a while
- Location
- Carlisle, Massachusetts, U.S.
starting 2 enjoy this thread,,,I splice all our ropes rig & climb,never even believed that this splices wouldnt take what we load them with.Insurance will be a problem when something fails...how much likely is that 2 happen?
Just like hand splices, hand-sewing fails or doesn't fail based on the quality of the work. There are a bunch of different ideas and examples of how to hand sew an eye on this thread. I can vouch for the method I've put out there. I've been using my hand sewn eyes for my harness bridges, lanyards and main climb ropes for years. I've had a bunch of pull tests done and everything exceeds accepted life support requirements.
To your question "...how much likely is that to happen?" (failure):
If you study the methods, are attentive to learning the craft, and have your work pull tested to prove the quality of your work, at that point you make the call whether the eye is safe for you to climb on.
-AJ
moss
Been here much more than a while
- Location
- Carlisle, Massachusetts, U.S.
I've updated my hand-sewn eye technique, mostly about the preparation before sewing. No longer using small C-clamps. I've figured out that the primary purpose of the clamping is to form the eye size exactly the size/tightness I want, and to create as straight/non-twisting alignment of the two cordage sides of the join as possible. I'm using conventional woodworking squeeze clamps, speeds things up and gives me more control of fine pre-sewing adjustments in the cordage positions.
I've also refined the sewing technique to create more consistent stitching thoughout the 3-pass sewing runs. I've shot video to show that, will post when it's edited down, only needs to be a few minutes unlike my usual epic length vids ;-)
Photos and descriptions here:
Current sewn eye technique
Disclaimer:
Hand sewing life support gear requires practice, patience, attention to detail and you should pull test your work to verify you've got it right. Hand-sewing is exponentially slower than traditional/standard splicing technique. It is not for everyone. Climb safe always.
-AJ
Last edited:
theatertech87
Branched out member
- Location
- Rochester
Looks good! Is the purpose of the tape just to keep things together pre stitching? Or is there some other alignment/ measuring thing going on? Looking forward to the video, it can even be really long, I'll probably watch all of it anywaysI've updated my hand-sewn eye technique, mostly about the preparation before sewing. No longer using small C-clamps. I've figured out that the primary purpose of the clamping is to form the eye size exactly the size/tightness I want, and to create as straight/non-twisting alignment of the two cordage sides of the join as possible. I'm using conventional woodworking squeeze clamps, speeds things up and gives me more control of fine pre-sewing adjustments in the cordage positions.
I've also refined the sewing technique to create more consistent stitching thoughout the 3-pass sewing runs. I've shot video to show that, will post when it's edited down, only needs to be a few minutes unlike my usual epic length vids ;-)
Photos and descriptions here:
Current sewn eye technique
Disclaimer:
Hand sewing life support gear requires practice, patience, attention to detail and you should pull test your work to verify you've got it right. Hand-sewing is exponentially slower than traditional/standard splicing technique. It is not for everyone. Climb safe always.
-AJ
moss
Been here much more than a while
- Location
- Carlisle, Massachusetts, U.S.
Looks good! Is the purpose of the tape just to keep things together pre stitching? Or is there some other alignment/ measuring thing going on? Looking forward to the video, it can even be really long, I'll probably watch all of it anyways
Yes, the tape keeps everything in position while I sew. Cordage is squirrely and it doesn't like to stay put otherwise. The red tape on the eye captures that exact size and tightness that I want for the eye.
-AJ
JeffGu
Been here much more than a while
- Location
- Osceola, Nebraska
Most excellent! Looking forward to the video!

theatertech87
Branched out member
- Location
- Rochester
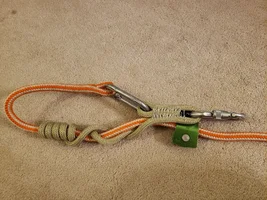
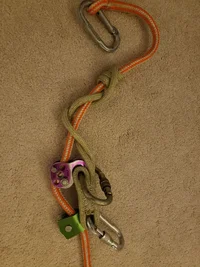
Saw this exact machine splice on my camp harness bridge and thought hey, why not prussik cord? Haven't given it a whirl yet... the srt esq picture I was trying to fit a cmi pulley with an offset pulley (poor man's wrench) in trying to make a cordage based hitch hiker..
more of a thought study than something I plan on putting into regular use (love my zigzag too much for hitch cord anymore) but perhaps the great creative minds on the buzz can come up with something more. If it works definitely something to get commercially done... I spent almost 3 hours doing the stitching, and for a disposable prussik cord, that's a bit much
Obviously ignore the non life support biners and the garbage pulley, it's what I had on hand
Attachments

moss
Been here much more than a while
- Location
- Carlisle, Massachusetts, U.S.
What’s going on here? Putting wax on the thread?
View attachment 64652
Yeah, that’s piece of beeswax i’ve been using for a long time to wax the thread.
-AJ
moss
Been here much more than a while
- Location
- Carlisle, Massachusetts, U.S.
Yeah, mind it will you? Exactly. Wax also increases tensile strength of fibers, I believe because it reduces self abrasion. But as Brocky mentions, waxed thread handles so much better during sewing than not waxed.I should mind my own beeswax, but will add that the wax helps keep the thread together and not kink as much.
-AJ
moss
Been here much more than a while
- Location
- Carlisle, Massachusetts, U.S.
Stumbled across this video in my subsription feed. Not my work, but seems we're not the only ones doing it
Finally had a chance to watch this video. A few problems to notice and technique refinements to be made:
1. He's using the chisel tip leather cutting needle that comes with the Speedy Stitcher, it will cut rope fibers every time he pushes it through, always use a ball-tipped needle. When you push the chisel tip needle through you can literally hear the fibers tearing, not in the video, music covers the sound.
2. Hammering the needle through like that will break needles. Shouldn't be that hard to push through. Each sewing pass should be slightly outside the previous pass, you can find a way to get it through without excessive force. Sometimes you get a tough push but hammering it through especially with a chisel tip needle not good.
3. He's following the technique seen on Speedy Stitcher how-to videos, what's missing for sewing life support is balanced tensioning one hand on each thread side to finish a stitch. That's why I tape a couple of fingers each hand for sewing. You have to slide the sewing awl/needle away from the work per stitch to get a good grip on the thread both sides.
4. I noticed that the "lock loops" on the back side are not consistently buried. After I balance tension each stitch I grab the awl side (top) of the stitch thread and roll my fist slightly but firmly to bury the lock on the back side, if you pull it too far and it comes through just pull it back through with the back side thread leg, retension and rebury it. Ideally there should be no lock loops visible on the back side of the stitched join.
Just a tip on putting the backside thread through the lock loop: in the video he has a needle on the end of the "tail" to make it easier to go through the loop. Since I'll have somewhere in the range of 6-7' of thread per side at the beginning of sewing an eye (I'd rather have leftover thread at the end than run out before I'm done), I make a bight a few inches from the lock loop, push that through then pull the rest of the tail through. What's good about that is everytime you do it you're releasing twist, starting from the end of the tail with a needle you're essentially capturing twist and can get some nasty thread hockles especially when you're further into the join on the last pass.
It is really challenging/time-consuming to do a well constructed lock-stitched life support eye, that's why this is a very small club ;-)
-AJ
Last edited:
moss
Been here much more than a while
- Location
- Carlisle, Massachusetts, U.S.
Saw this exact machine splice on my camp harness bridge and thought hey, why not prussik cord? Haven't given it a whirl yet... the srt esq picture I was trying to fit a cmi pulley with an offset pulley (poor man's wrench) in trying to make a cordage based hitch hiker..
more of a thought study than something I plan on putting into regular use (love my zigzag too much for hitch cord anymore) but perhaps the great creative minds on the buzz can come up with something more. If it works definitely something to get commercially done... I spent almost 3 hours doing the stitching, and for a disposable prussik cord, that's a bit much
Obviously ignore the non life support biners and the garbage pulley, it's what I had on hand
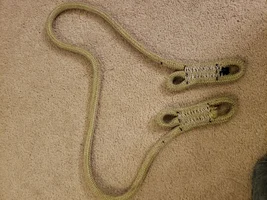
That is a lot of hand sewing! But then again three hours ain't bad for prototyping a concept. Thinking that if you just make the two eyes inline similar to what I sewed for the "Moss Lanyard", one life support join and one short join for a constrictor (for the lower tight eye) that you'll get better directional loading, a bit more streamlined and less sewing work.
Imagine the ring not there that's the "upper eye" on one leg of the prusik cord

-AJ
moss
Been here much more than a while
- Location
- Carlisle, Massachusetts, U.S.
My comment was about someone early in this thread who predicted how any and everyone who did hand sewing was going to die, nothing specific, all hand sewing.
"I feel fine, I think I'll take a walk"
-AJ


