Documenting my hand-sewn eye process

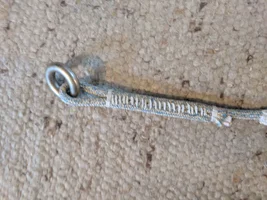
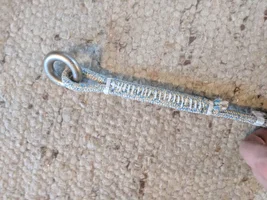
Moss for whatever it's worth I think you've done a great job documenting your sewn eye efforts and sharing for all. Thanks to you. Whether we use 'em for rigging or whatever, it pays to have a system.

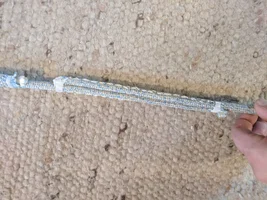
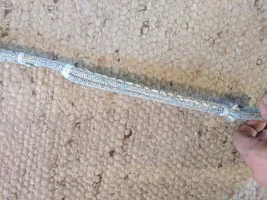
On that note, I am still left wondering a bit about 1) consensus on "ideal" threads for the stitching - including what is used in machines and what's better for hand stitching - size more than the material? And also the needles - esp. with regard to tearing of the rope thread material during stitching. 2) a stitching pattern - I know there are comments on this earlier on this thread, just wondering on where everyone kinda landed - Richard what does your computer say in the machine setup maybe?

Also, in what may be due perhaps to a pre-New Years dollop of rum and eggnog, has anyone thought of something like a small hand drill press stand thingy being modified for driving a needle and then having a rope holder and pad on the bottom for allowing the needle to pass thru the rope. Might it be possible to slowly sew a more exact pattern by flipping the rope holder/ clampy thing back and forth - to pass the needle thru dead vertical and then pull the thread (if you're not doing a lock stitch). There's lots of these little drill press like things on the web.

As for open minds Richard, it never changes. In the London Museum of Science and Technology you can see the original devices Joseph Lister used when he invented aseptic techniques and using carbolic acid aerosol spray for surgical procedures, to try and get surgical infection rates down. What they don't say is that he was, or was almost, drummed out of the Royal College of Surgeons for the heresy of his work in the day. Progress meets immovable object is as old as man (we should probably still feel sorry for poor old Grogg the Caveman when he invented the stick as a weapon . . . everybody knows you can only use rocks).
 
There are lever-powered sewing machines for leather that I've eyeballed before. It gives you a lockstitch and precise needle location. The professional grade ones range from 1-2k, so I don't think it will ever be important enough.

I don't think it would be difficult to set up your pressing platform so that you can just manually lock the stitches beneath the work. We're already doing that. But have a bollard, maybe, to hold the threads with one hand and tighten the stitches as you raise it for the next stitch? You end up with a sewing machine that has all of the complicated machine actions replaced by human actions.
You know it's funny you beat me to it but I've been contemplating posting about those for some time, and I'm actually surprised nobody's tried them yet as they cost about a 1/10 of what they computerized machines run. I keep talking myself out of buying one cuz I already own 10 others. I know they have them for sale and they are also on display at Tandy Leather. But as has been mentioned if you're dealing with anything leather make sure you're not using one of the diamond cut tips.
https://tippmannindustrial.com/tippmann-boss-leather-sewing-machine/
 
And as a follow-up they see material up to 3/4 of an inch thick so if you take most of our cordage and lay it vertically I think it would fit underneath the pressure foot. So you would not be sewing any kind of a zigzag but multiple rows of lockstitch.
 
There are lever-powered sewing machines for leather that I've eyeballed before. It gives you a lockstitch and precise needle location. The professional grade ones range from 1-2k, so I don't think it will ever be important enough.

I don't think it would be difficult to set up your pressing platform so that you can just manually lock the stitches beneath the work. We're already doing that. But have a bollard, maybe, to hold the threads with one hand and tighten the stitches as you raise it for the next stitch? You end up with a sewing machine that has all of the complicated machine actions replaced by human actions.
Because the cordage will lay on top of each other in other words vertically, there really won't be a need of any kind of a pressing platform, again it won't be a zigzag. The question will be if three or four passes near each other can be made successfully.
 
@SomethingWitty; Sorry to be a nag, but did you ever manage to stumble across your supply of needles that were perfectly sized for the Speedy Stitcher? It would save a bunch of folks a lot of heart burn if you could come up with the size of those needles. Thanks in advance.

No problem if you have not, I know life can get very busy, especially at this time of year. Happy Holidays to you and yours this season.

Tim

I do not have a complete answer to this question. but this information can get you some of the way. I noticed somewhere else, that the shank diameter of the needles to the Speedy Stitcher is near 2.0 mm. I suppose any needle shank diameter in the range 1.95 to 2.05 mm might fit the stitcher. On this website you will be able to find about 200 different kinds of needles with this shank diameter: https://my.groz-beckert.com/irj/portal/sewing#navurl://f184a2d3206d4115094d85559962dd95

This brand is sold Worldwide. But other needle brands can supply similar needles. You need to be aware of the "needle system" that fits.

From the 200 kinds you have to select a needle length, needle diameter and point style that you should like to use. I guess that a point style, "R" like the a standard universal point style will be right for the job. It might also be a more ballpoint jersey kind. I am not sure this is the whole storry, because the length of the needle shank itself might be critical for the speedy stitcher. I did not find dimensions of the shank length of these needles.

I have got one of the other kinds called "Sewing Awl":

I think it will be harder to find other kinds of replacement needles for this type, because the groove continues into the shank part of the needle. I have not been able to find alternative needles of this kind. See Photo:
Sewing awl needles.webp

Happy New Year!

/Viggo
 
Last edited:
@Gymnast; Hey, Viggo! Great post! Great links you've provided there, too! Thanks a lot for jumping in and trying to provide some help with this. Who knew that sewing could be such a complex and nuanced activity? Not me, that's for sure.

Have a safe and happy New Year, your own self! I hope to see more of you on the forum in 2019!

Best wishes, Tim
 
@Gymnast; I just thought I'd post a link here to a YouTube video that automatically followed onto yours as I was watching it. It is a pretty well done demonstration of how to use the standard Speedy Stitcher tool, along with a couple of leather crafting tools and tips along the way. He also chooses to use the Speedy Stitcher slightly differently than the instructions show in a couple of instances, because of hard-won experience. The guy shows the finished work at the end, which is nice looking work. Here's the link to that video.


Edit: I forgot to also post a link to the Tippmann Needle and Thread Guide in PDF format that @yoyoman was kind enough to mention earlier. There is some good info in this document that I did not know, about how to verify that your needle and thread are compatible, with regard to size.

Here's the link:

http://tippmannindustrial.com/content/Needle-and-Thread-Guide.pdf
 
Last edited:
Also.. embarrassed to say.. I ran out of thread AGAIN!! I honestly have no clue how that happened as i used a good 7ft of thread & ran out on the SpeedyStitcher side with about a foot left on the lock side.. but i was able to recover alot cleaner this time..

That Speedy Stitcher video I provided a link to above contains this guy's remedy for this problem of running out of thread.
 
Last edited:
Just thought I would share my preliminary work. Going to very VERY crudely test it tomorrow (hopefully).

For my notes and everyone else following along. It's 9.3mm epicord (TEUFELBERGER says 7700 lbs) stitched with doubled up marlow #8 twine (79 lbs)

Traditional eye splice. Nothing fancy, just followed the normal directions, full fid bury with overlap in the eye. No lock stitching (ordinarily I would but it's rather stiff and I didn't feel like fighting with something that's going to be destroyed)

Eye with ring. Stitched with doubled up thread, using what a quick search calls a hemming stitch? Basically through the rope top to bottom, then across to the other piece of rope, then back through bottom to top, stagger with a zigzag pattern. 2 passes, once along the center of the 2 pieces of cordage, then once again through the "middle" of each cord. Overall length of the stitching is 1/2 fid length(4.75 inches). Call it ~84 penetrations. This should give (i hope) a strength of around 84*79*2 = ~13200lbs which is greater than the strength of the epicord. For the sake of completeness the ring is a ISC steel ring rated at 70kn, which is way over what everything else should break at. The ends are whipped and stitched additionally so the cord doesn't fray. The throat of the eye is also whipped and stitched to reduce the possibility of lateral loads pulling the eye apart based on a reccomendation found in this good old boat magazine video.

The end to end is a straight stitch, done in 2 passes down the middle of the cord over a full fid length (9.5 inches). Call it 68 penetrations which (I hope) should give 68*79*2 = ~10750 lbs. The ends of the epicord are also whipped to prevent unraveling.

My plan for testing crude as it is. Bucket truck hooked to the homemade sling with a 70 kn steel rigging carabiner; the other end will be connected via rigging carabiner to a manufactured tape sling with a breaking strength around 6000 lbs; this will then be attached to a rigging sling of some sort to a tree.
The intent being that the tape sling acts as a poor mans load cell. If it survives and my sewing breaks I know they're below a rough strength estimate. If the tape slings breaks before the sewing, then I know it's above a rough strength.
If tape sling breaks, I'll remove it and see which of my splices breaks first.
 

Attachments

  • IMG_20190101_154255.webp
    IMG_20190101_154255.webp
    294.4 KB · Views: 44
  • IMG_20190101_154304.webp
    IMG_20190101_154304.webp
    400.6 KB · Views: 38
  • IMG_20190101_154308.webp
    IMG_20190101_154308.webp
    418.4 KB · Views: 32
  • IMG_20190101_154311.webp
    IMG_20190101_154311.webp
    545.7 KB · Views: 31
  • IMG_20190101_154315.webp
    IMG_20190101_154315.webp
    408.3 KB · Views: 32
  • IMG_20190101_154323.webp
    IMG_20190101_154323.webp
    434.2 KB · Views: 39
@Gymnast; I just thought I'd post a link here to a YouTube video that automatically followed onto yours as I was watching it. It is a pretty well done demonstration of how to use the standard Speedy Stitcher tool, along with a couple of leather crafting tools and tips along the way. He also chooses to use the Speedy Stitcher slightly differently than the instructions show in a couple of instances, because of hard-won experience. The guy shows the finished work at the end, which is nice looking work. Here's the link to that video.


Edit: I forgot to also post a link to the Tippmann Needle and Thread Guide in PDF format that @yoyoman was kind enough to mention earlier. There is some good info in this document that I did not know about how to verify that your needle and thread are compatible, with regard to size.

Here's the link:

http://tippmannindustrial.com/content/Needle-and-Thread-Guide.pdf

Thanks for this video on the Speedy Stitcher. Actually I build a holding Tool similar to the one seen in video - its quite handy to have that - Photo: Syskruetvinge.webp
I did also look at the Leather workers forum for information on this Speedy Stitcher or similar awls. The funny thing is, that these folks don't like it, and they prefer other tools. Example: http://leatherworker.net/forum/topic/62811-hand-sewing-punch/?tab=comments#comment-406368

I think the Tipmann guide might be right for a sewing machine. My opinion is, that for the same needle, you can use a thicker thread with the Hand Sewing Awl than with a sewing machine. A sewing machine can't oprerate with high friction on the thread. For reference, I use a V-364 polyester thread with a size 160 needle in the Sewing Awl.
 
Last edited:
theatertech87 Thanks for sharing your plans for testing the sewn ropes and eyes. I hope you will share some of the test results with us.

I got a comment regarding the eye stitching. Evans Starzinger did a similar eye test, that he commended here - see post #861. http://forums.sailinganarchy.com/index.php?/topic/154025-ropeknotsplice-load-testing/&page=9
I have copied the photo to here: Evans1.webp
It is a stitched eye loaded in pull test. As you can see, the stiches at the throat of the eye caries most of the stress due to the different elongation of the rope on each side. In order to compensate for this phenomena, I should like to bend the rope like this before doing the stitching: oeje klar2.webp
/Viggo
 
So question about the top picture above - has anyone ever thought about stitching two sets of stitched areas per spliced eye rather than just one? I ask this because some of the sewn eyes I got commercially lately look shorter than they used to be in the "old days" by a bit. With two sets of stitching, then if the one near the cut end of the rope pulls a bit, the splice is redundant/ backed up. Just wondering.

Addenda: Also what about tightly whipping the section across both rope strands near the cut end to help stop rope creep/ movement and maybe preventing tearing thread in this location? As discussed above, glue and whipping might help in this regard as well - like the Freesole brand goop I spoke of above?
 
Last edited:
So question about the top picture above - has anyone ever thought about stitching two sets of stitched areas per spliced eye rather than just one? I ask this because some of the sewn eyes I got commercially lately look shorter than they used to be in the "old days" by a bit. With two sets of stitching, then if the one near the cut end of the rope pulls a bit, the splice is redundant/ backed up. Just wondering.
I think the art snake anchor is done that way intentionally. Short machine splices down the length of the anchor so you can clip in in multiple places like an ultra sling. Also theyre designed to rip the stiching and leave the cord interact do you get some sort of deceleration and shock absorbing in the case of a fall
 
Gymnast, I not sure bending the stitched area would help if just doing the typical perimeter sewing. The stitches wouldn’t hold it in that shape and some of the stitches might be loose, or real tight when it is straightened. It would seem that only the short section would have to be bent to accomplish what you’re hoping to do. Maybe combine with what theatretech87 suggested, two sewn areas with a bump of rope of the short section between them? Without seeing the stitches of the yellow rope before being tensioned, It’s hard to determine what’s going on in the picture.
Theatertech, krazy glue works good for fray prevention on unmeltable ropes and cords. I like the gel type as it stays on the surface more so you can easily see where it’s already been applied.

I’m wondering if a separate thread for the round perimeter stitching should be started, as the two methods are so different.
 
Gymnast, I not sure bending the stitched area would help if just doing the typical perimeter sewing.

I’m wondering if a separate thread for the round perimeter stitching should be started, as the two methods are so different.

I am not sure, that bending will perform either. But I should like to see have some verification. I take your points.

Try to look at this test video by Richard from 1.25 in video:

What you see is machine stitched eyes with long seams where the stiches brake near the throad - just as the picture with yellow rope from Evans would suggest could happen. For the ropes used here I think you would expect an elongation of 20-50 % before they snap off. The expected elongation before braking should influence how much bending of a seam is to be made before sewing. What I like to see is, that a larger part of the seam will share the load near maximum load.

I did some photos of sewn eyes on shock cord for a project I had. This shock cord have a working elongation of about up to 120 % and this is much more than rope - but I think some of the same issues are relevant. Sometimes exaggeration can make you know more.

This is a sewn eye with no bending of seam with no load. This is with load:
Syet øje belastet.webp

This is a sewn eye with a bending seam at no load and at different loads:100-140-220pct.webp

I would prefer that both kinds of stitching Would remain in this same thread. I think more issues are common problems.

/Viggo
 

New threads New posts

Kask Stihl NORTHEASTERN Arborists Wesspur TreeStuff.com Teufelberger Westminster X-Rigging Teufelberger
Back
Top Bottom