I just whipped mine up
using this needle from treestuff and it wasn't really a struggle. I've done lock stitching on hand spliced eyes that was more difficult. Granted I only did 2 passes and not 3, but it was relatively easy and I could see a 3rd pass if spaced accordingly being doable without a speedy stitcher.
Anyways onto my test results.
First the uncut video of the test. I tried using my go-pro to record it at 90 frames per second, but even slowed down (see the end of the video) you still can't see much.
I succeeded in breaking the webbing sling before the stitching failed, which according to the tag should have been 6500 lbs ABS. Was it new? no; but it was still in good enough condition to not have a concern about needing to retire it and was still in regular the regular use rotation. A second attempt to break the stitching resulted in nothing. I wasn't able to break it; pulling against a 30000 lb truck with a front end loader, the brakes on the truck were slipping and rather than damage the bosses equipment, we called the test.
So now onto the diagnostics.
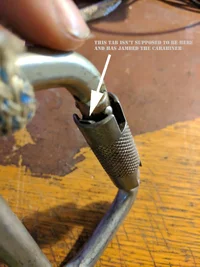
1 carabiner was broken during the test. The carabiner itself is still intact, however the gate had the spring? that actuates the gate jamb and prevents the barrel from rotating and opening.
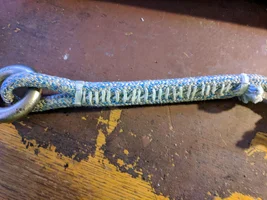
The end to end overlapping hand stitched splice shows very little signs of being loaded. It stretched enough that some of the whipping slipped and the ends of the cord frayed a little bit (this could most likely have been prevented with better whipping, or using a hot knife to melt the cut ends. The stitching shows no signs of wear or slippage and the splice itself still feels firmly joined.
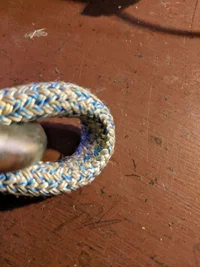
The hand stitched eye shows some slight discoloration and and wear on the cover fibers where the ISC ring sat. But to be honest, I've gotten worse signs on wear first climb on a new lanyard on a rough barked tree. The stitching shows no signs of wear or slippage and the splice itself still feels firmly joined.
The hand spliced eye is the only one showing any signs of damage with a few broken cover strands in the cover, and besides knowing what it's been through, would be enough for pause during a gear inspection, but would probably get a pass and continue to be climbed on.
All in all what I would consider a very successful test on what was for me an untried technique. I feel comfortable enough with the results that I would be comfortable climbing and rigging on something similar for my own use. That being said some additional tests would be nice for my own curiosity, and to see if it's possible to shorten up the length of the splice and retain strength (either through closer stitching, or doing 3 passes).
Lastly a bit of my own musing. I was interested in this more from a curiosity standpoint rather than any actual desire to save money, or vs my own hand spliced eyes. As I've watched this thread there seems to have been a leaning towards replicating what machines are capable of doing, both with attempts to replicate the stitch patterns and density as well as with the style of stitches. Not to say that any of that is wrong, and I don't disagree with that line of thinking; I just figured there might be an easier to reproduce way of getting to the same end result. With the earlier pages of the thread delving into the overall splice strength vs number of stitches vs strength of thread; I assumed that the strength could be retained with a longer length splice with easier to do stitch passes (no 3rd pass which sounded like where most of the difficulty arose)
I feel like I've written a small easy