
Navigation
Install the app
How to install the app on iOS
Follow along with the video below to see how to install our site as a web app on your home screen.
Note: This feature may not be available in some browsers.
More options
You are using an out of date browser. It may not display this or other websites correctly.
You should upgrade or use an alternative browser.
You should upgrade or use an alternative browser.
Documenting my hand-sewn eye process
- Thread starter moss
- Start date
SoftBankHawks
Branched out member
- Location
- Japan
Over here the yuzu citrus gets to be the size of a football, sorry, soccer ball. still pretty light though....I dunno.....a lot I guess, that yuzu is mostly air anyway. It'd probably be your last sitting...
moss
Been here much more than a while
- Location
- Carlisle, Massachusetts, U.S.
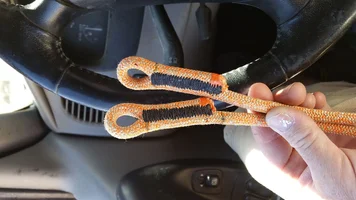
These turned out good. This is tight cordage. Not and easy one but rock hard
I'd climb on that all day and then some, nice work!
-AJ
Dave Rohach
Branched out member
- Location
- Janesville, WI
I'd have to agree, they look every bit as sound as a comm'l sewing machine. Very nice, clean work! Someone would complain, nonetheless! [emoji12]
moss
Been here much more than a while
- Location
- Carlisle, Massachusetts, U.S.
CBM do you have any idea what the tensile strength of your splices are, that is number of stitches times the strength of the thread, before subtracting for the locks? Thanks
Sewn eyes of that technique are breaking in the 5000+ lb range. When both eyes are pulled together as in the typical use as a hitch cord they break much higher. The strength of the eye is increased beyond the calculation of the number of stitches and the strength of the thread by the amount of compression/friction between the two sides of the join. I know that doesn't answer your question but it gives you a ballpark.
-AJ
Thanks for the reply Moss. I get a lot of compression by putting my first pass of stitches through both cords top to bottom with lock stitches. I alternate the bury of the lock stitch to the middle of one cord and then the next instead of putting it between the two.
- Location
- ALVIN TX
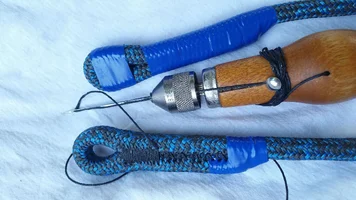
I'm documenting the sewing process for an eye I'm working on. Sewing the eye on NE Ropes Tachyon. For this eye I'm pre-tensioning the join with clamps to increase the friction on the finished eye.
Sewn eye documentation
I'll add more photos to the set as the eye is finished.
Materials...
Thread
C-Lon Tex 400 Double bonded nylon, .9mm, 75 lb. dry strength.
Hand-waxed with bees wax, improves handling for hand sewing and increase tensile strength.
Needle
7x3 (ball tip) 180 industrial machine needle (ground down the needle shaft to fit the sewing awl chuck)
Speedy Stitcher sewing awl
Clamping to increase pre-sewing compression

Clamps off, tape retains the compression, basting stitch to capture the tension with thread. White tape is removed as the stitching progresses.

-AJ
- Location
- ALVIN TX
What is that machine is a drill or whatI'm documenting the sewing process for an eye I'm working on. Sewing the eye on NE Ropes Tachyon. For this eye I'm pre-tensioning the join with clamps to increase the friction on the finished eye.
Sewn eye documentation
I'll add more photos to the set as the eye is finished.
Materials...
Thread
C-Lon Tex 400 Double bonded nylon, .9mm, 75 lb. dry strength.
Hand-waxed with bees wax, improves handling for hand sewing and increase tensile strength.
Needle
7x3 (ball tip) 180 industrial machine needle (ground down the needle shaft to fit the sewing awl chuck)
Speedy Stitcher sewing awl
Clamping to increase pre-sewing compression
Clamps off, tape retains the compression, basting stitch to capture the tension with thread. White tape is removed as the stitching progresses.
-AJ
TimBr
Official Well Known Greeter
- Location
- Northern Virginia
Here's a link to one of the options available on Amazon. It may be the least expensive offering, I'm not sure.
http://www.amazon.com/gp/aw/d/B000H...ng+awl+kit&dpPl=1&dpID=51U0KCJBFTL&ref=plSrch
Be warned, I think the needles that come with the Speedy Stitcher are not suitable for the use that moss is putting the Speedy Stitcher to. Moss bought a separate set of needles, which I think might have a "ball" head on them or something, which prevents the rope fibers from being cut as he passes the needle through each time.
Read his posts closely and carefully. His work is just amazingly beautiful, and the best photographed of anything else out there, from what I've seen.
Tim
bonner1040
Branched out member
- Location
- Boston
"Be warned" key words
Sent from my iPhone using Tapatalk
Sent from my iPhone using Tapatalk
You CANNOT use the speedy sticher needles. Even if you grind them down there still rough on the fibers. The needles from tippmannindustrial.com work well. But i would CAUTION stitching your own life support. Its takes lots of practice and im not even close to as good as moss.
Attachments
TimBr
Official Well Known Greeter
- Location
- Northern Virginia
@CBM, Beautiful looking work you've done there, thanks for posting up the photographs!
Those Speedy Stitchers are fairly amazing for what they are able to accomplish for so little money spent.
If you had to guess how long it takes you to do one stitched eye like those shown above, start to finish, what would you say?
Thanks in advance for any answer you choose to give.
Tim
Those Speedy Stitchers are fairly amazing for what they are able to accomplish for so little money spent.
If you had to guess how long it takes you to do one stitched eye like those shown above, start to finish, what would you say?
Thanks in advance for any answer you choose to give.
Tim
moss
Been here much more than a while
- Location
- Carlisle, Massachusetts, U.S.
You can file the edges off the Speedy Stitcher leather cutting needles (which come with it) but it's much better to buy the ball tipped needles from Tippman. I had to work pretty hard to convert a leather cutting needle to one that doesn't damage rope. Splicers understand this: when you're working a fid during a splice and you hear that subtle soft crunch you know you're ripping rope fibers. If you push a needle through rope and you hear a crunch you are also ripping through rope fibers. When you push a fid or a needle through rope fiber it should be silent. Splicers and sewers don't crank the music while they're working the fid or needle, at least they shouldn't. You need all your senses in play.
-AJ
-AJ
Last edited:
moss
Been here much more than a while
- Location
- Carlisle, Massachusetts, U.S.
This is the ball tipped 7x30 180 needle from Tippman Industries, notice I ground down the shank so it will fit the Speedy Sticher chuck. It parts the fibers instead of cutting them when you push it through.

moss
Been here much more than a while
- Location
- Carlisle, Massachusetts, U.S.
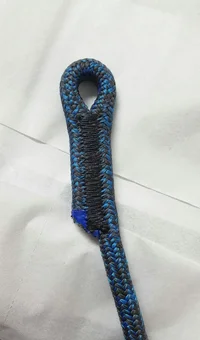
I just finished and climbed on this sewing project, NE Ropes Tachyon "Saluting Branches" rope version.
Tight eye one end, webbing loop on the other (not for life support) for rope hauling etc.
The webbing eye is a fun starter sewing project. First I wrapped vinyl tape on the rope end and singed the cover fibers at the end with a lighter (mini torch works) to keep the cover end from unraveling. Take the tape off and extract and cut off 3" of core. Make a webbing loop to fill the 3" hollow core, leave enough to make the external loop. I put in a couple stitches to hold the cut ends of the webbing together, makes it much easier to stuff into the core. I used the blunt end of a bamboo skewer stick to stuff the webbing home. I stitched from the loop end through the cover and webbing and kept on going to put the stitching in about 3/4" of the rope core. To finish I put a short piece of shrink tubing with the adhesive on the inside over the the end of the cover. This prevents the cover end from fraying during use.
Examples of my rope sewing projects here

-AJ
Tight eye one end, webbing loop on the other (not for life support) for rope hauling etc.
The webbing eye is a fun starter sewing project. First I wrapped vinyl tape on the rope end and singed the cover fibers at the end with a lighter (mini torch works) to keep the cover end from unraveling. Take the tape off and extract and cut off 3" of core. Make a webbing loop to fill the 3" hollow core, leave enough to make the external loop. I put in a couple stitches to hold the cut ends of the webbing together, makes it much easier to stuff into the core. I used the blunt end of a bamboo skewer stick to stuff the webbing home. I stitched from the loop end through the cover and webbing and kept on going to put the stitching in about 3/4" of the rope core. To finish I put a short piece of shrink tubing with the adhesive on the inside over the the end of the cover. This prevents the cover end from fraying during use.
Examples of my rope sewing projects here
-AJ
SomethingWitty
Arkansawyer
- Location
- LR
"Be warned" key words
Sent from my iPhone using Tapatalk
We can read, friend.
Calm down. Have fun.
New threads New posts
-
test
-

-
 light rigging with ring and "figure 8" aka "rescue 8"
- Started by snunyabizness
- Replies: 11
-
seeking part-time climbing arborist - Eastern Massachusetts
- Started by cercidiphyllum
- Replies: 1
-
 Bulldog Bone-Elongated Bollard with RE nano swivel. Purchased for $325, asking $325 for it.
- Started by False Hemlock
- Replies: 1
-
-