- Location
- Ontario, Canada

Navigation
Install the app
How to install the app on iOS
Follow along with the video below to see how to install our site as a web app on your home screen.
Note: This feature may not be available in some browsers.
More options
You are using an out of date browser. It may not display this or other websites correctly.
You should upgrade or use an alternative browser.
You should upgrade or use an alternative browser.
Tandem Tree felling plan critique requested
- Thread starter DLT
- Start date
- Location
- Home of the New Jersey Devils
- Location
- Home of the New Jersey Devils
Kevin, I've started writing this while awaiting your evidently-marked-up JPEG image which you'd saved as a PNG. I had purposely deleted some of the "tedious" information in my earlier post today (which I'm glad to see in your last sketch that you'd heeded!) but will have to include it here now. Okay, the image just came in. Congrats on using Netscape! Anyway, here goes (for you and everyone else):
PNG is ideal for "sketches" and other "unnatural" images both because it's a "lossless" format (maintains full clarity/integrity) and it can compress them very well due to their simple makeup. It's not very good in terms of resultant file size for photographs, which usually contain information which does not lend itself well to the compression system PNG uses. PNG is too literal for "comfortable" (as in sharing with dial-up friends) file sizes when the images are photographic in nature. "Sketches" compress very well under PNG but photos do not.
JPEG uses a complex method for combining/throwing-out information. This leads to "comfortable" image sizes for complex things such as photographs (which can usually "stand" the resultant alteration of their makeup). When dealing with more simple images such as "sketches", JPEG falls short in both clarity and file size when compared to PNG because JPEG effectively makes the "simple" images "complex" in order to compress them in the way it does.
Whenever you "work with" a JPEG image and save it again as a JPEG the amount of image degradation escalates. Doing what you did with the JPEG and saving it as a PNG likely didn't cause any degradation but the file size increased considerably (to nearly 900 KB, greater than 3× the original).
I guess what I'm trying to say is that a good rule of thumb is "original sketch (or screenshot of non-photographic material!) = PNG", "photograph = JPEG", and/but "once a JPEG, (most) always a JPEG".
Saving a PNG as a JPEG will degrade it (usually not too noticeable in a photograph but very much so in a "drawing" or typical screenshot) and the JPEG will likely be a larger file as well.
Saving a JPEG as a PNG will not degrade it but the file will be very much larger. If the JPEG file was a sketch, the damage will already be done and it's no longer such a "simple" image to compress.
I love Kenny and his enthusiasm, but I often get lost in his posts. I hope this one isn't that way for you all! It's vastly simplified but makes perfect sense to me")
Thanks for "listening".
This is intended as general help and most certainly not as any form of chastisement. I'm always available for private questions, though if they're "Windows"-specific I may not be your best bet.
PNG is ideal for "sketches" and other "unnatural" images both because it's a "lossless" format (maintains full clarity/integrity) and it can compress them very well due to their simple makeup. It's not very good in terms of resultant file size for photographs, which usually contain information which does not lend itself well to the compression system PNG uses. PNG is too literal for "comfortable" (as in sharing with dial-up friends) file sizes when the images are photographic in nature. "Sketches" compress very well under PNG but photos do not.
JPEG uses a complex method for combining/throwing-out information. This leads to "comfortable" image sizes for complex things such as photographs (which can usually "stand" the resultant alteration of their makeup). When dealing with more simple images such as "sketches", JPEG falls short in both clarity and file size when compared to PNG because JPEG effectively makes the "simple" images "complex" in order to compress them in the way it does.
Whenever you "work with" a JPEG image and save it again as a JPEG the amount of image degradation escalates. Doing what you did with the JPEG and saving it as a PNG likely didn't cause any degradation but the file size increased considerably (to nearly 900 KB, greater than 3× the original).
I guess what I'm trying to say is that a good rule of thumb is "original sketch (or screenshot of non-photographic material!) = PNG", "photograph = JPEG", and/but "once a JPEG, (most) always a JPEG".
Saving a PNG as a JPEG will degrade it (usually not too noticeable in a photograph but very much so in a "drawing" or typical screenshot) and the JPEG will likely be a larger file as well.
Saving a JPEG as a PNG will not degrade it but the file will be very much larger. If the JPEG file was a sketch, the damage will already be done and it's no longer such a "simple" image to compress.
I love Kenny and his enthusiasm, but I often get lost in his posts. I hope this one isn't that way for you all! It's vastly simplified but makes perfect sense to me
Thanks for "listening".
This is intended as general help and most certainly not as any form of chastisement. I'm always available for private questions, though if they're "Windows"-specific I may not be your best bet.
Jeez Glens, I got a headache now and the trees still standing. /forum/images/graemlins/smirk.gif
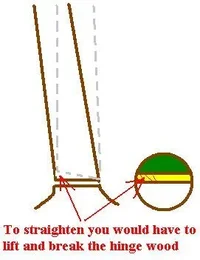
Guys, what's going on here? Are you trying to say that by wedging the low side of a leaner on a standard hinge you can straighten the tree? Coz that's the biggest load of BS I've ever heard. To do that you'd have to break the hingewood to prop the tree up some to level it. See diagram.
And once the felling motion commenced the effect of the wedge would be lost and the tree would lean back over UNLESS there was a rope that took up the advantage gained by the uprighting effect of the wedging.
The hinge steers all, leaving side fibre on the side opposite to the lean whilst cutting out the low sides fibres with a wing cut may help turn it, leaving a pie shaped hinge fatter on the side opposite the lean may help turn it, but wedging the low side on the one staight notch to straighten the tree is BS.
I wedge the low side on side leaners, especially with the 1/4 cut purely as back up and safety. But it doesn't straighten the tree. Yes a pull rope 45 degree offset will help but wont guarantee it to follow the hinge ... why? Because once the tree is on it's way the pull rope gets slack and has lost it's effect of keeping the tree on line, what it's up to now is is hinge dynamics.
Also things that can help:- notching more uphill and leaving a pie shape, so will a side rope, and so will 2 notches or duel notches, the first to straighten the tree the second to fell the tree.
And of course my favourite and yet rarely spoken about method due to OHS whiners and professional criticizers ... hang in there a bit longer and as it's going over cutting out more hinge on the low side ... and this is one of the most effective methods as when the tree is falling the weight is a lot less than when it is still so manouverability of the tree is gained easily, you can literally turn them.
Attachments
alright already..fall em and let us know in awakenings what happened, or if it goes sweet lets hope to see it in climbing..but just get with it i think every possible thought has come up now. lets geton with the outcome of what waslearned
- Location
- Ontario, Canada
Eric, I think Mark was using the wedges to support the low side of the tree while he cut the back out.
It looks like he bored it to place the wedges prior to tripping the back of it.
I use wedges to lift leaners but on the back to break the hinge on the low side in order to prompt the tree to turn.
It looks like he bored it to place the wedges prior to tripping the back of it.
I use wedges to lift leaners but on the back to break the hinge on the low side in order to prompt the tree to turn.
- Location
- Hotaka, Japan
On a heavy side leaner; leaving more hinge wood on the high side, a dutchman, wedges, still unless I'm using a rope, the success rate seems to be less than half, except for slight gains. I must be doing something wrong?
Okay, so I actually have some thoughts regarding the original point of the thread...
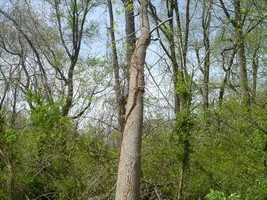
Tree #2 in the attached, reduced-sized copy of the principal image (30% geometrically and stripped of any profile data for ~10% final file size), will readily fall to the right. 90° (or probably anywhere in an arc ±45° from that) to the property/"fence" line, without so much as a hint of a pull rope; using wedges and a "simple" appropriately-oriented pie-shaped hinge with no fancy dutchman or snipe cuts.
To get tree #1 to go to the right much more than 45° from the property line would probably require a rope being pulled up into the crown using nothing more than a throw-bag/line and one of the $60 endless 1/2" rope 1/2-ton ratchet hoists. No feet have to leave the ground for this job.
Now I'll grant that this situation offers itself perfectly to a training exercise whereby one tree can be used to pull the other over. To do it safely, both trees will have to be climbed to be properly rigged together.
The way I see it, tree #2 will have to be felled away from tree #1 and allowed to go approx. 30° where it then "hangs on" tree #1 to provide counterweight which will allow tree #1 to be felled in a conventional manner using only wedges in pretty much any desired direction into the open field. The order in which the felling cuts is made would pretty much be immaterial. I might opt to first hang the lead tree off the trailing tree before starting the back cut in the trailing tree.
That, of course, limits the direction tree #2 can be felled. Any deviation from straight away from tree #1 would require some combination of side-torque mitigation:
- a very thick hinge -- this will increase the danger of barber-chairing the stem and will likely require a pull rope be installed in tree #2 just to get it moving
- a pull rope off to the (high) side of the direction of tree #2 fall
Ultimately this exercise reminds me of something like this "simplified" pencil sharpener:
Attachments

- Location
- Home of the New Jersey Devils
You're right on Kevin. I'm not saying (or trying) to straighten the tree using the wedges. What I'm trying to do is reduce the stress on the high-side hinge so that it can work longer through the fall= more control. That combined with the tag line and both trees fall directly on target with the face and not somewhere inbetween that and 90*. That's all.
Cut em!
Cut em!
- Location
- Ontario, Canada
I don't think you'll turn a heavy leaning tree too much.
chris_girard
Branched out member
- Location
- Gilmanton, N.H.
Mark, I used that wedge technique on the low side of side leaners before as well. You're right, you just want to use it to take some stress off the high side so your hinge can work longer.
One thing that you probably already know, is that you do not want to drive the wedge to far into the side adjacent to the hinge, as this can actually weaken the hinge.
DLT, Dublin N.H. is not too far from were I live. Let me know where and when you're doing the job and I'll try to be there.
Chris
One thing that you probably already know, is that you do not want to drive the wedge to far into the side adjacent to the hinge, as this can actually weaken the hinge.
DLT, Dublin N.H. is not too far from were I live. Let me know where and when you're doing the job and I'll try to be there.
Chris
- Location
- Bloomington, Indiana
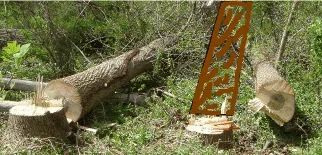
I still have this question about Mark's photo that showed the butt ends of the trees. The question concerns the butt end of the tree on the right.
[ QUOTE ]
...it looks like fiber has pulled from the stump and stayed with the tree on the left side, and pulled from the tree and stayed with the stump on the right side. Any idea why? How did things look as the tree went over
[/ QUOTE ]
[ QUOTE ]
...it looks like fiber has pulled from the stump and stayed with the tree on the left side, and pulled from the tree and stayed with the stump on the right side. Any idea why? How did things look as the tree went over
[/ QUOTE ]
- Location
- Home of the New Jersey Devils
It seems quite common to me. I usually see fiber pull from a log-end. One thing that adds to this is the lifting by the wedges there. The other side (you know I;m sure) is pulled from the stump by the flare and the struggle to hold onto the tree.
- Location
- Milford, New Hampshire
Mark,
Understood and I agree. My whole cutting plan is designed to maintain the integrity of the hinge and let it work as long as possible, not to steer the tree.
Thanks all for the posts. You'll have to wait till Friday or Monday for the actual cut, we still have apple trees to prune first.
Understood and I agree. My whole cutting plan is designed to maintain the integrity of the hinge and let it work as long as possible, not to steer the tree.
Thanks all for the posts. You'll have to wait till Friday or Monday for the actual cut, we still have apple trees to prune first.
chris_girard
Branched out member
- Location
- Gilmanton, N.H.
[ QUOTE ]
Mark,
Understood and I agree. My whole cutting plan is designed to maintain the integrity of the hinge and let it work as long as possible, not to steer the tree.
Thanks all for the posts. You'll have to wait till Friday or Monday for the actual cut, we still have apple trees to prune first.
[/ QUOTE ]
Hey Dan,
One thing that I was thinking about which hasn't been mentioned here yet, is that if you're concerned with the sidelean in the trees and still want to maintain the integrity of a full width hinge (not a tapered hinge), you can use the "adjusting the gun" technique that Tim Ard of game of Logging teaches.
He was taught this tecnique by Sorin Erikkson. As you may already know you can calculate how much sidelean you have and then aim or gun your sights that amount away from your intended area of lay. I would not use as Tim suggests an additional 50% aim as we have found that this actually overshoots your target.
Daniel Murphy wrote a great article in the July 2004 TCIA mag about the tapered hinge vs. the Adjusted Gun Tech. Very interesting reading.
Chris
chris_girard
Branched out member
- Location
- Gilmanton, N.H.
Yes it has and I'll let DLT tell you the results.
You will like it.
You will like it.
- Location
- Milford, New Hampshire
note: attached pictures edited 5/14 9:30pm est - 2 pictures mislabeled
POST MORTEM:
Hey guys, sorry for the delay in this post between my schedule and the board crashing.
Here’s the bottom line. The plan worked as well as I hoped. We did several modifications of the original plan based upon input from the discussion. Attached is a complete description of the work, and a folder of pictures. But I’ll summarize a few things here.
1. Based upon your postings, we did several modifications, used primarily as backups:
a. larger rope (from 5/8” to 3/4”)
b. bought a larger hand winch (lug-all 6000-15, used as a backup)
c. beefed up the anchor weight by completely filling the Fuso with chips
d. used a second, larger truck (international 4700) as a backup anchor
e. planned for test borings for decay in the hinge area (note – we forgot to do this step before cutting the first hinge)
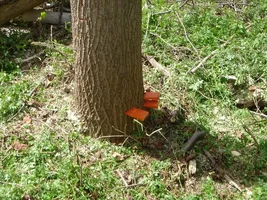
f. used wedges to help support the hinge from downhill side lean
2. I stayed with a traditional uniform hinge. My cutting training was with Tim Ard, and I subscribe to his philosophy of a consistent, uniform hinge. Though I have seen Soren demonstrate a Dutchman, I do not feel comfortable, skilled, or safe using either a Dutchman or tapered hinge)
3. The quick summary: (does not list all of our backup systems, see attached)
a. tied a 3/4” stable braid to tree one, connected to tree two with a clove hitch, then tied off to the hand winch anchored to the Fuso. Pulled all slack out of the system.
b. Cut both face notches, bore cut both hinges leaving 2 inch straps, set wedges
c. released tree one, then tree two.
d. hand winched until they both fell in tandem. At the point of freefall, with the winching stopped, tree one was still not over center. Tree two completed pulling tree one. The hinges held better than expected, little influenced by the side lean.
Roger M: The cleanup was no problem, though I do prefer 1 at a time.
Roger B: We choose not to suck them both together with a running bowline. I did not want to put undue stress or torque on the hinge of tree one. Regarding the triangle shaped hinge, I used it on heavily ice-laden trees in the 1998 ice storm. Worked very well to reduce the barberchair
I chose not to use a holding line opposite the lean for 2 reasons:
1. I wanted to see if the hinge would hold without it
2. If the whole system failed backwards, that line could pull the trees towards the house.
Ekka (Eric): likewise. I had one prior learning experience in felling a two adjacent trees that were “grafted” together about halfway up the trunk. The stumps were slightly in front of one another. We installed a pullover line, two face notches, and two back cuts. Because they were grafted together, and the stumps one in front of the other, neither hinge would work until we cut one of them off. (hope you can visualize from this description). I believe the crowns have to move independently for both hinges to work freely.
TreeCo (Dan): you gave me a lot to think about. I was expecting some wire and decay. We built in several backups. I do not have the knowledge or capabilities to perform to research or publishing standards. However, all of my experiences lead to better choices and decisions. I believe that this is more than a stroke of luck, with lessons that can be applied in the field with a high level of confidence and safety.
Thanks to all for the posts
A big thanks to Chris Girard who came down on 24 hours notice to be in the show. Thanks Chris.
POST MORTEM:
Hey guys, sorry for the delay in this post between my schedule and the board crashing.
Here’s the bottom line. The plan worked as well as I hoped. We did several modifications of the original plan based upon input from the discussion. Attached is a complete description of the work, and a folder of pictures. But I’ll summarize a few things here.
1. Based upon your postings, we did several modifications, used primarily as backups:
a. larger rope (from 5/8” to 3/4”)
b. bought a larger hand winch (lug-all 6000-15, used as a backup)
c. beefed up the anchor weight by completely filling the Fuso with chips
d. used a second, larger truck (international 4700) as a backup anchor
e. planned for test borings for decay in the hinge area (note – we forgot to do this step before cutting the first hinge)
f. used wedges to help support the hinge from downhill side lean
2. I stayed with a traditional uniform hinge. My cutting training was with Tim Ard, and I subscribe to his philosophy of a consistent, uniform hinge. Though I have seen Soren demonstrate a Dutchman, I do not feel comfortable, skilled, or safe using either a Dutchman or tapered hinge)
3. The quick summary: (does not list all of our backup systems, see attached)
a. tied a 3/4” stable braid to tree one, connected to tree two with a clove hitch, then tied off to the hand winch anchored to the Fuso. Pulled all slack out of the system.
b. Cut both face notches, bore cut both hinges leaving 2 inch straps, set wedges
c. released tree one, then tree two.
d. hand winched until they both fell in tandem. At the point of freefall, with the winching stopped, tree one was still not over center. Tree two completed pulling tree one. The hinges held better than expected, little influenced by the side lean.
Roger M: The cleanup was no problem, though I do prefer 1 at a time.
Roger B: We choose not to suck them both together with a running bowline. I did not want to put undue stress or torque on the hinge of tree one. Regarding the triangle shaped hinge, I used it on heavily ice-laden trees in the 1998 ice storm. Worked very well to reduce the barberchair
I chose not to use a holding line opposite the lean for 2 reasons:
1. I wanted to see if the hinge would hold without it
2. If the whole system failed backwards, that line could pull the trees towards the house.
Ekka (Eric): likewise. I had one prior learning experience in felling a two adjacent trees that were “grafted” together about halfway up the trunk. The stumps were slightly in front of one another. We installed a pullover line, two face notches, and two back cuts. Because they were grafted together, and the stumps one in front of the other, neither hinge would work until we cut one of them off. (hope you can visualize from this description). I believe the crowns have to move independently for both hinges to work freely.
TreeCo (Dan): you gave me a lot to think about. I was expecting some wire and decay. We built in several backups. I do not have the knowledge or capabilities to perform to research or publishing standards. However, all of my experiences lead to better choices and decisions. I believe that this is more than a stroke of luck, with lessons that can be applied in the field with a high level of confidence and safety.
Thanks to all for the posts
A big thanks to Chris Girard who came down on 24 hours notice to be in the show. Thanks Chris.