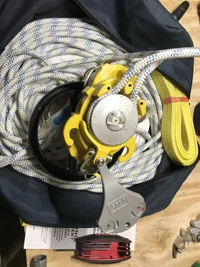
Is this the adapter that you mentioned here? I pulled the wheel off of my rollgliss today and tried to drill a 15mm socket to use with a 3/8" adapter I already have. Went through 3 drill bits and didn't scratch the socket!! Hard stuff! and cheap drill bits is not a good combination. Went to the hardware store looking for one of these but had no luck so before ordering online I wanted to verify it was the right part!!Here is the drill adapter in place. It started out as a 5/8 shaft adapter for 1/2 inch grinding and buffing wheels. The stub shaft on the device is also 5/8 inch. I shortened the shaft adapter to the same 3/4 inch inside length as the device stub and also turned off the threads to make it a smooth shaft to grip in the cordless drill. The drill in the second photo is not powerful enough for sustained SRT with the device but worked fine set up MA with two pulleys. For faster ascent on single line, one just needs a bigger drill.
- Stewart
View attachment 48337 View attachment 48338
Thanks so much.
Mike
https://wowdeals.online/itm/Eazypow...bor-Adaptor-RH-Thread-1Pack/332561807714.html