
Navigation
Install the app
How to install the app on iOS
Follow along with the video below to see how to install our site as a web app on your home screen.
Note: This feature may not be available in some browsers.
More options
You are using an out of date browser. It may not display this or other websites correctly.
You should upgrade or use an alternative browser.
You should upgrade or use an alternative browser.
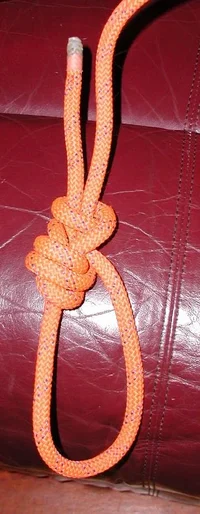
How do you dress and set your Yosemete?
- Thread starter mateo
- Start date


- Location
- Ontario, Canada
That's the same way I tie it because I think the rope bites the tail tighter.
- Location
- Longmont, CO
where did you get that red & black climb line?
- Location
- Retired in Minneapolis
- Location
- Minneapolis
Off topic but I'll ask it here since there can't be that many ways to dress a yosemite (I hope):
If a guy were looking for a totally budget oriented 1/2" climbing line that holds knots ok, what would you advise?? Lets say something around $50 or less for 120'.
If a guy were looking for a totally budget oriented 1/2" climbing line that holds knots ok, what would you advise?? Lets say something around $50 or less for 120'.
- Location
- Retired in Minneapolis
Arborplex is about the cheapest half inch line you'll find. You might find a hank of 16 strand cheaper if you'll settle for a shorter line. End of the roll hanks in off-lengths generally go cheap. Get hold of our sponsors to see what they might have.
TreeCo
Carpal tunnel level member
[ QUOTE ]
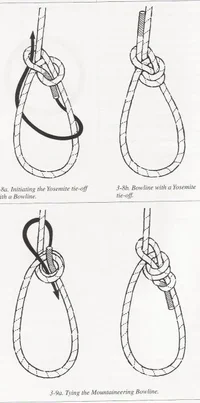
Here is a scan from ON ROPE showing the Yosemite tie-off.
[/ QUOTE ]
See, the image there has the tail going on the left side of the working end (presumably) not on the right like mine and Kevin's. Will this not hold? Or will it fail, becuase it's not set correctly? Just curious Maybe we should weight test it... Not sure how to do that.. but that's not the problem with the original bowline is it?
mateo
Here is a scan from ON ROPE showing the Yosemite tie-off.
[/ QUOTE ]
See, the image there has the tail going on the left side of the working end (presumably) not on the right like mine and Kevin's. Will this not hold? Or will it fail, becuase it's not set correctly? Just curious
Maybe we should weight test it... Not sure how to do that.. but that's not the problem with the original bowline is it? mateo
- Location
- Minneapolis
TreeCo
Carpal tunnel level member
[ QUOTE ]
[ QUOTE ]
Here is a scan from ON ROPE showing the Yosemite tie-off.
[/ QUOTE ]
See, the image there has the tail going on the left side of the working end (presumably) not on the right like mine and Kevin's.
[/ QUOTE ]
I think what you are seeing is mirror imaged knots. I suspect both are the same strength.
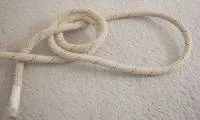
Attached image is of mirror imaged bowlines with yosemite tie offs. I'm a leftie by the way.
[ QUOTE ]
Here is a scan from ON ROPE showing the Yosemite tie-off.
[/ QUOTE ]
See, the image there has the tail going on the left side of the working end (presumably) not on the right like mine and Kevin's.
[/ QUOTE ]
I think what you are seeing is mirror imaged knots. I suspect both are the same strength.
Attached image is of mirror imaged bowlines with yosemite tie offs. I'm a leftie by the way.
Attachments
- Location
- Retired in Minneapolis
Look at the lower ON ROPE illustration.
Arbos have called that a "Jacked bowline" You make two round turns before putting the end of the rope through. Another variation is to make two round turns with the tail, on the rope. I've done that when I was going to ground-drag logs or brush piles. The alternative is the famous "Hatchet Bowline" which is untied by choping off the rope about a foot above it.
Arbos have called that a "Jacked bowline" You make two round turns before putting the end of the rope through. Another variation is to make two round turns with the tail, on the rope. I've done that when I was going to ground-drag logs or brush piles. The alternative is the famous "Hatchet Bowline" which is untied by choping off the rope about a foot above it.
- Location
- Bloomington, Indiana
[ QUOTE ]
Another variation is to make two round turns with the tail, on the rope.
[/ QUOTE ]
So 'the rabbit goes out of the hole and around the tree'-- twice(?)-- and then back in the hole?
Another variation is to make two round turns with the tail, on the rope.
[/ QUOTE ]
So 'the rabbit goes out of the hole and around the tree'-- twice(?)-- and then back in the hole?
TreeCo
Carpal tunnel level member
Tom I've heard for years the 'jacked bowline' is two round turns with the tail.
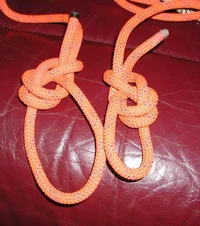
Here's a photo of a jacked mountaineering bowline with a yosemite tie off. I've never seen this anywhere and is likely just a lot of over kill.
Here's a photo of a jacked mountaineering bowline with a yosemite tie off. I've never seen this anywhere and is likely just a lot of over kill.
Attachments
- Location
- Retired in Minneapolis
Mahk,
You've got it right. The hole is actually a tunnel now though. Since it is two round turns")
You've got it right. The hole is actually a tunnel now though. Since it is two round turns
TheTreeSpyder
Branched out member
- Location
- Florida>>> USA
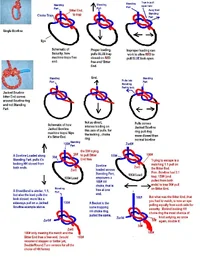
Drawings from MTL archives.
i think a Yosemite tie off is for security and to keep a nice clean/clear eye. i think the double/mountaineering bowline gives softer first loaded arc, so gives strength and security increase. But, a mountaineering bowline would take more carefull dressing, for the pull from 1 part of the eye comes to a point that is on the 2nd tier up/ more leverage to capsize; especially in stiffer/thicker lines. DBY SlideShow; maid by slip knot method
i think that the proper finish to a simple bowline is with the bitters/tail/working end on the inside of the eye. This is said to protect it more from inversion. But, also; in recognizing a sheetbend as a cut open bowline; the same mechanics should apply. Thus, another reason for finishing the bowline with bitters inside eye; is so that the standing part's most immediate and intense tension is placed on the easiest to hold part of the bitters; for best security. Placing the bitters to finish inside the eye, protects the tail from being pulled and inversion; but also, places the bitters/tail into the most imeediate clamping pressure of the choke ring(s); like it's cousin sheetbend.
Pulls of Bowline to SheetBend Comparison - Shows relationship of bowline to sheetbend, and also how a simple change in the way device allows force to flow, alters the mechanics, and makes sheetbend less secure etc. If we are making a Square Knot; Then... we pit the standing part, against the standing part, but in sheetbend trap, standing part agianst the bitters. Square-Thief-Granny-SheetBend Strategies In understanding why hitch slides descending in DdRT, and not SRT; i refer to the simple lessons of Square being a knot to self/loop(DdRT), vs. Sheet, being a bend of lines to a single run (SRT); and the way they load, and why.
Personally, i think of a jacked bowline as the turn the bitters makes not being around the standing part at all, but rather around one leg of the eye; as shown in the Attatchmeant to this post . This simple alteration like many; changes the mechanics/ pulls and securities in the knotting i believe. There is a use for the strategy though. Like when inverting a retrievable bowline around an overhead mount; whereby the standing part is relaxed, and is used for retrieval only; i think we should use a mountaineering-jacked-yosemite type bowline. For, a regular bowline depends on the force from the standing part to empower it's secure clamping/keeping of the bitters/tail/working end, by it's choking ring(turn or round turn in DB/DBY). But, in this inverting/retrievable bowline scenario, the standing part is not standing under tension, but is relaxed. The tension is all in the loop holding pulley or other device; this tension flow empowers the locking of the choke ring(s) to trap bitters; and that empowering force has changed it's flow and direction. The loop is where the clamping/securing of the bitters for the style of jacked bolwine comes from as i understand it; so is more proper for this use. i don't think a free hanging bowline should be jacked. Attatchment shows how i trace the forces through this one, and how a regular bowline should be loaded from standing part, to bottom of eye in straight line. Not across loop with standing part unloaded (like retrievable/inverting bowline loads it). Similarily, there are times you use a Spanish Bolwine, by the loading direction. As all ways and always, i think technician must look at loading direction of the empowering force through tese devices.
Attachments
Thanks for showing the mtn. bowline via the slipknot method. I have always used the slipknot and bight method to tie the bowline, seems like few folks have seen it.
Your slide show is the first time I have seen the mtn. bowline tied that way.
Your slide show is the first time I have seen the mtn. bowline tied that way.
Norm_Hall
New member
- Location
- Wauconda, (Chicago),IL,USA
Mateo, that's the same way I tie it. I use it all the time. I think it is a much safer knot than the stationary bowline.
Because it has a bigger radius bend (2 parts of rope) at the "horseshoe", it adds about 5% strength to the knot.
Because it has a bigger radius bend (2 parts of rope) at the "horseshoe", it adds about 5% strength to the knot.
TheTreeSpyder
Branched out member
- Location
- Florida>>> USA
Glad to hear more use the slipknot method; it is my favorite. A real easy finish on the ground is if standing part is anchored, then back up away from it to pull lacing into position from slipknot phase. Or, in tree, allow the weight of the standing part to pull knot into finish from slipknot phase. 2+meg vid of tying DBY using this slipknot technique. . Though backwierdz like my other stuff; this is an easy way to tie the DBY; 250k animated .Gif-tying DBY behind back . Notice in both; we keep it loose, so it can slide into place easily.
i first read about the slipknot method; when it was called the climber's method(so i had to learn it). If a climber was stuck on a shear face; from an overhead lip or by helicopter; they would lower a line down; and climber could hold on to position with 1 hand and form slipknot with other, work bitters around under armpits, then into slipknot, without letting go of handhold. Once correctly done, climber could even fall, and if they held the bitters pinched to standing part, the falling action would set the knot! Then i picked up the double bowline, then later saw a yosemite finish, and combined all 3. It has been my faithfull friend.
i believe becuase of the larger/softer curve it is stronger as you say, and also more secure. But, it does pull from a higher, 2nd tier, so has more leverage to deform, if not dressed properly i think.
Thee extra strength is in the round turn/double/mountaineering version shown; but not in an extra turn laid into a clove hitch as choker for a more secure Water Bowline, as the larget /softer arc effect is lost, even though 2 turns; they are 1 at a time. Another attribute besides the 'clean eye'; is that i think a DBY is more symetrical/easier on eye/ easier to quick check; such as usually attributed to the fig. 8 family by mountain/rescue.
Another advantage to making the bowlines with the slipknot method, is that you can stop and lay it down, or hang it from thumb etc. before finishing. Then, quickly fininsh/trap when device is brought to you, or other line stretched to you etc.
And, a real obscure notion, kinda from KnudeKnoggin's method, then screwed around by me a DBY method; maid in the bight!. Though, ya need to primarily load (first and more) the standing part.
- Location
- Bloomington, Indiana
Tom;
In the second drawing of the mountaineering bowline it looks like there is an extra loop that the tail is going through. What is that? Or am I just not seeing it right?
So, in the jacked bowline, the hole is a round turn (two turns) and the 'rabbit' also makes a round turn (two turns)?
Mateo;
Is the last of your photos upsidedown from the first two? I had trouble following what you did until it occured to me that that is what happened.
Spydey;
For your 'Jacked bowline' the initial loop has to be made with the standing part on the topside of the loop, not on the underside of the loop as in the standard bowline. I couldn't tell this from your photo and I made the knot several times and had it collapse before realizing what you had done. Once the knot is made, it's easy to see why this version is called 'Jacked'. Where did you find it?
Excellent caution about using a bowline as the loop for a static retrievable. I usually just tie the end of the retrieval line to a loop sling and, until you mentioned it, I hadn't paid much attention to what happens if you tie the loop. If the SR is made using a loop tied in the end of a rope then the hitch that forms when the loop is pulled around the tree limb is a stirrup hitch. It loads the knot much differently than if you just place a load in the loop. The same caution would be true for using a spliced eye for a SR as well.