GLeasy Bars

NickfromWI

Participating member
Location
Los Angeles, CA
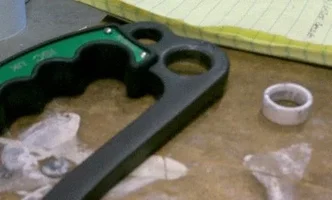
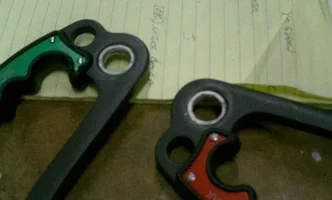
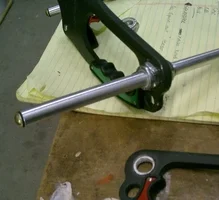
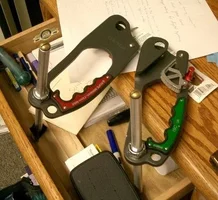
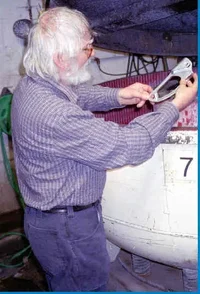
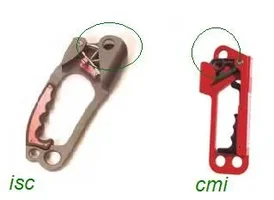
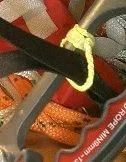
Okay, I got me some of Greg's (klimbinfool) GLeasy Bars a couple weeks ago, and finally got the ascenders to put them on. Greg makes these bars to go on the CMI ascenders. Againts Tom's advice, I went for the ISC instead. I knew there'd be some modifying to make them work perfectly, but got them anyway.

So the ascenders I got are the ISC Professional RP 210. I bought them at Nomad Adventures in Joshua Tree, CA. $139/pr. There are 2 lower holes, one a bit bigger than the other. The bars were NOT fitting in the smaller hole (which is just big enough to fit most locking carabiners). The larger hole was too big. I made it fit snug, though!
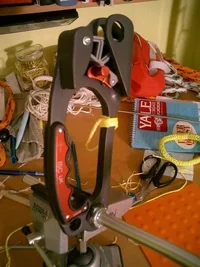
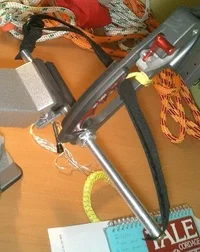
Here's the pics

love
nick
 
This first pic shows what I did, more or less, to make it work. I found an appropriate sized piece of PVC pipe, cut a 1/2" ring off the end of the pipe, and sanded the outside edge down a hair so that it just BARELY fit into the large hole on the ascender. The inside of the PVC ring was tight enought that it wouldn't slip over the threads on the bars, but if turned, would follow its way down the threads until it met the band in the middle of the bar where the ascender is meant to fit.
 

Attachments

  • 20590-CIMG3718.webp
    20590-CIMG3718.webp
    14.5 KB · Views: 233
Okay, I just realized that I should first show what the bars look like. Here is a pic from the loctite coversation going on in the Butterfly II bridge thread...

Click to see the GLeasy bars

On the top bar, you see two lock-nuts on the outside of the threads. Inside the nuts to the right, there is a shim of some sort that Greg provided. I didn't use it. On the very middle of the bar, between the threads you see an area of maybe 1/2" that has no threads. This is the exact middle of the bar, where the ascender sits. The PVC ring fit very snugly over that spot.
 
Now all that's left is to sew the straps that will go over the hands and feet and this thing will be ready for the trees.

You can rest assured that there will be some small whoopie slings spliced to the small loops!

Stay tuned for more pictures...once I get my Singer fixed!

love
nick
 
Wouldn't it be cool if you have the ascender that The Wizard is holding?

I'm anxious to see how you go about attaching the top of the stirrup to the ISC's.
 

Attachments

  • 20599-Denny w-ascender.webp
    20599-Denny w-ascender.webp
    34 KB · Views: 174
Nick , nice job on the mounting. Tom and I and others are using the original proto types, which have a on one side of the bar a 3/4"flare that would butt up to the ascender allowing the use of only one nut.

In order to cut cost in half, you have the new version. Much simpler to make. Although, I like proto types the best, it illiminated me from having to by 3/4" stock alluminum and wasting a 1/4' of metal just for that flare on one side.

Your right though , you dont have to have a stirrup for the upper ascender. I dont anyway, I just use a teather from the upper to my saddle and a middle micro attached to my saddle for a secound safety.Works well for me, but i'm sure the more you fool with it, the more you'll streamline it. As you saw , Tom has done some nice work on the lowers. So when alls said and done I would like to see your getup.

We are going to be doing some redwood climbing by the Tree House the weekend before May and then there is a tree fund climb or something happening after that . I'm suppose to help Oxman with this along with others.I'm gonna take out a large dead top , should make a mighty crash when it hits. If you get the chance , maybe you should come up that weekend before and give those ascenders a long jaunt up a tree .

Thanks
Greg

Ps If you have any trouble with the ascenders not moving up the line smoothly, let me know.
 
Phase 2 complete

The second phase (sounds importanter that way) has been completed. Phase 1 was working with actually fitting the bars onto the ascenders. Phase 2 was doing any splice work.

Each ascender had one splice put on it. On the upper, I spliced a whoopie. This will give me a chance to play with the length of the lanyard to the upper ascender. I can make changes while in the tree so that I can perfect the distance. I might just leave the whoopie so that other people can use it, too. I don't have pictures of that whoopie for whatever reason. Maybe I'll take them tonight.

The lower ascender needed a bit of creativity. Let me see if I can explain this verbally....OR you can click on the attachment to this post to see the 2 ascenders side by side. Okay, Greg made these bars with the CMI ascender in mind. I wanted to make these bars work on the ISC professional ascender. If you look in the pic, you see that both ascenders have a hole at the top of the ascender. In typical/caving use, one might clip a carabiner to this hole, then clip that 'biner to the rope. This is to help the rope from popping out of the ascender. With the GLeasy bar setup, that hole is used for a special purpose on the lower ascender. A strap would run from one end of the bar, up through that hole, then down to the other end of the bar...forming a triangle with the bar and the strap- that hole being the top of the isosceles triangle. Okay, now if you look at the pic, on the ISC, the whole is only on one side of the teeth. But on the ISC, there are 2 holes, one on each side of the ascender

If the strap were to go up, through the 2 holes, then back down- the only way to get the rope onto the ascender would be to feed the end of the rope into the top of the ascender...an unfeasible option.

So how to solve this puzzle?
 

Attachments

  • 20696-ascender.compare.2005.webp
    20696-ascender.compare.2005.webp
    7.1 KB · Views: 157
Re: Phase 2 complete

I'm not yet sure if this is gonna work, but I spliced a small loop of throwline onto the spine of the ascender. It is attached by means of a triple constrictor hitch which was pulled snug with all my force (probably like 30lbs of pressure!). The ends of the hitch were spliced together (making it a loop). Then I used a flexible glue (used to repair Gore-tex fabrics) to coat the knot to hopefully help prevent it from loosening itself.

Now, the strap can go from the end of the bar, through the loop, then to the bottom of the bar.

The straps are phase 3 (out of 4). I have to work on my Singer tonight then I might be able to sew them up.

I am not sure if this loop idea will work. It might be better to not have any loop and just have the strap go through the big hole in the middle of the ascender (the hole your hand would normally go through).

Only time will tell.

love
nick

ps- don't forget to see the pic!
 

Attachments

  • 20699-CIMG3777.webp
    20699-CIMG3777.webp
    45.4 KB · Views: 153
Re: Phase 2 complete

Okay, I ummmmm "found" a typo on a previous post. When describing the holes on the top, I referred to both as ISC. The ISC has 2 holes and the CMI has one hole. It won't let me edit it (it says it's too late!)

Phase 3 is complete. I have sewn everything. I'll show pics later this afternoon if I get a chance. Now I'm in Phase 4: TNA (Trial 'n Error). I need to try it for a while and see if there are changes that need to be made. I'm hoping not.

Stay tuned for more photos...

love
nick
 
Re: Phase 2 complete

Okay, here's the other two photos I have...This first one is the lower ascender. I sewed on a strap with velcro on it. You put the strap through a small rectangle shaped ring on the far end of the bar, then you double it back and hook the velcro together.
 

Attachments

  • 20765-CIMG3807.webp
    20765-CIMG3807.webp
    37.5 KB · Views: 137
Re: Phase 2 complete

Here's the upper ascender. You can see the blue loopie. I sewed on buckle and strap onto the upper bars. I don't know if this strap is gonna stay. Doesn't seem to do much. I made it adjustable in case I'm wearing gloves.

I really think the best thing for the upper bar is to remove the strap, and slip on handle-bar grips from a bicyle. Prob is the bars on a bike are much thicker, so there will be some more modificating to make the handles work.

I noticed something last night. I was trying out the setup- seemed to work out okay (though I was only going up about 15'). Anyway, I did a few pull ups on these bars. For me at least, it's a lot harder to do a pull up on a smaller diameter bar. Does the same ring true for everyone? If that is the case, it may be worth it to put the bike handles just to prevent fatiguing when going up a tree that's taller than 15'!!!!

Now on to TNA....Tinkering and Adjusting that is! I'll give this a try for a little while and refine it as needed.

love
nick
 

Attachments

  • 20767-CIMG3810.webp
    20767-CIMG3810.webp
    54.7 KB · Views: 129
Re: Phase 2 complete

Lookin' good Nick.

Until I saw the pic of the stirrup it wasn't clear to me how you were going to attach the webbing. That looks pretty good.

I'll bet that if you kept doing chin ups on the small diameter rod your hands and arms would change. I'm reading a book by John Long. He wrote about his early days of climbing and bouldering. He and his buddies would do various types of finger tip pullups to train for crimping holds. The flame-outs went away after a while.

I think you've got the right idea about using bike grips. Now you have to find a way to shim them out. Do you want an idea that I came up with?
 

New threads New posts

Back
Top Bottom