Show off them splices

Just looking at the pic and the green markers, but my thought is that is the exit point for the opposite eyes and there is a tapered cross over to keep diameter more uniform. ??
I hear what your saying, i just personally don't know how that works while keeping a DB splice style covered eye. Naked 12 strand, yes, i can see how the opposite eye's tail could end up over there, but the other way..idk.. my brain hits a stone wall..haha.
 
Right Right.. DB rings can definitely become a pain. I definately struggled on my first couple.. both 12 strand as well as DB

These are the covered beeline splices that promted the question..

S190190-16.jpg


Ironically, in the photo you can see the exit markers on the cover... Whatchya think.. does that look like a class 2 bury length or just a long class 1?
Another possible way these are being made is just tapering the cover and core and burying them together, just in the cover next to the core, with the green marks the exit points.
Just became aware that arbsession is offering break testing, it will make having tests done at a more reasonable price.
C2BE6CA6-5B80-43F4-8035-312131A2ED92.webp
 
I really hate to ask questions here as they sometimes get buried & unanswered, but at the same time i don't feel they deserve their own thread...

When looking at finished products like Ultra Slings, Soft Anchor Slings, whatever the company wants to call them, how are they determining the pocket size? I see a lot of times the pockets are much bigger than they need to be.

I've always made the pocket size just big enough to pass the object, in hopes to get more pockets per sling & a possible closer fit, more like what a dead eye or adjustable could provide.

Is there some benefit I'm overlooking to having them much larger? From a manufacturer standpoint, longer pockets mean less brummels, hence quicker to produce.. Is that the only reason i see them big, their just easier to produce while still maintaining a functional tool?
I think a mass producer would make large pockets to accommodate a large variety of objects. Your point of faster production might have something to do with it too. I also make mine as small as possible, customised to the block I intend the sling for.
 
More pockets uses more rope, too. But I like them small, myself. Especially if I'm splicing something onto the end of the anchor, like a pulley. Pockets only need to pass that, because nothing else will be used on the sling.
 
More pockets uses more rope, too. But I like them small, myself. Especially if I'm splicing something onto the end of the anchor, like a pulley. Pockets only need to pass that, because nothing else will be used on the sling.
I've developed a habit of using my single ring ultras as utility slings since they are usually in a bag close by the work. Choke them around a tree and clip a pulley to a loop to redirect a pull line or to clip the rope puller to.
I like small pockets.


Bonner mentioned at some point that the ultraslings are the most time consuming spliced products that they make, so fewer splices and less rope needed to meet a certain length both seem like good reasons.
I have never tried a commercially produced ultra. Do the ones for smaller rings have pretty small loops?
 
I think a mass producer would make large pockets to accommodate a large variety of objects. Your point of faster production might have something to do with it too. I also make mine as small as possible, customised to the block I intend the sling for.
My bad, i should have specified.. what i mean is the large pockets on Safebloc, THT, Beast rings etc.. they are indeed large hardware, but in the cases I'm referencing, it's as if you could almost fit these things through longways.

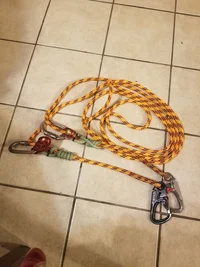
On the bare slings, the large pockets make would sense though from an "unknown usage" perspective..

I've developed a habit of using my single ring ultras as utility slings since they are usually in a bag close by the work. Choke them around a tree and clip a pulley to a loop to redirect a pull line or to clip the rope puller to.
I like small pockets.


Bonner mentioned at some point that the ultraslings are the most time consuming spliced products that they make, so fewer splices and less rope needed to meet a certain length both seem like good reasons.
I have never tried a commercially produced ultra. Do the ones for smaller rings have pretty small loops?
I'm glad you mentioned the Bonner posts. This leads to another question that's been bothering me. At one point he mentions the importance of having each leg equalized.. this makes sense to me as well as not inducing twists as well.. but my question is, how are they going about it, are they actually counting pics per section? Or just eyeballing/measuring & adjusting the first brummel of each series?

I've done it both ways & have noticed you can't just mark equal lengths. I'm usually one pick shorter or longer than the opposite side when counting from that sides last tuck. This will usually get them dead on for me. For a 5/8's single Med X ring, I'm usually 13 then 14 on the other side when counting picks.

I'm just curious how y'all are going about it. My newer methods is definitely way more time consuming, but kills the second guessing in the back of my head.

I don't think I've ever bought one, actually. The ones I've seen usually had fairly large pockets no matter what was spliced onto it.

I haven't either, i can't justify the cost even though i know there's probably a better methodical process being used. 249 retail for a safebloc & about 30ft of spliced tenex is just... Idk.. alot! Lol.

(This isn't a question directly to you Jeff, but if you know.... by all means..)
Speaking of Tenex-Tec & Safebloc..
I've thrown this out there without much luck before, but, where did the idea of Trex not being ok for Safebloc/Notch Triple Thimble come from? Is there some actual data or recorded accounts that suggests not to use it?
I ask as i still see people (ppl who make an actual living splicing) still using Trex on these items without any sort of concern being voiced..
 
Picked up a 150 of Wizard 11.5 mm from a place called braids and lace. They habe been manufacturing rope products since the 1930's and supplying the arborist industry since the 70's. I live 25 mins away and didn't even know they existed until they had a booth set up at a climbing comp. I visited the factory yesterday and was very impressed. The price is amazing and the owners are super friendly and were willing to spend a lot of time talking to me about their products and processes...I also found out that they will do break testing (for a small fee) as well as sewn terminations on any rope...not just there own! The verdict is out on the rope as of yet but I will keep you posted. Anyone living in Southern Ontario interested in rope, break testing or sewn terminations I would highly recommend giving them a try


20191102_161927.webp
 
Picked up a 150 of Wizard 11.5 mm from a place called braids and lace. They habe been manufacturing rope products since the 1930's and supplying the arborist industry since the 70's. I live 25 mins away and didn't even know they existed until they had a booth set up at a climbing comp. I visited the factory yesterday and was very impressed. The price is amazing and the owners are super friendly and were willing to spend a lot of time talking to me about their products and processes...I also found out that they will do break testing (for a small fee) as well as sewn terminations on any rope...not just there own! The verdict is out on the rope as of yet but I will keep you posted. Anyone living in Southern Ontario interested in rope, break testing or sewn terminations I would highly recommend giving them a try


View attachment 63297
I just ran across them the other day. At first i thought they were just a seamstress site given the name, but I'm glad i checked them out. I like that pattern, looks very visible..

What you doing on your bury there, is it a small fid.. half fid, etc? Nice smooth taper whichever it be.

View attachment 63298my first 16 strand splice, first ring and ring. Feel free to critique.

The rope was new teufelberger ultra vee, the black on the big ring side is from my gloves trying to finish the bury.

Did it give ya any trouble burying? Your x-over don't look frumpy, bumpy or overexpanded.. other than whip or lockstitching it, if say it looks good from my house..
16 strand is my fav to splice. For some reason i always ends up with Teufelberger & Im curious if others bury as nice as this stuff does with it's waxy/plastic new texture.

Revamped the rope guide. Much happier with it
View attachment 63306

New boots have the clip n step thingie, so modified the micro saka on my harness
View attachment 63307
Sam that mini is freaking awesome. If i hadn't blown what i did buying the dang Haas Velox that won't even fit around my fucking boot, I'd tear it down & make what u have right there.. So much more compact & stowable. Really nice work right there.

Nice job on the rope guide/pulley saver too!
Few questions -
What did u stuff the eye with?
What did you end up with for length on your Pinto Rig prusik. The splice also looks very flexible for having the bury so close to the wraps.

I like it, it's just a croll with a length of bungie cord clipped onto the back of my harness, just pulls out and goes over the shoulder. I can roll it up quickly and stuff it into the chalk bag on the back of my harness. I had a spliced loop on it before but since i have the clippy boots now, changed it.
I bought a HAAS too but don't use it since it's too bulky for me, plus it's a weaver product.

The eye has a 3.5" bit of 6mm stainless steel wire with the ends rounded over, soaked it in super glue and two layers of heat shrink over it. Thats sitting in the core of the top of the soft eye.

I didn't really measure it, i wrapped the cord on the rope, marked where i wanted the pinto to sit, added an inch and a half to each end since thats what i lose to the splice. It was stiff as a wedding prick initially, after hidden stitching the splices i worked them by hand for a while to stretch and soften the splices up enough to get it on the tether.
 
Did it give ya any trouble burying? Your x-over don't look frumpy, bumpy or overexpanded.. other than whip or lockstitching it, if say it looks good from my house..
16 strand is my fav to splice. For some reason i always ends up with Teufelberger & Im curious if others bury as nice as this stuff does with it's waxy/plastic new texture.

The first side, the small ring, went very smooth. The second side with the crossover was quite a bit of work, I took it back apart 3 times before I got it to bury. You can't really see it, but you can feel that it is slightly narrower at the crossover.

I started to whip the splice but it was rock hard and I thought pushing a needle through it may do harm than good with cutting threads. That and the instructions listed whipping/ lockstitch as optional on 16 strand.

Should this not be optional? I bought a splice one time on Samson hawkeye that was not stitched.
 
I just ran across them the other day. At first i thought they were just a seamstress site given the name, but I'm glad i checked them out. I like that pattern, looks very visible..

What you doing on your bury there, is it a small fid.. half fid, etc? Nice smooth taper whichever it be.

I used a 13 mm fid for sizing and it was a short fid length. So for 11.5 it will be somewhere in between. I also took 7 pairs when tapering the cover instead of the standard 6 because of the longer measurement. The crossover bury was a bit of a PITA but not the worst. I can say with certainty that without @ARLO core reduction method I wouldn't have been able to run it home
 
The first side, the small ring, went very smooth. The second side with the crossover was quite a bit of work, I took it back apart 3 times before I got it to bury. You can't really see it, but you can feel that it is slightly narrower at the crossover.

I started to whip the splice but it was rock hard and I thought pushing a needle through it may do harm than good with cutting threads. That and the instructions listed whipping/ lockstitch as optional on 16 strand.

Should this not be optional? I bought a splice one time on Samson hawkeye that was not stitched.

Dang thats a bugger.. hate having to repeat steps.. those types of x-overs can be tricky if you've never done them before or don't have specific tools at hand. I find that keeping the exits on the complete opposite side of the cordage helps keep the tails from snagging into each other or causing other sorts of chaos. I also make 4 marks total on the x-overed tails. 1 on each tails exit point after milking all possible slack out (like you would traditionally with a 16strand core/cover x-over)... Then, while it's still milked, i do 1 mark on each tail @ the center point of the x-over. I just use a fid to open the cover up enough to shove a sharpie in there, i do this while trying not to induce any cover slack.. (also by keeping the exits at complete opposite sides it's easy to know what your marking through the cover, i think of it as top & bottom). When it's time to taper those tails, i pull them out until I see the center mark.. I'll usually taper back to a little before the center mark i made in the tail as the material your now tapering/removing will cause cover to gain in a little length & throw center marks off..

I don't go through all that marking with a regular 16 strand splice yet they come out nice & even, but for some reason i do this on the e2e's to get a more uniform X-over. You'd think youd be able to succeed using typical 16 stand x-over instruction if you approach it like normal & just treat one of the two cover tails as if it is a core.. It's just how i do it i guess..

I don't know what your exact troubles were with the x-over, but hopefully that can help you in the future. I also use a soft fid, which makes these types of tasks/buries a lot easier... along with a strong anchor.
 
I used a 13 mm fid for sizing and it was a short fid length. So for 11.5 it will be somewhere in between. I also took 7 pairs when tapering the cover instead of the standard 6 because of the longer measurement. The crossover bury was a bit of a PITA but not the worst. I can say with certainty that without @ARLO core reduction method I wouldn't have been able to run it home
Thanks for the update.. What is this Arlo method? Are we just talking about thinning the core tail before the intitial bury? In other words, thinning a section that will be cut off anyways in the end. Or are we talking about removing actual core from somewhere else further up the line?

You can just link me something if it takes to long to explain.. whatever's easier.

You mentioned it ending up a little longer than a short fid, so you took a little more from the cover... i kinda took that to mean, a short fid is your usual bury length.. is that correct?

Nothing overly revolutionary...a simple reduction of core volume on the last 5 or 6 inches of the core before the final bury with the cross over. Helps immensely for the core to pass with ease
 

New threads New posts

Kask Stihl NORTHEASTERN Arborists Wesspur TreeStuff.com Teufelberger Westminster X-Rigging Teufelberger
Back
Top Bottom