shankenstein
New member
- Location
- Twin Cities
I just bring the the threads to the same side and tie a square knot and then bury them back inside.
A square knot connecting both ends?
Follow along with the video below to see how to install our site as a web app on your home screen.
Note: This feature may not be available in some browsers.
I just bring the the threads to the same side and tie a square knot and then bury them back inside.
Have I missed discussion on terminating the stitching twine? Any good pictures or videos on how to finish the stitch? I am going to practice with some non life support pieces first.
Thanks!

I got some 1.5 mm dyneema whipping twine, waxed. The breaking strength is over 200 lbs (pretty sure, still researching the manufacturer's specs). One of the things I gather from watching this thread is that some of the unpredocatable strength of the splice could relate to bad stitching. So I wonder, more stitches might night directly translate to more strength. I do understand, however, that good friction of the rope your stitching increases strength.
So I've got line that has a 200 lb breaking strength and that goes into 5000 25 times. I'm going to experiment with some stitches that have 30 to 35 stitches and get them break tested. Is there some common logic that says that's a bad idea?
That sounds like a good plan. Maybe instead of sending them out to be tested, do it yourself at first with a car to see where it breaks.
I'm not sure how stronger thread with less stitches would work. There might be a point where less stitches might not generate enough friction, and only the stitches are holding them together.
The only thing I don't like about it is how thick the thread is, when you get to the last pass the cordage being sewed will be super hard to push such a big needle thru. I'm thinking if you were stitching a 5/8" bull rope it would be excellent but for 11-11.7mm lines I wonder if the deformation of the cordage fibers would be an issue on your final sewing pass. Worth trying to pull test it.
-AJ
Thanks a lot for the insight. I am doing my practice stitches on 1/2" stable braid and if things are looking good I may make a friction saver out of the same stuff. The little bit I've done so far seems pretty smooth pulling the needle through with pliers.
It had occurred to me to test using the car and I like the idea of seeing where the break happens to try and learn how to improve the stitching pattern. I only have a small car so I'm a little skeptical that I'll actually be able to break the splice without really shocking the system, which I would avoid doing. For my car's sake!
I'll post some pics and results when I get the chance to. Thanks for being such avid participants in this discussion brocky and moss!
The trick with using a vehicle is to be in the lowest gear possible and creep forward very slowly. And anchor to the most solid frame part possible (of course). And keep people and animals clear if stuff starts flying. If you do rip a car in half you will have proved the integrity of your stitching!
-AJ
Edit: Did you break those well-used eyes yet?
Unfortunately no, have been insanely busy with various projects (book, art etc.) and a broken finger (not tree related) now scrambling to catch up with my tree work customers. I haven't finished my new lanyard so still climbing on my old one that is supposed to be retired ;-) It's doing fine but will be replaced soon.
-AJ
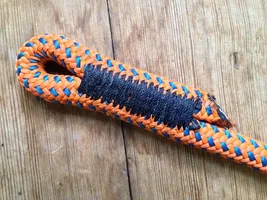
 A good reason to sew your own? I bought two and both looked like this. The top is the front and the bottom one is the back. I don't think any of the locks are inside the cord! Another thing about these loops is they are pictured as if a small eye is at one end of the loop, but the shrink tube is the only thing holding it in this position.
View attachment 48261 A good reason to sew your own? I bought two and both looked like this. The top is the front and the bottom one is the back. I don't think any of the locks are inside the cord! Another thing about these loops is they are pictured as if a small eye is at one end of the loop, but the shrink tube is the only thing holding it in this position.
View attachment 48261 A good reason to sew your own? I bought two and both looked like this. The top is the front and the bottom one is the back. I don't think any of the locks are inside the cord! Another thing about these loops is they are pictured as if a small eye is at one end of the loop, but the shrink tube is the only thing holding it in this position.