
Navigation
Install the app
How to install the app on iOS
Follow along with the video below to see how to install our site as a web app on your home screen.
Note: This feature may not be available in some browsers.
More options
You are using an out of date browser. It may not display this or other websites correctly.
You should upgrade or use an alternative browser.
You should upgrade or use an alternative browser.
HRC
- Thread starter cory
- Start date
- Location
- Everywhere
Can you email the picture? I will post it for ya.
NickfromWI
Participating member
- Location
- Los Angeles, CA
The pic is too high of resolution. An easy fix for this is:
1- open the pic
2- find the "Print Screen" key on your keyboard and press it
3- Open the programs "Paint." Every pc has it these days. It's under "accessories."
4- Hit CTRL-V to paste the pic in the paint program
5- Now draw a box (using the box tool in the upper left of the tool pallete) around the picture you want
6- Now hit CTRL-X, CTRL-N, N, CTRL-V. don't ask- just do it. You've now pasted just the part of the pic you want.
7- Hit CTRL-A then CTRL-W and resize the pic to something that looks reasonable to you.
8- Hit CTRL-S and save it as a .png file (change the .bmp or .jpg to .png)
Now come back and post it.
love
nick

- Location
- Everywhere
Now thats what I'm talking about....
NickfromWI
Participating member
- Location
- Los Angeles, CA
GREAT JOB!!!! Good thing you didn't have to use my convuluted technique.
Now, back on topic. That looks like a mighty fine whipping you got going on there. What kind of twine is that?
love
nick
Now, back on topic. That looks like a mighty fine whipping you got going on there. What kind of twine is that?
love
nick
Waldo
Participating member
- Location
- Portland, OR
how is doing that better than just using electrical tape to wrap the ends?
NickfromWI
Participating member
- Location
- Los Angeles, CA
That all depends on the quality of the whipping. I've had tape come off on me and I hate it. The whipping CAN be more secure. If it is done unsecurely, the whipping will come off.
Of course, either whipping or tape will come off in the wrong circumstances.
For me, it boils down to elegance!
If the tape works fine, than the whipping only looks better.
It looks like cory used a whipping that doesn't pierce the rope, similar to this one:

However- if the whipping were a style that pierces the rope, the whipping would have the advantage of locking the end of the cover down to the end of the core. Electrical tape can't do that.
love
nick
Of course, either whipping or tape will come off in the wrong circumstances.
For me, it boils down to elegance!
If the tape works fine, than the whipping only looks better.
It looks like cory used a whipping that doesn't pierce the rope, similar to this one:
However- if the whipping were a style that pierces the rope, the whipping would have the advantage of locking the end of the cover down to the end of the core. Electrical tape can't do that.
love
nick
knudeNoggin
New member
[ QUOTE ]
That all depends on the quality of the whipping. I've had tape come off on me and I hate it. ...
It looks like cory used a whipping that doesn't pierce the rope, similar to this one:
However- if the whipping were a style that pierces the rope, the whipping would have the advantage of locking the end of the cover down to the end of the core.
[/ QUOTE ]
This can be improved upon, for tightness and probable locking of the cover to core by force of compression.
In the image provided by Nick, treat the tying as being that of the Strangle knot, but for whipping, with more turns. I don't know what your material was, but I find that when using mason line (which comes in some wild colors, too -- neon pink / green / ... ) a minimum of 4 and comfortable maximum of 6 wraps fits nicely over the TWO twists of the ends; in, what, about 50-80# nylon monofilament fish line (which is quite tough vs. abrasion), the number of wraps needs to be increased to about 7-9 to cover the underlying Overhand twists (two --one more than for the usual Dble.Overhand). (One possible other advantage to using fishing line is that it can be firm enough to aid the insertion of the bight-end when tying it (vs. using forceps or other help).)
So, in reference to the sketch, I lay the end, with a stopper knot (Overhand or Ashley's --quick & simple) in it for purchase for tools in tightening, on the rope, then make the requisite overwraps, and then tuck in A BIGHT (this has two purposes: avoids having to figure right-size and cut and then waste whipping material; and allows for a secondary securing binding structure). This forms a normal Strangle with multiple overwraps; I then add a 2nd underlying overhand twist by simply tucking the end around the bight, which twist is worked under the wraps.
The bight-end should be pointing as it is in Nick's images, towards the rope end, for long ropes. It seems easier to tie it in the opposite direction, but then one will need to be able to either flip a large bight around the rope (pull it through...) or over the store of whipping material; with it towards the end, one simply wraps one side of it around the rope end.
The multiple Strangle knot is hauled DAMN TIGHT(tm) with tools:
something to grip the ends (the bight easily forms a Pile Hitch around a screw driver; forceps grip the stoppered end with a couple wraps for strength); and pliers to iteratively squeeze the body of the whipping to help even out the high tension at the ends.
After the Strangle is set, then the bight end can be finished, by wrapping non-end side around & around, 2-5 times; then just haul on its end to set. Both ends of the whipping will exit this structure on the same end of it.
*kN*
TheTreeSpyder
Branched out member
- Location
- Florida>>> USA
Best pic resier IMLHO is a free windows powertoy , can then right click a pic and resize on the fly, including groups of pix.
knudeNoggin
New member
Let's see how the wonders of technology suffer at my fingers!

A photo of whipping (say, "Whip it!, Whip it good!")
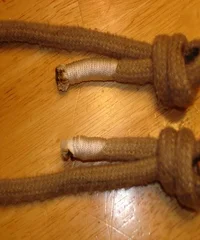
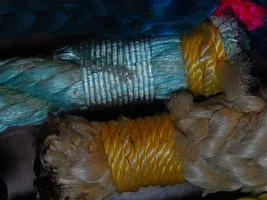
I'll start with a close-up (camera "Trim"'d) of the whipping
I described above--a sort of extended Strangle knot.
Here it is in both 150# laid nylon mason line (golden),
and 80?# monofilament nylon (clear).
What is there but HARD to discern is the boundary between
the end of the Strangle and the fusion of the Common Whipping
finish of the Bight-end.
For the golden whipping on the bottom rope (old 12-strand
nylon?), count in 3 from the left; see the small gap in the
wraps just above center? --it's where the strand coming from
the top passes left/beside the end of the Strangle and runs
under the Strangle's wraps. You can see the very fuzzy and
less gold ends puffing out from the rightmost wrap.
In the light blue (CoExOlefin) rope's clear whipping, this
same point 5 in from the right and slightly lower then the
center of the rope--quite hard to see in the translucent line!
And the double-twist of the ends is set into the ravine
between strands of the rope--and necessitates a whipping
cord not too thin! Here, ends are on left, only one at this
point (seems I hauled the bight-end out on next crease).
(The *blossom* of the stiff blue fibres so annoyed me
that I put on that right-at-the-end mason line Constrictor
variation (#1253), with ends further tied somehow.)
*kN*
A photo of whipping (say, "Whip it!, Whip it good!")
I'll start with a close-up (camera "Trim"'d) of the whipping
I described above--a sort of extended Strangle knot.
Here it is in both 150# laid nylon mason line (golden),
and 80?# monofilament nylon (clear).
What is there but HARD to discern is the boundary between
the end of the Strangle and the fusion of the Common Whipping
finish of the Bight-end.
For the golden whipping on the bottom rope (old 12-strand
nylon?), count in 3 from the left; see the small gap in the
wraps just above center? --it's where the strand coming from
the top passes left/beside the end of the Strangle and runs
under the Strangle's wraps. You can see the very fuzzy and
less gold ends puffing out from the rightmost wrap.
In the light blue (CoExOlefin) rope's clear whipping, this
same point 5 in from the right and slightly lower then the
center of the rope--quite hard to see in the translucent line!
And the double-twist of the ends is set into the ravine
between strands of the rope--and necessitates a whipping
cord not too thin! Here, ends are on left, only one at this
point (seems I hauled the bight-end out on next crease).
(The *blossom* of the stiff blue fibres so annoyed me
that I put on that right-at-the-end mason line Constrictor
variation (#1253), with ends further tied somehow.)
*kN*
Attachments
knudeNoggin
New member
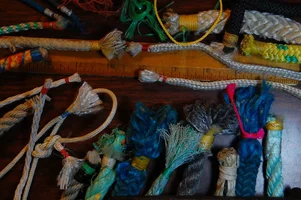
And here's a group of miscellaneous whippings, ropes, and
whipping material--mason line, monofilament fishing line,
strips of fibrillated polypropylene, and tea-bag string !
The fib'd PP is pretty neat: it's so flat yet relatively
strong that one can play around with the sort of half-hitching
that is done in binding fishing nets & head-/ground-ropes.
I've put on some of that in cases where the original whipping
er taping was starting to come untaped. The tea-bag string
is both frictive and weak, so needs can't well support the
extended Strangle; I use variations of French Whipping with
it, sometimes alternating between Half-hitch (of the French)
and Overhand. In some cases where the whipped rope is slick
and thin, I will poke some whipping through the rope to keep
it in place--as you just can't crank the small stuff tight
enough to grip.
*kN*
Attachments
NickfromWI
Participating member
- Location
- Los Angeles, CA
[ QUOTE ]
Yes, Nick, that's the way I did it (only way I know).
How do you do the lockstitch whipping?
[/ QUOTE ]
I should've posted this sooner. Lemme know how this works out for you:
Whipping Directions
love
nick
Yes, Nick, that's the way I did it (only way I know).
How do you do the lockstitch whipping?
[/ QUOTE ]
I should've posted this sooner. Lemme know how this works out for you:
Whipping Directions
love
nick
New threads New posts
-
test
-

-
-
-
 Supreme court decision on glyphosate, roundip, bayer and Monsanto
- Started by Daniel
- Replies: 0
-

-