Documenting my hand-sewn eye process

Huh.. interesting.. i haven't followed those links anywhere but do you have any pictures of the end result?

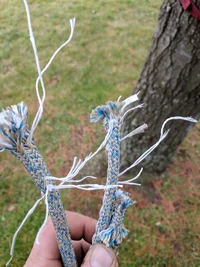
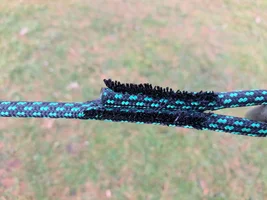
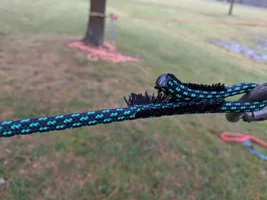
Parameter stitching is the style where you just keep passing the needle through the two ends of the rope.. around & around & around.. Brocky has some posted & the latest 9.3 epicord pictures from Theatretech that he is going to break test, shows some parameter stitching..

Is splicing the male version of knitting..? Ummm hell No! You can call it that..lol.. but I'll pass on the comparison.. hahaha.. "Wait what...?" "No.. those aren't knitting needles you see in my lab..." "Those are precision ninja throwing darts..!!" "Nothing to see here folks move along... move along!!"
 
So looked around the cave of wonders a bit but guess I've turfed a bunch of the older experiments. Did find one of the old 9 mm Edelrid climbing rope splices made using the stitcher - it's interesting 'cause it's a glued splice. These things held on all summer/ ~8 months, including thunderstorms/hailstorms, as support lines for busted trees. Initial tensioning was done with block and pulley and some of 'em were tight as guitar strings at the end of the summer. The second pic is a fairly recent experiment on an ISC clip and Armor-Prus 10mm using three stitch rows and doubled thread to see what that would be like. It survived a yank with the 4Runner without even moving. Maybe I need to get it to Richard one of these days.

9mmEdelrid.webp

10mmArmor-Prus.webp
 
So looked around the cave of wonders a bit but guess I've turfed a bunch of the older experiments. Did find one of the old 9 mm Edelrid climbing rope splices made using the stitcher - it's interesting 'cause it's a glued splice. These things held on all summer/ ~8 months, including thunderstorms/hailstorms, as support lines for busted trees. Initial tensioning was done with block and pulley and some of 'em were tight as guitar strings at the end of the summer. The second pic is a fairly recent experiment on an ISC clip and Armor-Prus 10mm using three stitch rows and doubled thread to see what that would be like. It survived a yank with the 4Runner without even moving. Maybe I need to get it to Richard one of these days.

View attachment 56561

View attachment 56562
So with that armor-prus, was that a lock stich method you used, but with double thread?
& you gave it a tugg with the Toyota.. right?
 
It is what you called parameter stitched not lock stitched (edit: Practical Sailor as below calls this a round stitch - thanks Moss - think I get it). They're hard as rock on third pass.
As above, next experiments might be to make two sewn splices each end - in other words to make each sewn splice a bit longer and redundant with small space between them..
The two links were citations to seam strength studies in textile journals. Which leads me to believe that mechanical strength of sewn splices must have been studied in depth somewhere by now - maybe in ocean racing/ sailing industries for things like the Volvo Ocean? It's a field I am unfamiliar with - anyone?
On the collection of 9 mm Edelrid, one set of lines was used on a medium sized spruce which has since recovered from stem cracking/droop and 2 yrs later is growing straight up quite nicely, one set was used on medium sized elm branches which didn't make it and had to be pruned back and the last set of cabling was used on a older large crab which ended up as a permanent cable/ brace job with ehs cable and threaded rods. The thing I liked about the spliced ends is it made the whole temp setup very neat looking - these were higher end properties and the work was examined and talked about a lot. And it was an end use for old dynamic climbing lines - they also seemed to move and stretch with the trees in the wind. Altogether these were fun jobs. I digress from splicing though.
 
Last edited:
The stitching on the Armor-Prus might more accurately be called round side, rather than perimeter, if your needle is only going through one rope at a time. The round perimeter has the needle going through both rope sections each stitch, which gives four times the thread strength for each stitch.
 
(Edit: stitch was a round stitch as above.) My thought about double thread was if the needle is perhaps doing mischief as it goes thru the rope, minimizing the number of passes thru the rope while at the same time doubling the strength of the thread might improve the strength of the splice. This'd need to be yank tested to verify though. Double thread is something you probably can't do with a machine?
 
Last edited:
We need an entire web site with it's own forum to contain this thread ;-) Will look at the perimeter stitching concept more closely.
-AJ

Ok, that jogged my memory. As mentioned in the Practical Sailor article, from their testing they determined that the Round or Perimeter stitching run needs to be 2.5" for a 3/8" rope. Yeah, that's why I never tried it, that's too long a stitched area for my use. For example an 11.7mm diameter line would require the stitched area length to be very close to 3".

They also mention that they tested precompression and multiple pass basting stitching and found it made no strength difference for the perimeter stitching technique.

https://www.practical-sailor.com/issues/37_46/features/Stitching-Instead-of-Splicing_11521-1.html

I think what's happeningwith three-pass lock stitching technique is I can achieve excellent strength and durability in a shorter run of stitching, so it's more about getting enough stitching in to get the strength needed. They also mentioned that when the cordage gets too hard to push a needle through easily there is danger of damaging rope fibers. That makes a lot of sense. So... my conclusion is: Three pass technique is more about achieving enough stitches to get required eye strength for a shorter stitching run length. Reinforces even more my current thinking that some restraint is required in tensioning stitching doing 3-pass stitching. As I mentioned I'm finding that "pre-compression" using small C-clamps is actually useful in aligning the cordage weave through the length of the join and the eye. Interesting that I arrived at a decent performing way to sew eyes that was based on reasons probably not entirely logical, nevertheless led to good results. Learning never stops.
-AJ
 
We need an entire web site with it's own forum to contain this thread ;-) Will look at the perimeter stitching concept more closely.
-AJ
Actually I had thought last night about a review article in pdf as we do with science papers periodically, with citations.
Also, in typical Canadian fashion want to say "I'm sorry" but I still think if you have room, two sets of stitching on each sewn slice may not be a bad idea, at least on anything that'll really get reefed on like rigging lines, etc.
Moss I also remember it was you a year or two ago that was talking about how you finished your throw hook splice with a slanted/ tapered cut end and I remember I had just finished mine with a straight cut and a bunch of tape to ease the abrupt bump - remember thinking how I had watched that boat sail without the benefit of advice from here.
Cheers

(edit: one more thing, if Richard or TS and Nick wanted to provide sewn splicing and testing services, I wonder if they could start something like having a check box on your order for a label from them to them for shipping rope down to be sewn spliced. If you did that with your order, then the label(s) could be shipped with it and you could get a way better rate from UPS - up here they want an arm and a leg to ship to the US which is a barrier to getting the stitching/ testing done stateside, at least for us in Cant-ada.)
 
Last edited:
Just breifly scanned that article.. my eyes were drawn to the conclusion where this was stated..

-"Both (perimeter) round-stitched and basted/whipped sewn eyes are viable alternatives to splicing..."

-"The strength is predictable"

-"and the stitching is durable"

Very nteresting statements considering the points usually made within the arguments against using these methods.. & from a reputable source as well. No.. it's not a climbing magazine's article, but the situations encountered in Marine rigging aren't exactly non-life threatening.. I mean they can't exactly be promoting methods that are going to have the sails/sheets & heavy rigging come crashing down on Captain Jack Sparrow!

Continuing on what was mentioned in the conclusion, why aren't we using the Parameter method? It's stated they achieved stronger results with it? It also seems as though it's an easier method than the lockstitch methods..
 
Since I couldn't safely break my splices with the truck and front end loader... I figured some other testing method was in order. Enter some over charge mechanical advantage, and a knife!

I figured I would tension everything up with a 4:1 and a rope jack to get the splices good and tight, and see just how many of the stitches I could sever before failure. Shockingly more than i was expecting! On both my eye splice and a machine stitched eye I was able to sever almost 3/4 of the stitches before the splice failed. And on the end to end splice, i able to shorten the splice via cutting (video and pictures explain it better) by over 75% before failure.

The youtube playlist of the breaks
https://www.youtube.com/playlist?list=PLqdGyWEKZXdR5PGxy20Hwqu1XrLpWv7qZ

I might have to splice up some more and send them off for proper testing with some different patterns. I've got enough rope, but probably need to order some more thread
 

Attachments

  • IMG_20190105_120927.webp
    IMG_20190105_120927.webp
    249.9 KB · Views: 23
  • IMG_20190105_121129.webp
    IMG_20190105_121129.webp
    271.9 KB · Views: 23
  • IMG_20190105_121728.webp
    IMG_20190105_121728.webp
    863.7 KB · Views: 22
  • IMG_20190105_121744.webp
    IMG_20190105_121744.webp
    282.3 KB · Views: 21
  • IMG_20190105_122023.webp
    IMG_20190105_122023.webp
    302.3 KB · Views: 20
  • IMG_20190105_122158.webp
    IMG_20190105_122158.webp
    401.8 KB · Views: 22
  • IMG_20190105_122542.webp
    IMG_20190105_122542.webp
    242.7 KB · Views: 22
  • IMG_20190105_122714.webp
    IMG_20190105_122714.webp
    227.1 KB · Views: 22
  • IMG_20190105_122822.webp
    IMG_20190105_122822.webp
    182.4 KB · Views: 21
  • IMG_20190105_122854.webp
    IMG_20190105_122854.webp
    235.9 KB · Views: 22
T-Tech.. I don't understand why you went that route instead..? Why couldn't you Safely break them.. you mean you couldn't break without injuring yourself or do you mean you couldn't without damaging your vehicles.. I'm confused here.

Obviously with the way you did it, you can manipulate/slice the splice while under tension, but by doing so your not figuring out whether your tools are failing at the splice or away from that.. In other words your not figuring out whether or not the way its sewn is viable termination.

Yes. Don't get me wrong, seeing how many stitches you can sever & have it still hold weight is definatley an interesting experiment, but both me & you have no clue where the stitching pattern is going to break at & how much force it took, whether it be a truck pulling or your 4:1 causing it to break (that's your control figure) Also, I would figure.. you'd want to know the Cordage is breaking away from the splice to begin with before experimenting with how many you can sever, right? That way, it's a case of knowing the stitching method is good, but then additionally here's how durable it is by showing the severing.. You picking up what I'm putting down here..? There's an example I'm trying to recall that would suit this explaination perfect, it's on the top of my tongue but I'm having a brain fart.

Either way T-Tech thanks for the time & effort! I look forward to seeing these patterns broken in the future!
 
Yes the issues was potential damage to the vehicles.

I'm definitely picking up what your putting down when it comes to not knowing the absolute strength or natural failure locations. In this particular case I wanted to do something with the splices that I could still learn from, as they had no practical purpose. I'd never intentionally tried to make a stitched splice fail and I was curious how that failure under load would compared to a similar treatment of a commercially produced splice.

As far as where the break were to naturally occur, yes it's important on a theoretical level. But to me as long as the strength of the splice is roughly equivalent to the strength of the rope (or more importantly the splice is stronger than an equivalent knot) then it becomes a moot point when in use. I should never EVER be loading a rope that close to it's breaking strength. Working load limits and safety factors and all that should kick in well before the physics of where and how a break occurs become important (at least to me). In a perfect world, nothing will break because what ever load I have hanging (myself included) should never be dropped unexpectedly... Anyways I digress on that (basically proof of concept and learning).

Edit: Something I probably should've explored in my test was what happens with repeated tension/slack after the stitching was cut... Again more from a curiosity standpoint than anything hard and fast for rules

Moving forward a more scientific approach to break testing with actual break numbers instead of rough guesses is in order, just need to figure out how/who/when, with a decent comparison of stitch patterns and or locations being a part of that
 
Yes the issues was potential damage to the vehicles.

Just out of curiosity, what was going to happen to the vehicle or loader.. I'm having a hard time picturing a 9mm rope damaging a loader..lol.. know what i mean?

As far as where the break were to naturally occur, yes it's important on a theoretical level. But to me as long as the strength of the splice is roughly equivalent to the strength of the rope (or more importantly the splice is stronger than an equivalent knot) then it becomes a moot point when in use.
Yes, that's exactly what I'm saying T-Tech... You almost spelled it out for me right there.
Without a load cell or some other measuring device, you cannot know this until that Cordage breaks away from the splice.. Only at that point can you make the judgement call that the stitching is as strong as a knot or the cordage itself. Without seeing that happen, it's mearly assumed.


I should never EVER be loading a rope that close to it's breaking strength. Working load limits and safety factors and all that should kick in well before the physics of where and how a break occurs become important (at least to me). In a perfect world, nothing will break because what ever load I have hanging (myself included) should never be dropped unexpectedly...

Your right, no one should be doing that. But that breaking strength is the only known factor in the equation unless you have measuring tools. You have to know the lanyard is going to break away from the stitch too be able to know your stitching job will hold.. & even then, it may be less than the listed MBS because if how the core has been disrupted with the stitching.. regardless, that is your starting point

When doing these the way we do without actual load cells, it like a pass or fail test.. it either holds or it doesn't.. anything less than that is no bueno when it comes to these diy methods without measuring tools.

I'm not trying to be confrontational in this response here.. i swear! Just having a conversation.. Also I do understand your reasoning for cutting the strands, but your basing it's ability/durability to hold on unknowns not knowing if that splice will break before the cordage. I just don't want you or others to get a false impression from the test & think
"" *xyz* type of stitching can withstand this many cut strands, so i must be doing this right"" That's all..

So.. hey.. what type of stitching was on that GM climbing prusik anyways? A lockstitch? I bought a loose hank of the 8mm & hand spliced some experimental stuff. I will say, it was quite weird to splice with, the cover felt like the cheap polyolefin you get with hardware store hollow braid.. It bunched & milked like an cheap plastic accordion.. real weird.. just didn't feel right at all.. & buried like butter.. super loose.

Anyhow my friend.. I'll let you get back to your stitching laboratory!
 
Since I couldn't safely break my splices with the truck and front end loader... I figured some other testing method was in order. Enter some over charge mechanical advantage, and a knife!

I figured I would tension everything up with a 4:1 and a rope jack to get the splices good and tight, and see just how many of the stitches I could sever before failure. Shockingly more than i was expecting! On both my eye splice and a machine stitched eye I was able to sever almost 3/4 of the stitches before the splice failed. And on the end to end splice, i able to shorten the splice via cutting (video and pictures explain it better) by over 75% before failure.

The youtube playlist of the breaks
https://www.youtube.com/playlist?list=PLqdGyWEKZXdR5PGxy20Hwqu1XrLpWv7qZ

I might have to splice up some more and send them off for proper testing with some different patterns. I've got enough rope, but probably need to order some more thread

Dude! You're the one-man research department for the "Insane Hand-Stitchers Benevolent Association" (aka IHSBA)!
-AJ
 
Well.. Jimmy-cracked-corn last night & came up with this..

It's definitely something that will take more than a few tries to get right.. that & the correct tools will probably help..
f728543e2b4e97ef744870b4e414512a.jpg
6d119239e9be6f5faa48d66ff88f8a84.jpg


I did this with a hack job of a needle.. I ground down the SS needle a little too fast & really blunted it.. I'm sure the fact that this 8mm Epicord cover has absolute no stretch didn't make it any easier..

As far as needle sizes go, that is one confusing racket.. I spent about three hours last night trying to find a better/slimmer ball point solution (yes, thanks, I've seen the posted links in this thread). When i look at needle/thread charts, the sizes make sense, but when i go searching for them, the sizes don't correlate.. especially if your looking on Amazon. It's almost as if every company has chosen a different standard or part number system to go by. That & after all that time, i still don't know what each number represents. What i really want to be able to differentiate is, the hole size & how stiff the needle is going to be.. I just ended up buying something off Amazon hoping I'd be able to get it this weekend.. i believe it was s 180/24 135x17... whatever that's supposed to mean..lol. It seemed close to a few other ones that were posted. No clue how big the hole will be & hoping it will fit the c-lon tex 400 i bought.

Hello Mr CrackCorn, received the length of 8mm Epi yesterday, thanks very much! I'm thinking of making the prussik portion of an adjustable false crotch with it, I'll sew a ring on to it (two eyes on the ring). Yeah that cover is tight! This will be fun. I will send out your industrial ballpoint needle Monday.
-AJ

Nice.. Nice!

Just fyi.. measure before stitching.. i think i cut longer than what u requested.

Say.. what do you think is more versitile.. a floating ring loop or your typical two eye ring loop.. (like the one your planning on)..

I've seen some scenarios & some hypothetical scenarios, where the floating loop could be useful. Just one benefit i think of is, more room with only one prusik "leg" in small ring to pass sewn climb line terminations.. Or the ability to for it to equalize if used in swabish style lanyard adjuster by tying & passing lanyard through ring.. I'm just trying to think of the drawbacks..

Also, in a Pinto Pully scenario, which of the two connection styles do you think is stronger? The two Eyes..? Or the Loop configuration.
 
Just out of curiosity, what was going to happen to the vehicle or loader.. I'm having a hard time picturing a 9mm rope damaging a loader..lol.. know what i mean?

The rope itself wasn't going to do any damage. But the hardware holding it to the truck could crack the grill (think the steel ring I had on it, or the carabiner I broke lol) But my bigger concern was the brakes were slipping on the truck while we were pulling against them. Not a huge concern, but since it's the bosses 70' forestry truck that was less than 6 months old, I figured an abundance of caution was prudent.
I've seen some scenarios & some hypothetical scenarios, where the floating loop could be useful. Just one benefit i think of is, more room with only one prusik "leg" in small ring to pass sewn climb line terminations.. Or the ability to for it to equalize if used in swabish style lanyard adjuster by tying & passing lanyard through ring.. I'm just trying to think of the drawbacks..

My personal experience with this is it doesn't much matter. The instance's I've found where it HAS to be one or the other are so far and few between, that you probably already have another piece of gear (pulley, biner, prussik etc) available that you can use it instead.

Also, in a Pinto Pully scenario, which of the two connection styles do you think is stronger? The two Eyes..? Or the Loop configuration.
This on the other hand does make a difference. I think 2 legs is WAY better, from a usage standpoint. It's easier to setup a throwline through for setting a false crotch from the ground, rope is easier to install between the cheeks, and retrieval links in the form of steel rings or XSRE biners pass through without trouble (they always caught on the spacer when ever i tried a loop). Only downside is the rope isn't fully captured on the pulley (i.e. it can lift out) but in actual usage this has never been a problem


Also forgot to add, that the machine stitched eye had some sort of locking stitch on it, done in 2 passes with doubled up thread
 
Last edited:
Nice.. Nice!

Just fyi.. measure before stitching.. i think i cut longer than what u requested.

Say.. what do you think is more versitile.. a floating ring loop or your typical two eye ring loop.. (like the one your planning on)..

I've seen some scenarios & some hypothetical scenarios, where the floating loop could be useful. Just one benefit i think of is, more room with only one prusik "leg" in small ring to pass sewn climb line terminations.. Or the ability to for it to equalize if used in swabish style lanyard adjuster by tying & passing lanyard through ring.. I'm just trying to think of the drawbacks..

Also, in a Pinto Pully scenario, which of the two connection styles do you think is stronger? The two Eyes..? Or the Loop configuration.

If I understand you correctly, this will be a sliding, setable or floating loop (the prussik/ring combo) for a length adjustable retrievable false crotch. I think you know more than me about the rest of your questions ;-)
-AJ
 

New threads New posts

Kask Stihl NORTHEASTERN Arborists Wesspur TreeStuff.com Teufelberger Westminster X-Rigging Teufelberger
Back
Top Bottom