


Navigation
Install the app
How to install the app on iOS
Follow along with the video below to see how to install our site as a web app on your home screen.
Note: This feature may not be available in some browsers.
More options
You are using an out of date browser. It may not display this or other websites correctly.
You should upgrade or use an alternative browser.
You should upgrade or use an alternative browser.
vvvvvvvvvvvvvv
- Thread starter Aerial Traveler
- Start date
RBJtree
Branched out member
- Location
- Pittsburgh
I took one of my first aid kit straps off and use the other for my mini bag. It didn't look like they had anything to do with life support to me. Also the plastic adjusters would certainly not meet life support spec.
moss
Been here much more than a while
- Location
- Carlisle, Massachusetts, U.S.
I emailed TEUFELBERGER Fiber Rope Corp. and asked about the removal of the first aid kit straps from the 2018 Treemotion. I received the following response...It's kinda what I figured they would say. I'm not sure why they mention cutting off the straps, mine could be easily removed without cutting.
______________________________________________________________________
Mike:
As inquired below. We can´t take over any responsibility of any change on our product. Because it would no longer correspond to the product which is certified.
It would be possible to cut these webbing loops off, but as mentioned, everything on your own responsibility as it would void the product certification.
Thanks,
Jason Lague
Market Manager – Tree Care
________________________________________________________________________
I've obtained the real letter the lawyers wouldn't let them send:
"Dear new Tree Motion product owner,
Damnit, why did you immediately mod our perfectly good product? We worked so hard on it for years, did extensive testing, trialed it with leading climbers around the world, basically poured our hearts and souls into it. We are here sitting around the office weeping on our stale croissants and cold coffee wondering, why, why, why have you done this.? In the future, please consider our feelings, we are humans just like you. Our entire development team will now need a mental health vacation to deal with your crushing actions.
With sad regards,
Teufelberger Tree Climbing Team
P.S., Sigh.... you don't need to cut the straps off, just take the buckles off, it really doesn't matter, your harness will be just fine. Let us know if you want any T-shirts."
-AJ
moss
Been here much more than a while
- Location
- Carlisle, Massachusetts, U.S.
This gave me a good laugh Moss, thank you. It would have been way cooler to receive this response from them.
I finally got to do some hanging, climbing and adjusting over the weekend. The back pad is extremely comfortable. I'm still fiddling with the bridge length, forward d straps, and leg pad tightness but don't have it quite right yet. Had some leg pad ride up that should be resolved through more adjustments over time.
Had to re-learn the best length and place to attach my knee ascender bungee (the bridge ring worked well for that) and familiarize myself with all the new storage options this harness affords.
The adjustable DIY chest harness was "very not bad" and is a keeper. Just need to cut off some excess webbing.
Glad you enjoyed that ;-)
I adjust my TM leg straps a little loose, where they sit on my legs has more to do with the lower D’s riser straps adjustments. I set them so i’m tipped back slightly in a sit position, that balances load between the waist belt and leg straps perfectly. If the the leg straps ride in too far at any point roll to one side and pull them back one at a time.
I just figured out a nifty way to anchor my knee ascender bungee on my TM, i’ll post up a video later. It’s fairly Very Not Bad (tm).
moss
Been here much more than a while
- Location
- Carlisle, Massachusetts, U.S.
Here's my Tree Motion specific knee ascender bungee routing and anchoring setup. Should work on other bridge harnesses. The main thing is tuning the bungee length to get the lift without having it as tight as a piano string. Some other details on the knee ascender construction included. The SAKA Mini is so good my bit of work is fairly irrelevant but it allowed me to take advantage of stuff I had laying around:
-AJ
-AJ
Tom Lynch
New member
- Location
- Brockville
I love these kind of posts, thanks for the ideas everyone. I got to demo an old TM, I loved it. Not even set up I could feel how nice it would fly.
***Warning non TM content***
When things get too busy at one connection point, don't be shy to connect direct to the bridge. Depending on the angles and goals, it may even help position you better (or fight you really bad...). It will make things less intuitive when one system goes slack and you have remember there is a second point to manage. But allow for easy on off connections, rather then fighting to get everything in one point. I can just get two 'beainers in the Rock Exotica Orbitor Swivel, for reference. Here is an example, hook climb in a declining little willow.
 New Tribe > TM
Ah yeah, that looks clean. Did you ever try the single large DMM ring, and find it to be crowded when you had 3 tie-ins as shown above?
For context, I was simply transitioning from one tree to an adjacent tree about 10' away, for experimentation purposes, and found that the ring handled 3 okay, but it was a marginal pain to try and manipulate any of the carabiners once they were locked into the ring. One tie-in was my life line which was anchored way up the tree I was leaving, and a lanyard in MRS/SRT config over to the same tree. Then, the third tie-in was over to the dry and dying tree...oh man, I just realized that I may have had both ends of the third tie-in lanyard attached to the DMM ring as well. I guess I could have hooked them separately to the lower D's OR the upper D's, right? Edit: OR, I could have connected the returning lanyard end to the prusik's carabiner, and had only a single carabiner from that entire lanyard connected to my bridge ring. I'm fuzzy on the details now. Will have to see exactly what was going on next time I'm in the tree. Raining here...
Edit #2: I have a couple of mickey-mouse ear CMI pulley's that I can use as my lanyard adjusters, which will also afford me the ability to clip in when using them doubled! That issue is solved, I believe!

***Warning non TM content***
When things get too busy at one connection point, don't be shy to connect direct to the bridge. Depending on the angles and goals, it may even help position you better (or fight you really bad...). It will make things less intuitive when one system goes slack and you have remember there is a second point to manage. But allow for easy on off connections, rather then fighting to get everything in one point. I can just get two 'beainers in the Rock Exotica Orbitor Swivel, for reference. Here is an example, hook climb in a declining little willow.
New Tribe > TM
Last edited:
RBJtree
Branched out member
- Location
- Pittsburgh
I'm feeling a little unsatisfied with my 2nd bridge. I want clear lower d's. So I ordered a California swivel to try out. If I like it I might remove my 2nd bridge. Maybe move to a single adjustable bridge with the cali swivel...
RBJtree
Branched out member
- Location
- Pittsburgh
It's funny, everything else I own can be a total mess and I don't care, but if my saddle gets just slightly out of sorts I spend $100 dollars on a swivel that might make it better.
Last edited:
evo
Been here much more than a while
- Location
- My Island, WA
I think it’s funny that the new knee ascender craze is almost coming back full circle to the Beraneck rope walker..Here's my Tree Motion specific knee ascender bungee routing and anchoring setup. Should work on other bridge harnesses. The main thing is tuning the bungee length to get the lift without having it as tight as a piano string. Some other details on the knee ascender construction included. The SAKA Mini is so good my bit of work is fairly irrelevant but it allowed me to take advantage of stuff I had laying around:
-AJ
Ascender on a webbing rise to sit near the knee, bungee redirected from chestie or bridge back down to the opposite foot. He could be sitting pretty if he patented it, but no one would have considered such a thing
Last edited:
moss
Been here much more than a while
- Location
- Carlisle, Massachusetts, U.S.
I think it’s funny that the new knee ascender craze is almost coming back full circle to the Beraneck rope walker..
Ascender on a webbing rise to sit near the knee, bungee redirected from chestie or bridge back down to the opposite foot. He could be sitting pretty if he patented it, but no one would have considered such a thing
Yes, I should’ve mentioned Gerry in my video, his innovation was the first time I saw a modified foot ascender/bungee used in a rope walker. I forgot about redirecting to the other foot! Too cool for school. At the time I was refusing to use a foot ascender, was footlocking the tail climbing a Blake’s ;-) I’m still using the same old-school Pantin I bought maybe 12 years ago when I realized split-tail climbing would be so much better with a rope grab on my foot, straps need some repair.
-AJ
Acerxharlowii
Branched out member
- Location
- Greensboro
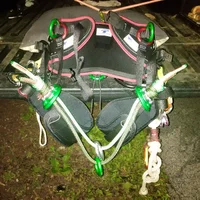
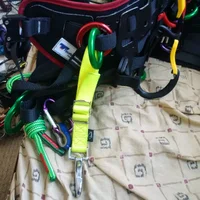
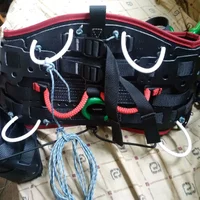
Here is what I've done so far (description in post #26 above).
I'm excited about the new adjustable chest harness that is essentially a DIY version of the Petzl Secure. The chest harness has a plastic webbing adjuster as an intentional weak link and no sewing was required.
Keep the suggestions coming!
View attachment 59035View attachment 59036View attachment 59037View attachment 59038View attachment 59039View attachment 59040View attachment 59041View attachment 59042
That’s weird the lite 2018 lite version still has the strapsHere is what I've done so far (description in post #26 above).
I'm excited about the new adjustable chest harness that is essentially a DIY version of the Petzl Secure. The chest harness has a plastic webbing adjuster as an intentional weak link and no sewing was required.
Keep the suggestions coming!
View attachment 59035View attachment 59036View attachment 59037View attachment 59038View attachment 59039View attachment 59040View attachment 59041View attachment 59042
What additional pieces NOT SUPPLIED by TreeMOTION might you deem as neccessities for this EVO piece? I expect my new EVO harness to arrive sometime next week. As far as the attachment point(s) goes, the ring supplied on the rope bridge doesn't look as large as the floating ring on my Skylotec Kolibri. I'm used to being able to fit a rope snap, carabiner, and also a 3rd carabiner, either for changeover to descend or with a 3-hole multiplier plate. I saw a great video on the TreeMOTION blog, with a DMM "transformer", but I can't find that anywhere.
If there is a particular accessory specfically for clipping into the bridge(s) that you feel is like "Mini-Me, you complete me!" please share.
I don't currently climb w/a swivel because I like 2 attachment points at my floating ring, rope snap and separate 'biner w/hitch climber setup. I've found it's easier to detach/re-attach the working end when clearing obstacles, or for changeover to a Fig. 8 descender, than if I use a 'biner directly connected to the hitch climber pulley. When descending, my alum rope snap and Fig. 8 on a mini-biner are staggered perfectly - they "miss" each other so the running end doesn't abrade any part of the knot as it pays thru. The hitch-climber connection is done with utility cord tied in a prusik over my working end, above the rope snap, attached to the climber pulley with a small DMM XSRE 'biner. A classic Sherrill Tree illustration from one of their catalogs 10 yrs ago. (this post has pics: http://www.treebuzz.com/forum/threa...recreational-work-climbing.36071/#post-542151)
I read through 2 Teufel PDF's, one specific to replacement of the rope bridges and another on the general fitting and use of the TreeMotion EVO. In sections 2.3 / 2.4 of the PDF for "how to put on and obtain a good fit", I see that the ring can be used with both bridges simul., or it can be fit thru one bridge only and the second rope bridge can be adjusted to a different length. (some good posts here on BUZZ about why you would do this). So I realize I have new options. But I'd like to hit the ground running (leave the ground stunning?) using one or two tricks you may have perfected already. TIA for your suggestions.
Last edited:
Crimsonking
Been here a while
My favorite bridge attachment has been the rook/hydra, though I’m looking at the cmi California swivel next. When zigzagging I clip the swivel to the lower d/ring to keep it out of the way, and just clip the zigzag straight to my bridge to shorten the system.What additional pieces NOT SUPPLIED by TreeMOTION might you deem as neccessities for this EVO piece? I expect my new EVO harness to arrive sometime next week. As far as the attachment point(s) goes, the ring supplied on the rope bridge doesn't look as large as the floating ring on my Skylotec Kolibri. I'm used to being able to fit a rope snap, carabiner, and also a 3rd carabiner, either for changeover to descend or with a 3-hole multiplier plate. I saw a great video on the TreeMOTION blog, with a DMM "transformer", but I can't find that anywhere.
If there is a particular accessory specfically for clipping into the bridge(s) that you feel is like "Mini-Me, you complete me!" please share.
I don't currently climb w/a swivel because I like 2 attachment points at my floating ring, rope snap and separate 'biner w/hitch climber setup. I've found it's easier to detach/re-attach the working end when clearing obstacles, or for changeover to a Fig. 8 descender, than if I use a 'biner directly connected to the hitch climber pulley. When descending, my alum rope snap and Fig. 8 on a mini-biner are staggered perfectly - they "miss" each other so the running end doesn't abrade any part of the knot as it pays thru. The hitch-climber connection is done with utility cord tied in a prusik over my working end, above the rope snap, attached to the climber pulley with a small DMM XSRE 'biner. A classic Sherrill Tree illustration from one of their catalogs 10 yrs ago. (this post has pics: http://www.treebuzz.com/forum/threa...recreational-work-climbing.36071/#post-542151)
I read through 2 Teufel PDF's, one specific to replacement of the rope bridges and another on the general fitting and use of the TreeMotion EVO. In sections 2.3 / 2.4 of the PDF for "how to put on and obtain a good fit", I see that the ring can be used with both bridges simul., or it can be fit thru one bridge only and the second rope bridge can be adjusted to a different length. (some good posts here on BUZZ about why you would do this). So I realize I have new options. But I'd like to hit the ground running (leave the ground stunning?) using one or two tricks you may have perfected already. TIA for your suggestions.
Another good choice is the Petzl large swivel. It can handle 2 or 3 attachments, but don’t let it swing down when you hit the ground...
Another mod that enjoyed on my TM was a chainsaw bridge on the back. It centers the saw however you’re positioned, and distributes the weight evenly instead of putting it all on one hip.
Hello again. I finally read thru all the posts in this thread and I learned a lot. Took a look at that Rock Exotica Hydra, that's a sharp piece. I think I might opt to keep a ring on both bridges, but sub in something like a CMI double tie-in micro pulley if I want. I'd rather have the CMI piece fall and slap my jimmies than that Hydra... 
Yeah I didn't even KNOW what those xtra tubes and bungees were in the bag! I thought they were spares for the leg loops. DOH!
After reading through this I will definitely use some kind of static cord instead of the stretchy stuff to make gear loops, for exactly the same reasons mentioned... strength and multi-use options. My old Skylotec Kolibri came with a ton of gear loops, so I never had to do that.
I'll prolly make a new thread for some of this but I did want to address a few things quickly...
But here's the BIG SECRET, the huge innovation that JUST DAWNED ON ME about treeMOTION... it's got a COMPLETE SPARE set of left/right D-Rings where the rope bridges achor!! Holy cow!! Not only do I now have two bridges, I have TWO SETS of side rings, static on my hips and forward over my legs. Also pretty cool is that the leg loops have their own para-fasteners so I don't have to balance and step thru them, but honestly I would easily choose to step thru the loops if losing those quick-connects could reduce the cost by $50 or 75.
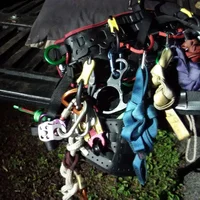
This is quite the versatile saddle. I'm only beginning to customize it now but here's what I've done so far...
*Two sets of Caritools, large mounted lower and small mounted higher, symmetrically on each side.
*Varied the length of the rope bridges and used a larger ring I had handy for the primary (shorter, closest) one.
Yeah I didn't even KNOW what those xtra tubes and bungees were in the bag! I thought they were spares for the leg loops. DOH!
After reading through this I will definitely use some kind of static cord instead of the stretchy stuff to make gear loops, for exactly the same reasons mentioned... strength and multi-use options. My old Skylotec Kolibri came with a ton of gear loops, so I never had to do that.
I'll prolly make a new thread for some of this but I did want to address a few things quickly...
- The treeMOTION documentation could be better (details later)
- The instructions refer to double-fisherman's loops (DFL) in their photographs and illustrations but they call them double-overhand knots! These are TWO VERY DIFFERENT KNOTS! This is an egregious error.
- There's a ridiculous amount of excess length on the strap adjusters! For goodness sakes if you rate your own episode on "My 600lb Life" I don't think you're going to be in this thing anyway... what's with so much extra webbing for the legs and back? Some of these are places where the saddle doesn't even expand. I certainly hope that multi-ply weave/perforated material is not given to stretch excessively over time.
- Not crazy about how it's packaged and shipped, all squished down, arriving with permanent creases in the flattened leg loops. At this price there certainly could be cardboard forms inside the loops so they arrive round, and stay round should I opt to step into them and not use the para-connect option. For goddsakes a $30 pair of cheap shoes ships without deforming.
But here's the BIG SECRET, the huge innovation that JUST DAWNED ON ME about treeMOTION... it's got a COMPLETE SPARE set of left/right D-Rings where the rope bridges achor!! Holy cow!! Not only do I now have two bridges, I have TWO SETS of side rings, static on my hips and forward over my legs. Also pretty cool is that the leg loops have their own para-fasteners so I don't have to balance and step thru them, but honestly I would easily choose to step thru the loops if losing those quick-connects could reduce the cost by $50 or 75.
This is quite the versatile saddle. I'm only beginning to customize it now but here's what I've done so far...
*Two sets of Caritools, large mounted lower and small mounted higher, symmetrically on each side.
*Varied the length of the rope bridges and used a larger ring I had handy for the primary (shorter, closest) one.
Attachments
Last edited:
Crimsonking
Been here a while
[*]The instructions refer to double-fisherman's loops (DFL) in their photographs and illustrations but they call them double-overhand knots! These are TWO VERY DIFFERENT KNOTS! This is an egregious error.
[*]There's a ridiculous amount of excess length on the strap adjusters! For goodness sakes if you rate your own episode on "My 600lb Life" I don't think you're going to be in this thing anyway... what's with so much extra webbing for thelegs and back? Some of these are places where the saddle doesn't even expand. I certainly hope that multi-ply weave/perforated material is not given to stretch excessively over time.
[*]Not crazy about how it's packaged and shipped, all squished down, arriving with permanent creases in the flattened leg loops. At this price there certainly could be cardboard forms inside the loops so they arrive round, and stay round should I opt to step into them and not use the para-connect option. For goddsakes a $30 pair of cheap shoes ships without deforming.
[/LIST]
But all nonsense aside, I did a short climb a few days ago when it first arrived, and no doubt, extremely comfortable, both when suspended from the rope bridge and also using a lanyard on the side rings.
But here's the BIG SECRET, the huge innovation that JUST DAWNED ON ME about treeMOTION... it's got a COMPLETE SPARE set of left/right D-Rings where the rope bridges achor!! Holy cow!! Not only do I now have two bridges, I have TWO SETS of side rings, static on my hips and forward over my legs. Also pretty cool is that the leg loops have their own para-fasteners so I don't have to balance and step thru them, but honestly I would easily choose to step thru the loops if losing those quick-connects could reduce the cost by $50 or 75.
This is quite the versatile saddle. I'm only beginning to customize it now but here's what I've done so far...
*Two sets of Caritools, large mounted lower and small mounted higher, symmetrically on each side.
*Varied the length of the rope bridges and used a larger ring I had handy for the primary (shorter, closest) one.
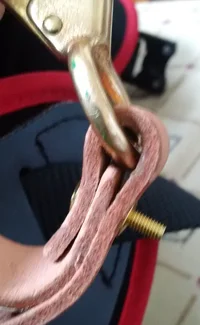
A double fisherman’s loop is made with two double overhand knots. They are correct in their term use, as there is not a loop formed. Teufelberger has too much at stake to carelessly release the wrong knot terminology in relation to the saddle bridge, on which our safety depends.
okay real quik, i apologize for my use of CAPS and shouting at Teufel and all, they know more about this stuff than i ever will, granted. But in my defense, the terminology is confusing. A double overhand and a DFL as I learned them (from various sources, Morrow, web, etc.) are tied differently. The hair-splitting of saying "no loop is formed" doesn't really help when basic terms are used interchangeably and in what I truly feel is misleading. If I tied what I learned as a double-overhand it would have been wrong. Teufel gives nice illustrations, it's a good guide, but this is the first time I ever heard a grapevine-style knot or DFL referred to as "double-overhand". Perhaps I live a sheltered life!
Oh and did I mention this thing is LIGHT??? Wow!
Oh and did I mention this thing is LIGHT??? Wow!
moss
Been here much more than a while
- Location
- Carlisle, Massachusetts, U.S.
okay real quik, i apologize for my use of CAPS and shouting at Teufel and all, they know more about this stuff than i ever will, granted. But in my defense, the terminology is confusing. A double overhand and a DFL as I learned them (from various sources, Morrow, web, etc.) are tied differently. The hair-splitting of saying "no loop is formed" doesn't really help when basic terms are used interchangeably and in what I truly feel is misleading. If I tied what I learned as a double-overhand it would have been wrong. Teufel gives nice illustrations, it's a good guide, but this is the first time I ever heard a grapevine-style knot or DFL referred to as "double-overhand". Perhaps I live a sheltered life!
Oh and did I mention this thing is LIGHT??? Wow!
Yep, in the tree climbing world "double overhand knot" is what it is, two of them joining cordage is the "double fisherman's".
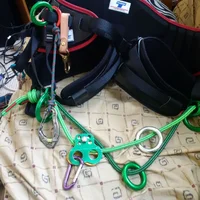
I've mentioned this elsewhere, the DMM Small Axis swivel fits two carabiners up top and one below on the front of the ring if you're flying a stock 10mm cordage bridge. Nice to not have a boat anchor on your bridge.
-AJ
I added a brass snap for my Silky saw, a DMM roller 'biner for my running end and I'm trying out a double attachment pulley on the bridge. The pulley worked brilliantly during descent yesterday with a rope snap and Fig 8.
A carabiner for the running end is something I use during ascent only, usually. But coming down if I take a different route and the rope gets re-directed then it really proves convenient, keeping it taut beneath my friction hitch instead of pulling upward 180* right at my hitch climber pulley. That's a PIA situation if you don't have a fix for it.
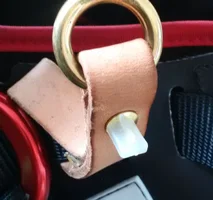
The brass screw protruding past the threads on the rope snap is sharp as hell. I used part of a plastic cover for a 3-way plug from a new power strip. One flat plastic piece is a nice tight fit to keep that screw from trashing this new harness. I'll saw or grind it off eventually...
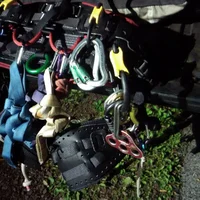
I don't know if I'm such a big fan of the Caritool. My first descent in this harness, I came down inverted, and the plastic gate got snagged on something (I'm upside down, how the heck do I know!) and the Caritool itself went inverted (gate popped to the outside) and some of my gear fell and clattered to the ground. Fortunately there was no one around. I like metal rings for my gear, I think. There's always a possibility of any non-locking gear coming open during a climb. They can fall, clip into or snag on a branch, rope, other gear, etc. W/the caritool now there's two detachment possibilities for utility gear, their own non-locking gates and now the caritool gate. I don't think the caritools are going to make the cut. I put one of those spring-steel snaps on the right side, but I can't stand them, really. They're difficult to manipulate. I'm gonna find a metal ring or something and swap that out.
Another big difference between putting on this Teufel harness and the Skylotec Kolibri I've been using, is that it's not quick and easy to cinch the waist belt tighter when it's on and buckled. If I may be permitted to WHINE just a little... it's annoying. Right now (maybe cause it's so new?) I can't get the belt to cinch, even when changing the angle of the buckle. I can't pull slack through from the other side. The buckle can easily be made to loosen, simply by lifting it up from flush against the strap. But the only way, it seems to me, to get it to tighten is to push slack thru from underneath, creating a loop, and then pulling the loop while trying to take up the slack. This isn't easy if I want to wear this harness really snug for some reason, cause it wants to loosen and I'm fighting it to stay tight. Say I didn't eat a big breakfast... So what I have to do is adjust it first, then clip it. (Ed. - Yes this was because the piece is new. I was able to cinch the belt around my waist while buckled after a few climbs.)
I find the loops treeMOTION sews into every web strap end to also be kind of convenient, for mini carabiners and miscellaneous gear. I hang my little blue DMM XSRE 'biner and cord off of one in the front, which I use to rig my hitch climber to climb.
A carabiner for the running end is something I use during ascent only, usually. But coming down if I take a different route and the rope gets re-directed then it really proves convenient, keeping it taut beneath my friction hitch instead of pulling upward 180* right at my hitch climber pulley. That's a PIA situation if you don't have a fix for it.
The brass screw protruding past the threads on the rope snap is sharp as hell. I used part of a plastic cover for a 3-way plug from a new power strip. One flat plastic piece is a nice tight fit to keep that screw from trashing this new harness. I'll saw or grind it off eventually...
I don't know if I'm such a big fan of the Caritool. My first descent in this harness, I came down inverted, and the plastic gate got snagged on something (I'm upside down, how the heck do I know!) and the Caritool itself went inverted (gate popped to the outside) and some of my gear fell and clattered to the ground. Fortunately there was no one around. I like metal rings for my gear, I think. There's always a possibility of any non-locking gear coming open during a climb. They can fall, clip into or snag on a branch, rope, other gear, etc. W/the caritool now there's two detachment possibilities for utility gear, their own non-locking gates and now the caritool gate. I don't think the caritools are going to make the cut. I put one of those spring-steel snaps on the right side, but I can't stand them, really. They're difficult to manipulate. I'm gonna find a metal ring or something and swap that out.
Another big difference between putting on this Teufel harness and the Skylotec Kolibri I've been using, is that it's not quick and easy to cinch the waist belt tighter when it's on and buckled. If I may be permitted to WHINE just a little... it's annoying. Right now (maybe cause it's so new?) I can't get the belt to cinch, even when changing the angle of the buckle. I can't pull slack through from the other side. The buckle can easily be made to loosen, simply by lifting it up from flush against the strap. But the only way, it seems to me, to get it to tighten is to push slack thru from underneath, creating a loop, and then pulling the loop while trying to take up the slack. This isn't easy if I want to wear this harness really snug for some reason, cause it wants to loosen and I'm fighting it to stay tight. Say I didn't eat a big breakfast... So what I have to do is adjust it first, then clip it. (Ed. - Yes this was because the piece is new. I was able to cinch the belt around my waist while buckled after a few climbs.)
I find the loops treeMOTION sews into every web strap end to also be kind of convenient, for mini carabiners and miscellaneous gear. I hang my little blue DMM XSRE 'biner and cord off of one in the front, which I use to rig my hitch climber to climb.
Attachments
Last edited:
Leftover tubing from a residential reverse-osmosis water unit and some of my fave kernmantle accessory cord. White loops look like hell (BLEH) but they're pretty rigid for clipping to.
Went up yesterday and brought my reach tool along. Happy to find that the little dog snap that comes w/the reach tool fastens easily to the 'L' shaped cutout directly aft of the red ring and above the two black AustriAlpin guides on the harness. It's high on the waist and keeps the tool from dragging on the ground.
Went up yesterday and brought my reach tool along. Happy to find that the little dog snap that comes w/the reach tool fastens easily to the 'L' shaped cutout directly aft of the red ring and above the two black AustriAlpin guides on the harness. It's high on the waist and keeps the tool from dragging on the ground.
Attachments
Last edited:


New threads New posts
-
test
-
-

-
-
 Free CEUs: February 05 & March 05 - 'Urban Forestry Today' Webcasts @ Noon (Eastern)
- Started by UFT
- Replies: 0
-

-


