Trailer hitch carried sprayer?

ATH

Been here much more than a while
Location
Findlay, Ohio
Years ago, there was a +/- 20 gallon sprayer that you could transport via a receiver hitch. It was on wheels so you could roll it around the yard. It was a smaller company selling it, but i cannot find it. Seems like they used to advertise a lot in several publications, trade shows, etc... Does anybody know what this is?
 
Not the one I recall...but that could work. Possibly carry on one of these?

717G1cHLE+L._AC_UF894,1000_QL80_.jpg
 
Little bit of fab work anything is possible.
So I'm gonna make my own.
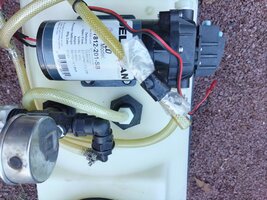
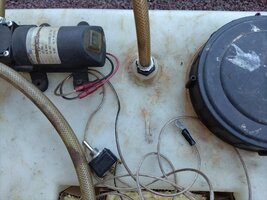
Got a 12V pump.

Found a Milwaukee M18 battery holder with a stepdown converter - so hoping the 6 or 8mAh High Output battery will be able to power it. If not, I'll figure out mounting a small car or large mower battery.

Bought a 16 gallon tank with a nice 12x22 footprint.
82123889_45_right.jpg


I'll get some angle iron and make a frame to hold it, welded to this hitch (but flipped over):

51+Iem+ei2L._AC_SL1500_.jpg

It is a receiving hitch, so I'll have a straight piece of square tube that will fit into the hitch on the truck and into this hitch (pins on both, obviously.)


I think I'll plumb it very simple with one pipe into the pump. The electric pump has a pressure switch, so I don't think there is any need to have a bypass (I'll just cycle through the hose to mix it). Planning to put a new hole at the very bottom of the tank so I still have the included drain to empty the tank if needed. Will only use about 15-20' of hose as the whole point is we'll bring the sprayer to the tree.


Then to make it portable, I'm thinking something along the lines of a removable handle coming up..not unlike Arbor Trolley's handle - but not at the angle. From there, it will be like a hand truck with just 2 wheels. I could make the handle so it has a bend and the horizontal piece fits into the hitch receiver, but then I wouldn't have the handle to help get the unit into the hitch for transport. I'm picturing the handle on the back side. I haven't completely figured that out yet. I also haven't figured out getting the unit onto the truck...15 gallons weighs a little over 120 pounds. Probably gonna have another 30-40 lbs in everything else. So lets call it +/- 175 pounds that's a little bulky. Doesn't sound like something I want to dead lift to get it onto the hitch. Maybe a light duty trailer jack mounted on it??? Would have to hold the sprayer to balance it, but the lifting would be easy. I also though about a static drop down leg - lean the whole thing back, drop a leg in the front, tip it up onto that leg and into the hitch. But I cannot quite get that to work right in my mind, so in real life is probably less realistic!

I should have less than $500 into it (not including battery and 3/8" hose (wouldn't add much anyhow), which I already have). This will have a bigger electric pump than the unit @The Green One linked above for less than half the cost - plus some entertainment doing the build!.

so far:
$135 for the tank
$50 for the pump
$20 for the battery holder/converter
$42 for the hitch receiver
$20 for quick connect hose to spray gun fittings
$35 for adjustable spray gun
$20 for 10" pneumatic wheels from HF (I already have them that I'll take off a small go cart my son and I but that he's since outgrown, but included price here anyhow)
$5 square tubing (also have in my scrap stuff, but included)

Need to buy:
Angle iron
Thin steel strap or ratchet straps to hold the tank to the frame
Pipe or square tube to make the handle.
Plumbing fittings
 
Hey ATH Nice work.

Whenever possible, I always add and fittings to/near the top of the tank.

With small electric pumps running 3/8" hose, I put a nylon plug in the added Bung, and using a caliper to measure a drill bit just a shade smaller that the 3/8" hose and then put the hose through that hole (interference fit) and a small screen filter on the end, that sits on the bottom of the tank. No loss of prime issues with this method!

I will take a few photos of a few setups I have to show you.
 
So just to clarify...suck it up from the top instead of a hole in the bottom?

Is that 3/8" hose all the way to the bottom of the tank?

I bought a 1/2" T that has F pipe thread on one side and hose fitting on the sides. Was thinking I'd lay 2 hoses for uptake in the tank. Seems like liquid is always on the wrong side of the tank and I'm thinking it'll pick up from either side. Not sure though if sucking in air through the other will loose prime? That's just the last few ounces so not a big deal.

Your way will make it less likely to leak out of the bottom...so I may revisit my pla!
Yes, the idea is to keep the bottom of the tank sealed (except drain) and pull from the Top. The braded hose IS 3/8" and the 2 tanks I have this setup, both have a shallow "Sump" that is the lowest point on the bottom. My suction filter sits inside that sump's crater, and indeed the tank needs to be level IF I want to empty it 99.9%.

I never tried the double suction lines into a single line through a Tee, so I can't comment on that ATH.

Leaks are not an option we ever want.

Keep us posted on your progress!
 
Back to the plumbing section for different fittings! LOL

I went to buy angle iron today. It's $3/ft (2" angle 3/16" thick). I'll probably use +/-10' of that.

While they were getting that, I took a look in the "shorts" bin. Anything is scrap price. I got two straps 1" wide probably 16 gauge (a little less than 1/16 on measuring tape, didn't measure with calipers or a gauge). These will work great for holding the tank to the frame. $2.20 for both. Way cheaper than ratchet straps...
 
Last edited:
Welded up the frame tonight. I'll grind it down a little, then post pics. When I do, you have to promise to remember:v I'm an arborist, not a welder!

Also, I think I have a plan for the plumbing. Wanna see what anybody thinks before I start drilling into the tank. Dry fit just for place holders/thinking out loud.

The gray T will sit in the bottom of the tank. I'll drill to put that PVC male NPT through the top of the tank where that F-NPT to 1/2" barb fitting will go to the pump. Thinking that hole will be at the red X. The pump will sit right where it is. Will put holes in the tank for that and have stainless 1/4" bolts holding it in with fender washers in the tank (should I put a rubber washer in the tank? I cannot imagine loosing water/mix just by sloshing around with the fender washers tight against the tank. I'll see if there is a 1/4 rubber washer just to be safe.

Then I need to get a 3/8" barb fitting. Sprayer hose taped for now just to get the idea. Will also put a strain relief so the hose doesn't pull directly on the pump where it is taped to the strap.

20240901_222722.jpg

20240901_222646.jpg

Will also put a switch between the battery converter and the pump. Probably going to mount the batter converter on that strap right about where it is. Will put a screw through the back so blunt head is against the tank and nut is on outside. Battery back itself will probably be mounted to the frame which will be a little wider than the tank on front/back so the straps can bolt to it.


Thoughts?
 
Still don't have everything figured out yet (as mentioned above too):

1) How to make the handle. I'd like it to be collapsible, but doesn't have to be. Maybe I'll use square tube welded to the frame with angled supports then get another square tube that will slide down inside. It could either be dropped in or removed. Maybe then squeeze the top and weld a 3/4" or 1" pipe onto that??? Bad drawing:
20240907_150636.jpg


2) How to lift it to get it into the hitch.
A) Maybe a kickstand on the front (hitch) side. Lean it back, put the stand down, then lift it onto the stand.
B) Some kind of jack. I was thinking trailer jack. But maybe a farm jack ($85-ish) and I also see this 23" Hydraulic ram at Harbor freight. (can that be mounted upside down?) for $60.

51Fe+bvonAL._AC_SL1500_.jpg
58906_W3.jpg
 
Looking good so far. Welding & fabwork is my weak spot, but as to your query regarding washers inside the tank when bolting the tank down, I'd use rubber or silicone washers before the fenders, so the rubber or silicone sits right next to the tank, then your fender, then nut. Although the fenders do a great job of distributing the force, metal on plastic eventually fatigues the plastic and can cause little microfractures, and with your rig riding on a hitch carrier, it'll likely experience quite a bit of vibration. The rubber or silicone would act as more of an isolator to aid in shock absorption and would also help with creating a better seal than fenders alone. For that reason, I'd be inclined to use some kind of rubber or silicone washers on the top side as well. Conical washers are great for this application.

Another note: I'll sometimes wedge a chunk of a pool noodle or pipe insulation underneath the filter on the top side of the tank, since I've had nipples break right off between the pump & filter from the constant dangling weight of the filter. Not sure if you've ever experienced that.

Second-to-last comment, I've never tried putting a T at the end of the suction tube/drop stick in order to fit 2 suction lines. I can understand why you're doing it, but I wonder if it will make the pump work harder when trying to suck the liquid up. I don't know the answer though. What I have done in order to ensure I suck up every last drop is to build a sloped platform (of sorts) below the tank which sets the tank at a slight angle with the drop tube assembly terminating at the low end. Even a few roofing shingles under half of the tank will put enough of a cant on it to achieve this. Doesn't have to be fancy.

Last comment, (pinky swear)...The filters I use in the tank aren't the typical round bulbous ones. I use a pvc slotted filter due to its lower profile design. Not sure if you use those, but they do a much better job of sucking in every lost drop from the bottom of the tank. Something like this...

1725742532593.png

You can make your own too by buying larger sections of pvc well points then cutting to size. Often comes in 5' lengths. I've made tanks where the inlet bulkhead was at the top/end, then one of these attached to the drop stick which can run the length of the bottom of the tank. Best way to get every last drop.
 
Looking good so far. Welding & fabwork is my weak spot Not my strong point!
, but as to your query regarding washers inside the tank when bolting the tank down, I'd use rubber or silicone washers before the fenders, so the rubber or silicone sits right next to the tank, then your fender, then nut. Although the fenders do a great job of distributing the force, metal on plastic eventually fatigues the plastic and can cause little microfractures, I just put locking nuts on - there wasn't room for the fender washers with the indentations in the tank - I'll add rubber washers to prevent cracking. The pump itself sits on rubber feet, so those are good.

Another note: I'll sometimes wedge a chunk of a pool noodle or pipe insulation underneath the filter on the top side of the tank, since I've had nipples break right off between the pump & filter from the constant dangling weight of the filter. Not sure if you've ever experienced that. I haven't, but good idea to protect it from breaking

Second-to-last comment, I've never tried putting a T at the end of the suction tube/drop stick in order to fit 2 suction lines. We'll see how it works. I can easily change that to an elbow if it doesn't work - I'll look at the PVC slotted pipe if I need to change. .
 
I think its ready for final cleanup and paint - hopefully will have time later this week.

I skipped a jack. Made the hitch long and tapered the "car end". Idea is I'll tip it back, slide it into the receiver, then slide the sprayer dolly further onto the square tube. I have 2 sets of holes for a hitch pin in the tube to hold it in place while sliding in.

20240917_170204.jpg
 
Did a couple minor tweeks over the winter (rear handle on bottom frame for easier loading into hitch). Used it today for the first time so took a couple of pics.

I didn't take a pic inside...but I will say the "T" for the intake did not work well. If one side was out of the water, the pump just sucked air instead of water from the other (makes sense, path of least resistance and all). I just made it an "L" going to one corner of the tank so its easy to tip and get the last of the liquid out.

I'm not going to say it is "easy" to lift into the hitch when full, but it does work. I think this is going to work out great when its just a little spot spray here and there - especially if it is some distance from the shop not needing to take the truck. Also the convenience of not needing to unload the back of the truck to slid a skid sprayer in.

You may notice I flipped the hitch bar from previous picture...it loads better with the slopped part up instead of down. Paint marks to signal when it is lined up correctly.

20250310_160933.jpg

20250310_161125.jpg
 

New threads New posts

Kask Stihl NORTHEASTERN Arborists Wesspur TreeStuff.com Teufelberger Westminster X-Rigging Teufelberger
Back
Top Bottom