dtreez
New member
- Location
- Bucks County
Follow along with the video below to see how to install our site as a web app on your home screen.
Note: This feature may not be available in some browsers.
Good suggestion. I sometimes have trouble keeping the crossover tight, and stitching it helps. I usually take the stitching out before finishing the bury. Is that necessary to remove the stitching, or is it OK to leave it in place?Did you stitch the crossover?
I've been putting a needle in my crossover, but not stitching it.Good suggestion. I sometimes have trouble keeping the crossover tight, and stitching it helps. I usually take the stitching out before finishing the bury. Is that necessary to remove the stitching, or is it OK to leave it in place?
I also have trouble keeping the tapered cover tail from getting sucked into the core before I have everything snugged up at the crossover. I've tried using a small clamp, but that always seems to get in the way. What I've been using instead of a clamp, with some success, is to take a piece of whipping twine and girth hitch it to the cover tail part way down the taper (so most of the strands are captured with the hitch). Then when it comes time to pull on the cover tail, I can use the twine to pull the tail back out of the core.
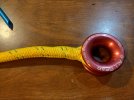
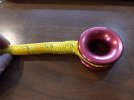
This photo looks like you have quite a bit of cover slack above the throat, I'd guess the measurements if the eye are a little short. I'll take a closer look later, but the only way I have found to make an accurate size eye it doing a few practice splices and trial/errorThis was my next attempt with 3/8" Stable Braid. I was very conscious this time of not twisting anything, but wound up with the same problem.
Maybe it is a problem with my crossover or final burry?
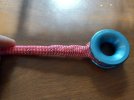
Another 'trick' I now almost always do when splicing double braid is on the initial measurements.Tried again. This time I made sure I had some cover tail left over to grab on to after the initial bury to pull on, which got the crossover much closer to the diameter of the rest of the rope.
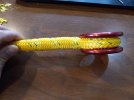
This one seems less bumpy than the last.
What do y'all think?
If this still needs a lot of improvement, I'll take some photos during the process next time.
THAT is a really helpful tip.Another 'trick' I now almost always do when splicing double braid is on the initial measurements.
When doing the first measurement/mark from the bitter end I will start about 6" from the end and make a mark, pull aside a few cover strands and mark the core in the same spot as well. Now this mark is the end of the rope, measure accordingly, consider making this mark with a different color sharpe.
This does a few things, it gives you a few extra inches on the core and cover buries to work with. For the core bury you can now make one long taper which makes it SO much easier. For the cover bury you can now use this extra material and tie a overhand or a few half hitches around the core near where it exits the cover at the throat. Half hitches help as a stopper, when the cover creeps back over the core unexpectedly, it also allows for more time and slack to really work your cross over.
No, this is why I don't really offer much direction with splicing help. What I'm talking about is the first measurement from the very end of the rope. Mark R from the end.THAT is a really helpful tip.
Samson's instructions say to make mark Z a short fid away from Mark X. To increase the length of the taper, could you make that measurement a long fid, or something?
That is REALLY helpful info. Thank you so much. Would love to see you make a video series.No, this is why I don't really offer much direction with splicing help. What I'm talking about is the first measurement from the very end of the rope. Mark R from the end.
Before you make any mark, measure a few inches from the end of the rope. I just eyeball it, but lets call it 6". Make a Mark with a DIFFERENT color from any other you will use, be sure to mark the core as well. This mark is now the end of the rope.
Next from that mark do your 1 fid down the rope to make mark R and follow the instructions for the remainder.
The next thing that deviates from the instructions is:
When pulling cover strands for the taper. Start pulling from Mark T, moving towards the end of the cover. The LAST three strand pairs, make a HEAVY mark, but do not pull or cut. This will give you extra length! for knots or securing the cover after it exits the core bury. This gives you extra "room" to work the cross over without loosing the end of the cover back into the core.
NOW, for the core bury:
AT the different color mark you made at the beginning, pull HALF the strands. (for ropes with two carrier strands or more I one or two to keep the braid together).
Taper the bitter end of the core by making a 45 degree cut.
This is a "pre" taper, which allows for the core to be folded in half but has a diameter about the same size or smaller than the core. ALL of this extra gets cut off eventually.
With a wire fid, go into mark Z and exit the fid at Mark T. Take the pre tapered core end through the wire fid half way from the end to the pre taper (about 3" if you measured 6").
*note* if using a wire fid (which you should in my opinion) you might not have enough fid length to do this all in one pass. If that is the case insert the wire fid through the empty cover to mark T, pull the core through and out. Next reinsert at mark Z exiting EXACTLY where the core exits the cover. Reinsert the core tail into the fid and complete the bury.
Now this should be your splice, with really long tails. It's now the time to set the cross over TIGHT. Take the time to pin the cross over, stitch it, or spike it ( I use whatever I have on hand, most the time spiking it with some long nails, or sailmaker needles. But I have used toothpicks, saftey pins or whatever I have on hand).
TAKE YOUR TIME!. Now that the cross over is secure, milk and massage EVERYTHING. Pull out a little extra core from mark x (as it likely sucked back into the rope). Then pull the ends of the cover until the last of the uncut marks are exposed, pull and cut these and bury and dress.
Now for the core from Mark T to Mark Z, Milk and dress ALOT until everything from mark T to the throat is a consistent and equal diameter of the rope when pulled taught. I then pin this area as well but leaving enough room to taper the core as per the instructions.
The final splice will be identical to the instructions, and this method just gives you some extra length to work with. The end result is exactly the same measurements in the finished product but a bit easier to work with. ALL of the added length gets cut off in the end and waisted in the scrap bin...
This method is the beginning steps to modified splices that have longer tapers and longer buries BUT DONT go down this path until you have mastered and wrap your head around the basic double braid. The modified tapers are for ropes like kernmaster, which are otherwise 'unspliceable' and not beginner tasks. Someday I'll make a video, or series of photos.