Bandit Chipper Chute Removal, Pocket Welding, and Bearing Replacement

Reach

Been here much more than a while
Location
Atglen, PA
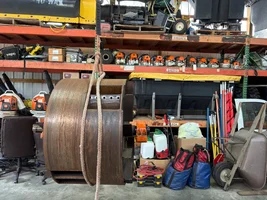
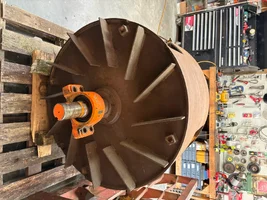
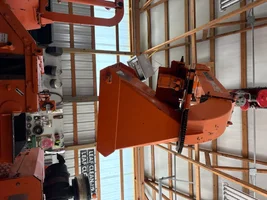
We have an older 1590XP that has decided it needs new drum bearings. The machine has 8500 hours so I can’t complain too much, but it’s going to be a project to change them for sure.

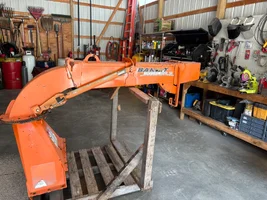
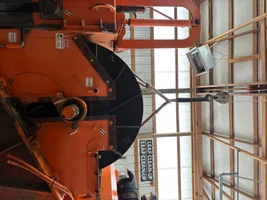
My shop can handle the project no problem, but I have one small part of the puzzle that I am unsure about. I may need to remove the chipper chute to lift the drum out (debating whether to work on it in the machine or not) and if I do lift the chute, is the chute more balanced at the factory lift point if it is pointed forwards, or backwards? Anyone ever figure this out before?
 
I have no idea, but if I had to guess it would be pointed backwards. Keep the weight over itself.
I thought that might be right, because the ring is set rather far back, but I wasn’t sure. If no one knows, that’s what I’ll try. Once I disconnect it I can’t spin it in the air though because this machine has a hydraulic chute rotator.
 
Treat it like a limb, 2-3 point rigging and up it goes. Make one leg adjustable under tension if you’d like.

Pictures are almost always fun.
I could do that, or I could be lazy and just lift by the attachment point that is there and see what happens. We’ll see how ambitious I feel when I lift it off. I’ll definitely take some pictures though.
 
I could do that, or I could be lazy and just lift by the attachment point that is there and see what happens. We’ll see how ambitious I feel when I lift it off. I’ll definitely take some pictures though.
Exactly how I’d go about it. Give it a good controlled test and adjust the plan from there
 
I thought that might be right, because the ring is set rather far back, but I wasn’t sure. If no one knows, that’s what I’ll try. Once I disconnect it I can’t spin it in the air though because this machine has a hydraulic chute rotator.
Is it possible to disconnect the rotator mechanism so it can free spin? I think getting it off is the easy part with one lifting point getting it back on and lined up you might need multiple rigging points to adjust your “level”.
 
Is it possible to disconnect the rotator mechanism so it can free spin? I think getting it off is the easy part with one lifting point getting it back on and lined up you might need multiple rigging points to adjust your “level”.
It is, if I disconnect the drive chain, but I don’t want to do that because the chain has been on there since 2007…

Getting it back on, I think it will somewhat self align, if I can get it closeish. If need be, I can add a forklift to the mix to push on things.
 
Today was chipper disassembly day, so I have some pictures to post. Everything came out nicely, though the chute did not balance at all. Much too heavy on one end, it needs two points of connection when I put it back on if I can figure a way to rig a second one without too much doing. Hardest part of lifting the chute is it has to slide forward an inch to clear a pair of alignment clips before it can be raised.

Everything else was easy technically, all just very heavy. I took it apart solo, but will look for spare hands when it is time to put the top back on again.
 

Attachments

  • IMG_8632.webp
    IMG_8632.webp
    252.8 KB · Views: 21
  • IMG_8634.webp
    IMG_8634.webp
    121 KB · Views: 28
  • IMG_8636.webp
    IMG_8636.webp
    234.4 KB · Views: 23
  • IMG_8637.webp
    IMG_8637.webp
    232.9 KB · Views: 23
  • IMG_8631.webp
    IMG_8631.webp
    156 KB · Views: 21
No idea why half the pictures are sideways, they looked right on my phone…

Tomorrow, I start welding the pockets on the drum. They’ve eroded where the knife and pocket meet, and I think that is slowing the chips enough that the chipper isn’t throwing like it should be. Or at least that is my thought, I can find no other good reason for its poor throwing performance.
 

Attachments

  • IMG_8639.webp
    IMG_8639.webp
    191.3 KB · Views: 17
  • IMG_8638.webp
    IMG_8638.webp
    216.9 KB · Views: 17
Thanks for the show

Gas Monkey and Counting Cars have nothing on what you’re undertaking

It will be interesting to see the surgery to get rid of the worn materials. Followed by fabrication of fresh frame. I’m assuming what you need isn’t on the shelf at the dealer/manufacture
 
After welding the drum won't you need to get it balanced?
Hopefully not, since the plan is to simply build up the worn areas of each pocket, and all pockets are worn pretty equally, the amount of material added should be the same all the way around. When it is done, I’ll see what it seems like, and if necessary I’ll look for someone who can balance it, but I really hope to avoid that. My budget for this repair is quite low.
 
Be very careful with heat around the central structure and shaft ie don't use heat to remove the bearings just grind/cut/chisel to avoid warpage. consider the bodywork approach - not one long bead but distributed spot welds (?) to keep the temperature down. However, I think as soon as you achieve weld pool you've entered the shrink/cool/pull regime so - I'm not sure.

Maybe you could perform a basic balance check - jack stand at each end with a pair of roller bearings, drum will roll to heavy spot down - and as a bonus you can check radial runout, maybe get a benchmark before you break out the welding. Or if the og bearings are ok use them
 
Last edited:
Be very careful with heat around the central structure and shaft ie don't use heat to remove the bearings just grind/cut/chisel to avoid warpage. consider the bodywork approach - not one long bead but distributed spot welds (?) to keep the temperature down. However, I think as soon as you achieve weld pool you've entered the shrink/cool/pull regime so - I'm not sure.

Maybe you could perform a basic balance check - jack stand at each end with a pair of roller bearings, drum will roll to heavy spot down - and as a bonus you can check radial runout, maybe get a benchmark before you break out the welding. Or if the og bearings are ok use them
Yes, I am always careful with heat around the central structure. I plan to torch off the outer bearing blocks simply because they’re so thick, but everything else will be cut with a grinder and chisel, no heat on the shaft and no risk of an accidental torch gouge.

I did check the balance best I could with the og bearings, which still roll ok enough and the drum is quite balanced. I’ll do the same again after grinding, see what it is like then.
Careful cutting with a torch is doable, but if you can an angle grinder with a cutoff for the bulk switching to a die grinder for the harder to reach. Should pop with a chisel just be sure to leave a 1/16 or so avoiding cutting straight into the shaft.

Those bearing races are tough ass steel trying to cut though cold.
Yes, I’ve cut many bearings off shafts over the years and it is not much fun, but is doable. When I get to the inner race, I break out my air cutoff wheel and my die grinder with carbide burr. Those both do great, and give plenty of control. The 9” angle grinder works great on big stuff and I love the power it has, but it’s too much for delicate work.

I’ve been debating the torch, and while I like how fast it cuts, I may just start with the 9” grinder and see if that will cut the blocks well enough. They’re cast iron, so as long as I get most of the way through I should be able to break them.
Sounds like you got it. If I remember right on my disk the bearing race spun on the shaft and we broke some burly ass homemade pullers trying to get it off.
Resorted to a torch gouging most of the material while intermittently cooling the shaft. A few licks with a chisel finished it off
 
Sounds like you got it. If I remember right on my disk the bearing race spun on the shaft and we broke some burly ass homemade pullers trying to get it off.
Resorted to a torch gouging most of the material while intermittently cooling the shaft. A few licks with a chisel finished it off
When a bearing spins on the shaft it always turns into a long day. I’ve seen that one before, and I’ve broke bearing pullers, bearing presses, and plenty of homemade tools trying to get those things apart. Sounds like you had a good plan to take it off though!
 
No idea why half the pictures are sideways, they looked right on my phone…

Tomorrow, I start welding the pockets on the drum. They’ve eroded where the knife and pocket meet, and I think that is slowing the chips enough that the chipper isn’t throwing like it should be. Or at least that is my thought, I can find no other good reason for its poor throwing performance.
Check for any lip that has developed from wear.

My first tree boss had something like that affect chip-throw on his bc1000, I believe.
 

New threads New posts

Kask Stihl NORTHEASTERN Arborists Wesspur TreeStuff.com Teufelberger Westminster X-Rigging Teufelberger
Back
Top Bottom