There are bowline & "anti-bowline" variations to be preferred to
the one you show. Bring the end through the rabbit hole from
the opposite side, and make the 2nd pass through this hole
on the eye-side of the first, and repeat. This will give you a
stronger & more secure knot, also easily enough to untie.
(I call it "anti-bowline" because of the end being brought back
through the opposite side of the nipping loop (rabbit hole).)
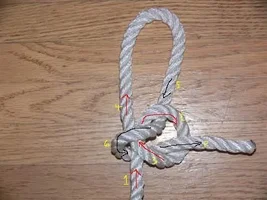
Rather than the two-popular Yosemite Bowline, take the tail
around both legs of the eye and tuck it back down (opp. to
its emergeance) through the central nip (rabbit hole), which
then gives the mainline 3 diameters to bend around and crush.
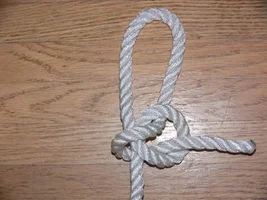
In the bowline image provded above (here):
www.cave.org.vt.edu/images-knots/jpg/full/bow3.jpg
... one would swing the end under-right then left-across/over
the legs of the eye, then rightwards under the central knot
to emerge up out of the narrow triangular center.
A similar re-tucking looks good--maybe better--for the "Cowboy
bowline", where the collar around the mainline is made in the
opposite direction such that the tail lies on the outside of the
eye legs rather than between them.
The retucking of the end pulls the eye legs together sufficiently
to prevent easy loosening of the knot even as the mainline
comes back through the collar (which is the key to untying
the knot).
*knudeNoggin*