JeffGu
Been here much more than a while
- Location
- Osceola, Nebraska
Lately, while staring up in a tree at a friend's house, I've been scheming to save money by using less rope... thereby letting me buy twice as many kinds of rope for the same money. Net savings of zero dollars. But, I can try more ropes this way. My wife fails to see my true genius shining through this plan.
I bought a couple of 75' hanks of rope just to experiment with a twist on an old idea. I hadn't seen this done quite this way before. The idea is to use extremely low cost, 3/16" lines to replace half of the rope. I seldom need to go higher than 75' on my initial climb, so that's what I bought. Any length of rope will work, the two retrieval lines just need to be the same length as the access rope.
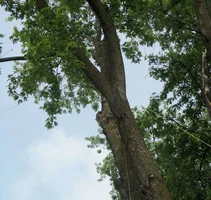
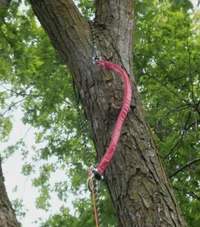
PIC 01: Throw line in tree. Nailed it on the first try (*ahem*bullshit*ahem*). This crotch was only 25' up, but pretend it is 75' up there, the length of the climbing rope.
PIC 02: I now attach the orange retrieval line, 75' of 3/16" 550 paracord with a small ring on one end, and a small clip on the other. I clip the throwline to the ring and pull it up.
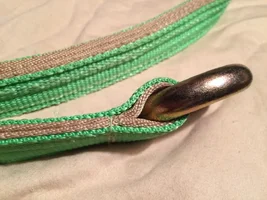
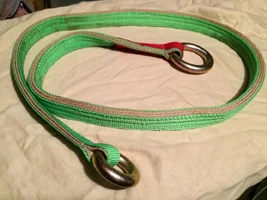
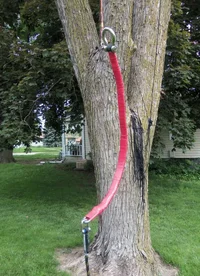
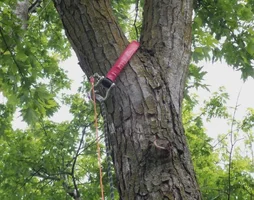
PIC 03: I now unhook the throwline and put it away, and clip the orange retrieval line to the friction-saver-anchor... this is a 3' long prototype. The climbing line is attached to the other end of the canopy anchor. I pull this up to the crotch.
PIC 04: When it gets close to the crotch, a quick jerk flips it through the crotch just like a ring-and-ring type friction saver. At this point, I clip the 75' black retrieval line, 3/16" Dacron polyester with a small ring on one end and a small clip on the other, to the tail end of the climbing rope.
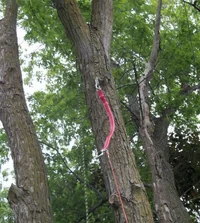
PIC 05: Another quick jerk pulls it on through the crotch, and I bring it back down to me. If this crotch was really 75' up the tree, that's where the tail end of my rope would be, hence the need for the second retrieval line (actually an install line, at this point).
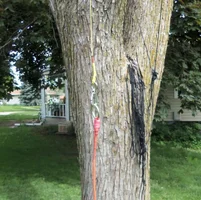
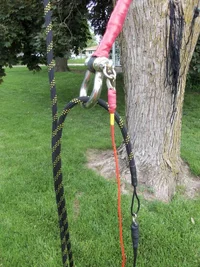
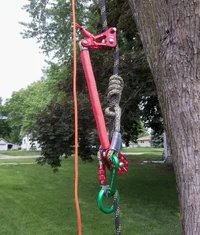
PIC 06: I now feed the black retrieval/install line through the large shackle on the anchor, and start pulling the anchor back up the tree by pulling the black line and climbing rope. In the pic, you can see them both because the crotch is only up 25' and the black line wouldn't actually be needed.
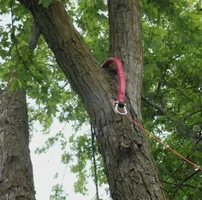
PIC 07: The anchor is back at the crotch, and the tail end of the climbing line is at the ground. A quick jerk and the anchor goes back into the crotch (going rope end first, this time) and the anchor is installed in choker mode in the tree.
PIC 08: Here it is, ready to go. There's no load on the rope, and the splice of the rope is in the shackle in this picture, but when I put some tension on the rope it choked up tighter and the smaller shackles that form the rope connection were through the large shackle and it was safe to climb. This 3' prototype was barely long enough to work on a stem this size, so my next one will be 4' long.
PIC 09: This was a picture of me pissing on the tree, and wasn't suitable for a family viewing audience.
PIC 10: Ready to climb! When done climbing, simply use the orange retrieval line to pull the whole thing back out of the tree. If it was really 75' up, I'd clip the black line back to the end of the climbing rope first, so the anchor can be lowered slowly, with control. That steel in the anchor hurts when it hits you.
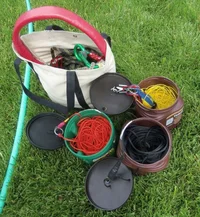
PIC 11: Climb over, everything back in the coffee tubs and freebie (promotional item) shopping bag. Not much to the whole setup.
PIC 12: Packed up and ready to leave. Total weight of the whole setup is about 20 pounds. Heaviest item is the prototype anchor, which has a lot of stainless hardware.
---------------------
I might be nuts, but I really like this idea. It worked better than I expected, and didn't take long to set it up, even with me stopping to turn the camera on, snap a shot, etc. throughout the process. As I said, this will work with any length of rope, but 75' is fine for me, and I can try two ropes for what a 150' hank would cost me, or I can cut a longer rope in half and have two access lines for the same price I'd normally spend for one.
I bought a couple of 75' hanks of rope just to experiment with a twist on an old idea. I hadn't seen this done quite this way before. The idea is to use extremely low cost, 3/16" lines to replace half of the rope. I seldom need to go higher than 75' on my initial climb, so that's what I bought. Any length of rope will work, the two retrieval lines just need to be the same length as the access rope.
PIC 01: Throw line in tree. Nailed it on the first try (*ahem*bullshit*ahem*). This crotch was only 25' up, but pretend it is 75' up there, the length of the climbing rope.
PIC 02: I now attach the orange retrieval line, 75' of 3/16" 550 paracord with a small ring on one end, and a small clip on the other. I clip the throwline to the ring and pull it up.
PIC 03: I now unhook the throwline and put it away, and clip the orange retrieval line to the friction-saver-anchor... this is a 3' long prototype. The climbing line is attached to the other end of the canopy anchor. I pull this up to the crotch.
PIC 04: When it gets close to the crotch, a quick jerk flips it through the crotch just like a ring-and-ring type friction saver. At this point, I clip the 75' black retrieval line, 3/16" Dacron polyester with a small ring on one end and a small clip on the other, to the tail end of the climbing rope.
PIC 05: Another quick jerk pulls it on through the crotch, and I bring it back down to me. If this crotch was really 75' up the tree, that's where the tail end of my rope would be, hence the need for the second retrieval line (actually an install line, at this point).
PIC 06: I now feed the black retrieval/install line through the large shackle on the anchor, and start pulling the anchor back up the tree by pulling the black line and climbing rope. In the pic, you can see them both because the crotch is only up 25' and the black line wouldn't actually be needed.
PIC 07: The anchor is back at the crotch, and the tail end of the climbing line is at the ground. A quick jerk and the anchor goes back into the crotch (going rope end first, this time) and the anchor is installed in choker mode in the tree.
PIC 08: Here it is, ready to go. There's no load on the rope, and the splice of the rope is in the shackle in this picture, but when I put some tension on the rope it choked up tighter and the smaller shackles that form the rope connection were through the large shackle and it was safe to climb. This 3' prototype was barely long enough to work on a stem this size, so my next one will be 4' long.
PIC 09: This was a picture of me pissing on the tree, and wasn't suitable for a family viewing audience.
PIC 10: Ready to climb! When done climbing, simply use the orange retrieval line to pull the whole thing back out of the tree. If it was really 75' up, I'd clip the black line back to the end of the climbing rope first, so the anchor can be lowered slowly, with control. That steel in the anchor hurts when it hits you.
PIC 11: Climb over, everything back in the coffee tubs and freebie (promotional item) shopping bag. Not much to the whole setup.
PIC 12: Packed up and ready to leave. Total weight of the whole setup is about 20 pounds. Heaviest item is the prototype anchor, which has a lot of stainless hardware.
---------------------
I might be nuts, but I really like this idea. It worked better than I expected, and didn't take long to set it up, even with me stopping to turn the camera on, snap a shot, etc. throughout the process. As I said, this will work with any length of rope, but 75' is fine for me, and I can try two ropes for what a 150' hank would cost me, or I can cut a longer rope in half and have two access lines for the same price I'd normally spend for one.
Attachments
-
 SRTanchor-01.webp144.1 KB · Views: 227
 -
 SRTanchor-02.webp112.4 KB · Views: 220
 -
 SRTanchor-03.webp251.4 KB · Views: 222
 -
 SRTanchor-04.webp114.1 KB · Views: 218
 -
 SRTanchor-05.webp158.5 KB · Views: 219
 -
 SRTanchor-06.webp243.1 KB · Views: 223
 -
 SRTanchor-07.webp101.5 KB · Views: 208
 -
 SRTanchor-08.webp122.2 KB · Views: 228
 -
 SRTanchor-10.webp158.1 KB · Views: 231
 -
 SRTanchor-11.webp195.5 KB · Views: 210